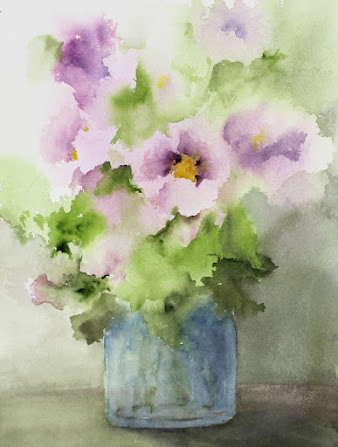
There is an old iris that we see around here. It's not very showy, but it smells incredible. We see them around the oldest places. They were likely shared between neighbors and friends. We found some when we moved here and then split it and planted it all over the place. It looks best in a place where it gets a bit of shade so you can see the color.
The color is sort of a greyed lavender. It looks sort of cloudy next to the showy modern ones.
The insides are really spectacular.
I like the contrast of the soft watercolor fade from purple to yellow next to the fine pencil lines of the dark purple on white.
Blow up the pic for a really good look inside.
Rurification
rur-i-fi-ca'tion: noun. 1. The process of becoming rural. 2. The collection of activities engaged in while residing in the country. 3. A blog about living and doing stuff in the country.
Monday, June 4, 2012
Sunday, June 3, 2012
Marie Boisselot
Meet Marie Boisselot. She's a gorgeous white clematis that grows on an old wheel frame, set on a pole in Lily's garden.We weeded her twice accidentally. It is a testament to her fortitude that she came back anyway.
Pretty impressive.
Pretty, too.
Saturday, June 2, 2012
Garden Pest: Flea Beetle
Our first garden pests have struck.
I planted out my baby eggplant starts and they were immediately attacked by flea beetles.
They are tiny little black beetles - kinda pretty, actually, with that dark blue/black sheen. They'll jump away when you disturb them, which is why they're called flea beetles.
They eat little holes in the leaves of everything in the nighshade and brassica family. That's the tomato family and the cabbage family.
Those are really really big families. And it is pretty much 90% of what's in the garden.
Curses.
We're going to treat them with diatomaceous earth, which will hopefully make them leave. And in the meantime, I'm going to hand pick them off.
Here's a tip for hand picking these little beasts:
Get a small container of water and put some dish soap in it. Go stand by your plants - remember that your shadow will cause them to jump away so try to be subtle. I realize that's really hard to do.
Dip your fingers in the water to get them good and wet, then slowly reach to the plant and pinch the beetle against the leaf. Roll it off the leaf so you can pinch it between your fingers and then drop it in the water. The soap breaks the surface tension of the water and makes it so they'll sink fast and not be able to stand on the water and jump out. I hate it when that happens.
You'll get surprising good at this in a short time.
When you're done with the plants, go right back and do them again. It doesn't take the beetles long to get back to the business of chewing up your plants, so it won't take you long to make a dent in their population.
Good luck!
P.S. Since garden pests are a pretty big issue here, I've added a Garden Pest section on the Gardening page. Click on the Gardening tab at the top of the page for a list of what we regularly battle and how we do it.
Labels:
bugs,
flea beetles,
garden,
garden pests
Friday, June 1, 2012
Peas and Tomatoes
I don't have enough room in my garden.
Sigh.
If I had more room, I'd need more energy and frankly, my dear, I'm out.
I always have a problem with the peas getting too big for their supports. Last year I had them on a 4' fence.
The tallest supports we have are for the tomatoes. Actually, It's a row of animal fence that's tied to big T stakes. It's about 5 feet high when all is said and done.
This year, to solve some of the space crisis, we hope, we decided to plant the peas on one side, early so that they'd get going and done fast - then plant the tomatoes on the other side, figuring that the peas would be done by the time the tomatoes needed the support and we could strip the peas off the fence and tie the tomatoes up.
It's a good plan.
I hope it works.
The tomatoes are about a foot high now and going gangbusters. They all have flowers. The peas are 5' high now and bearing like crazy. I planted two edible pod kinds and they love the heat. Who knew??
I'm a little worried that the peas won't be done by the time the tomatoes are ready to be staked.
So I'm picking the peas faster and trimming a little, here and there.
Oh, and did I mention the monster squash plant that self sowed at the corner of that bed? I didn't have the heart to take it out and it's got loads of flowers on it.
It's going to be a crowded bed.
It already is a crowded bed.
But not so crowded that Lily couldn't take these pics.
Oh, and that pea in the top pic. It was delicious.
Sigh.
If I had more room, I'd need more energy and frankly, my dear, I'm out.
I always have a problem with the peas getting too big for their supports. Last year I had them on a 4' fence.
The tallest supports we have are for the tomatoes. Actually, It's a row of animal fence that's tied to big T stakes. It's about 5 feet high when all is said and done.
This year, to solve some of the space crisis, we hope, we decided to plant the peas on one side, early so that they'd get going and done fast - then plant the tomatoes on the other side, figuring that the peas would be done by the time the tomatoes needed the support and we could strip the peas off the fence and tie the tomatoes up.
It's a good plan.
I hope it works.
The tomatoes are about a foot high now and going gangbusters. They all have flowers. The peas are 5' high now and bearing like crazy. I planted two edible pod kinds and they love the heat. Who knew??
I'm a little worried that the peas won't be done by the time the tomatoes are ready to be staked. So I'm picking the peas faster and trimming a little, here and there.
Oh, and did I mention the monster squash plant that self sowed at the corner of that bed? I didn't have the heart to take it out and it's got loads of flowers on it.
It's going to be a crowded bed.
It already is a crowded bed.
But not so crowded that Lily couldn't take these pics.
Oh, and that pea in the top pic. It was delicious.
Labels:
garden,
peas,
vegetables
Summer
Summer mornings dawn misty around here. The air is a little bit blue. The dew is abundant.
The cow vetch has been abundant, too this year, like the daisies. Our roads are lined with it. The stems are wiry, but it has lacy looking tendrils, too. It looks all dainty and ladylike, but in reality it's very tough.
This is a field in Newark, Indiana. It takes my breath away.
Labels:
cow vetch,
summer,
wild flowers
Thursday, May 31, 2012
Corn Fields
An important part of rural Indiana are the small cornfields that you can find around any corner on any piece of relatively flat land.There are some really really big cornfields, too, but it's these small ones that make me happiest.
I love the neat rows of early corn on a hazy morning or evening.
Labels:
corn fields
Hoosier Hills Fiber Festival
This weekend, you can find me at the Hoosier Hills Fiber Festival at the Johnson County Fairgrounds, in Franklin, Indiana.
Here's the website, with a map if you need one: www.hoosierhillsfiberfestival.com
Friday, June 1, 2012: 12 - 6pm
Saturday, June 2, 2012: 9am - 5pm
It's a great show - plenty of spinning and weaving and knitting and crochet and kumihimo and felting and animals and supplies and yarn and equipment and books and...
You really need to come.
Labels:
HHFF
Wednesday, May 30, 2012
New Butterfly
Remember that mystery chrysalis that K2 found in her garden? We thought it might be a pipevine swallowtail.We were wrong.
We kept it for a couple of weeks and then one morning, lo and behold, we found this.
We recognized it immediately! A Great Spangled Fritillary.
We get loads of these here. And their caterpillars are black, with orange spikes - very similar to the pipevine swallowtail caterpillars.
The butterflies have silver - silver! - spots on the back of their hind wings.
Here you can see the black spots on the back of the forewings - just showing.
It took this one a while to dry off and take its bearings.
And we were waiting impatiently, because we wanted to see if it was a male or female.
K2 was the lucky one to be next to the camera when it finally opened.
We think this one is a male. The females are much darker.
Note the bottom edges of the wings. See the fine black line and the little spots? That's indicative of a Great Spangled instead of an Aphrodite. The Aphrodites have a very heavy dark line along the bottoms of the forewings that tapers off on the hindwings. Now you know.
Labels:
butterflies,
chrysalis,
fritillary
Tuesday, May 29, 2012
Bee on Thyme Flowers
I can't remember which thyme this is - french, I think, but the bees found it as soon as it bloomed and every day I see a few on it.
The bees also like the horehound flowers. And I expect they'll be all over the lavender.
UPDATE: I see bees on the horehound all the time. I have not seen a single bee on the now flowering lavender. I'm surprised.
Note: This pic was way better before blogger did its thing to it. I'd say blogger cuts the pic quality by a good 20-30%. I've noticed it before. I wonder what the deal is.
Monday, May 28, 2012
Six Week Surprise
In the center of the photo is a queen cup. It's round and hanging facing down.
The bees in the Flower Lang decided to build a queen cell. Experienced beekeepers told me that it's normal to see these built and torn down. We did see the queen that day, but not very many eggs. Also there was syrup in the brood comb - not a good sign. We saw huge celled comb at the perimeter of the hive - likely where they will make more queen cups.
We might be seeing preparations for supercedure.
If the bees don't like the queen, they'll raise another one. Actually they'll raise a bunch. One is raised in the center of the hive and others will be raised on the outer edges of the hive. The extras are for insurance. Say the first new queen goes out to mate but doesn't come back. They'll have another queen there just in case.
Why do bees supercede? They know the queen. If there's a problem with her, they'll know and they'll take steps to replace her. Could be she's sick or damaged or misfiring. The bees'll know.
If this queen cup is much longer when we inspect next and if we find others, we'll know they're serious. If we see few or no eggs, we'll know why they're serious. Even if the queen is still there, we'll know they're going to supercede and we'll just stay out of the way while they do it.
If the cups are gone, we'd expect to see a lot of eggs and business as usual. If the cups are gone but there are few eggs, I'll consult the experts.
Should be interesting.
The bees in the Flower Lang decided to build a queen cell. Experienced beekeepers told me that it's normal to see these built and torn down. We did see the queen that day, but not very many eggs. Also there was syrup in the brood comb - not a good sign. We saw huge celled comb at the perimeter of the hive - likely where they will make more queen cups.
We might be seeing preparations for supercedure.
If the bees don't like the queen, they'll raise another one. Actually they'll raise a bunch. One is raised in the center of the hive and others will be raised on the outer edges of the hive. The extras are for insurance. Say the first new queen goes out to mate but doesn't come back. They'll have another queen there just in case.
Why do bees supercede? They know the queen. If there's a problem with her, they'll know and they'll take steps to replace her. Could be she's sick or damaged or misfiring. The bees'll know. If this queen cup is much longer when we inspect next and if we find others, we'll know they're serious. If we see few or no eggs, we'll know why they're serious. Even if the queen is still there, we'll know they're going to supercede and we'll just stay out of the way while they do it.
If the cups are gone, we'd expect to see a lot of eggs and business as usual. If the cups are gone but there are few eggs, I'll consult the experts.
Should be interesting.
Labels:
bees,
cell,
inspection,
queen,
queen cup
Sunday, May 27, 2012
Fava Beans
I grow favas every year just because they are snow tolerant. The University of Idaho extension office suggests planting favas as a winter cover crop.
Who knew?
I plant them the same time I plant the peas. This year we put extra chicken dirt on the garden and I've never seen favas so happy and dark green in my life. They're about 18 inches tall now and flowering like crazy.
White flowers with black spots.
The beans will come in pods. You're supposed to take them out of the pods, then take the outer cover off the individual beans. The outer cover can be bitter.
I don't care. I take them out of the pod then sautee them with lots of garlic. The bitter cover is pretty mild and doesn't bother me.
Also, if you haven't looked at the Gardening tab above lately, you might check it out now. I've added a lot of information on our veg gardening schedule and a comprehensive list of what I'm growing this year. As things progress, I'll be commenting on our experiences with each variety.
Saturday, May 26, 2012
Cherry Jam, Three Ways
Thanks to Murphala, we were recently able to pick a whole bunch of Montmorency cherries. It had been years since I'd had fresh sour cherries.
I love sour cherries.
We had enough to make three batches of jam, so I tried it three different ways. Here's the basic recipe.
Batch #1
Basic Cherry Jam
***
Easy.
To jazz it up, I decided to do a batch with vanilla.
Here's the thing about vanilla jam recipes. Inevitably, they call for a vanilla bean. Which I have. In the freezer. And which I am more than happy to use in jam. That's what they're for.
You have to split the bean and scrape out the seeds. Not a big deal. Except the seeds get kind of gooey and then they clump and I hate that and if you've got a pale jam, then the seeds show up and look like pepper, which can be off putting to some people. The jam is always delicious in the end, but .... you know.... maybe there's another way.
I tried 2 Tablespoons of my homemade vanilla extract instead of a vanilla bean.
Worked like a charm. Here's the recipe. This one is K2's favorite.
Batch #2
Cherry Vanilla Jam
***
I've also been thinking about jazzing up the plain fruit jams with more spices like star anise and cardamom. But I hate wasting fruit in crazy spice experiments so I did a little internet research first to see if such a beast as Sour Cherry Cardamom Jam existed. It did! Someone is selling it on Amazon. And I found recipes for Cherry Cardamom Pie, so I figured the proportion of spice to cherries from those recipes.
I tried it and it was darn good! Here's the recipe. This one is Lily's favorite.
Batch #3
Cherry Vanilla Cardamom Jam
Combine the cherries, water/juice and pectin. Bring to hard boil. [A hard boil is one you can't stir down.] Stir constantly and boil hard for 1 minute. Add sugar/cardamom mixture and vanilla. Stir well and return to hard boil. Stir constantly and boil hard for 1 minute. Ladle into jars. Cap with clean lids and rings. Process for canning 10 minutes in water bath or steam canner.
***
There you have it. Cherry Jam three ways.
Next up, peach season is coming. I'll be experimenting with peach jams, next.
I love sour cherries.
We had enough to make three batches of jam, so I tried it three different ways. Here's the basic recipe.
Batch #1
Basic Cherry Jam
- 4 cups pitted cherries
- 2/3 cup water or juice
- 3 Tablespoons Ball Low Sugar Pectin
- 2 cups sugar
***
Easy.
To jazz it up, I decided to do a batch with vanilla.
Here's the thing about vanilla jam recipes. Inevitably, they call for a vanilla bean. Which I have. In the freezer. And which I am more than happy to use in jam. That's what they're for.
You have to split the bean and scrape out the seeds. Not a big deal. Except the seeds get kind of gooey and then they clump and I hate that and if you've got a pale jam, then the seeds show up and look like pepper, which can be off putting to some people. The jam is always delicious in the end, but .... you know.... maybe there's another way.
I tried 2 Tablespoons of my homemade vanilla extract instead of a vanilla bean.
Worked like a charm. Here's the recipe. This one is K2's favorite.
Cherry Vanilla Jam
- 4 cups pitted cherries
- 2/3 cup water or juice
- 3 Tablespoons Ball Low Sugar Pectin
- 2 cups sugar
- 2 Tablespoons vanilla extract
***
I've also been thinking about jazzing up the plain fruit jams with more spices like star anise and cardamom. But I hate wasting fruit in crazy spice experiments so I did a little internet research first to see if such a beast as Sour Cherry Cardamom Jam existed. It did! Someone is selling it on Amazon. And I found recipes for Cherry Cardamom Pie, so I figured the proportion of spice to cherries from those recipes.
I tried it and it was darn good! Here's the recipe. This one is Lily's favorite.
Batch #3
Cherry Vanilla Cardamom Jam
- 4 cups pitted cherries
- 2/3 cup water or juice
- 3 Tablespoons Ball Low Sugar Pectin
- 2 cups sugar
- 1/2 tsp ground cardamom
- 2 Tablespoons vanilla extract
Combine the cherries, water/juice and pectin. Bring to hard boil. [A hard boil is one you can't stir down.] Stir constantly and boil hard for 1 minute. Add sugar/cardamom mixture and vanilla. Stir well and return to hard boil. Stir constantly and boil hard for 1 minute. Ladle into jars. Cap with clean lids and rings. Process for canning 10 minutes in water bath or steam canner.
***
There you have it. Cherry Jam three ways.
Next up, peach season is coming. I'll be experimenting with peach jams, next.
Friday, May 25, 2012
Renaissance
I love warm weather. The dye loves warm weather. Colors are always a bit better in the summer.
This is what came out of the dyepot last week.
Colorway: Renaissance.
You can see all of my colors, up close and personal next weekend at the Hoosier Hills Fiber Festival in Franklin, Indiana at the Johnson County Fairgrounds on June 1st and 2nd. Stop in and say, 'Hi.'
This is what came out of the dyepot last week.
Colorway: Renaissance.
You can see all of my colors, up close and personal next weekend at the Hoosier Hills Fiber Festival in Franklin, Indiana at the Johnson County Fairgrounds on June 1st and 2nd. Stop in and say, 'Hi.'
Thursday, May 24, 2012
Vultures
These birds are as much a part of our lives out here as trash collectors are in town.
They have the same job, essentially.
Last week we had a dead possum and a dead deer on the road. The scavengers, mostly vultures - during the day, took care of them before they really started to stink.
Thank heaven.
Have you ever watched one of these guys fly? They float on the air. You can always tell where the updrafts are in the Spring and Fall - the vultures ride them, long lazy spirals in the air.
They go south when the weather gets too cold to carry the smell of....uh....dinner....to them. They leave toward the end of November and come back in February. Vultures mean Spring.
Wednesday, May 23, 2012
Bees - One month
It's been a month since we installed the bees. They've drawn a lot of comb. They've raised their first batch of brood. This is what most of the brood comb looks like now.
On the outside is the new comb [left]- white and full of eggs.
Just inside that area is an area of capped brood.
And to the center of the comb [right]- the oldest part of the comb - is an area where the first brood has hatched out and the queen has started laying new eggs. It's darker because the bees have tracked pollen all over it. Consider it bee patina.
We're starting to see more bees around the place. I saw several while I was mowing through the blackberries and we saw a couple in the gardens near the house, too. As they build more comb, they'll hatch more eggs and there will be a lot more bees around the place to gather nectar and make honey.
Rumor has it that they like cucurbits - squash, melons, cukes. I've planted plenty and maybe I'll have a decent harvest this year.
Labels:
bees
Tuesday, May 22, 2012
New Oak Leaves
I passed these on one of our wild back paths and thought they were pretty.
Everything this year was zooming ahead by a month, then we had a hard freeze and a lot of the trees got stopped in their tracks. The oaks and low lying locusts especially got hit. They just started over again. The new leaves are beautiful and contrast nicely with the fully developed leaves of the maples, ets.
And our locust tree is just blooming now....
Monday, May 21, 2012
Iris and Daisies
I love this combination of flowers in one of our perennial beds: Siberian iris, daisies, peonies. They always remind me of ladies and gents at a white tie and tails event.
Sunday, May 20, 2012
True Love
Edward and duck have been hanging around together a lot this year. Every morning they do the head bobbing conversation thing.
It makes me dizzy.
Seriously, have you ever seen ducks do that? One bobs its head down then up, then another will. They 'talk' back and forth, silently. Up and down, up and down, up and down. Bobbing, bobbing, bobbing.
Then they follow each other all over the yard for the rest of the day.
It must be love.
Labels:
ducks
Saturday, May 19, 2012
Daisies

It's daisy season. They're everywhere right now.
Fields full of daisies - I love them.
We'll have them in smaller numbers throughout the summer, but right now they're glorious.
They volunteer all over the place. I have two big plants that volunteered right in the middle of the veg garden, in the path, at the corner of a bed. When they bloom, I'll post a pic.
This field is in Hendricksville, not far from Rosie's Diner. It slopes from the road down to the big creek that runs along Highway 43.
K2 snapped these pics on our way to town.
Labels:
daisies,
wild flowers
Friday, May 18, 2012
Barn
I love this barn. We pass it every time we go into town.
The bottom is cinder block and my gut says that it was a dairy barn, way back when. It's very very different from the other barns usually found out here.
If you've got any information about the style, etc, shout it out.
Thanks to Danille, in the facebook comments, I got this link (http://
Labels:
barns
Thursday, May 17, 2012
Salamander
We found this guy up next to the house hiding in a wet spot in the folds of the tarp that covers our emergency generator.
Look at the length of that tail!
He's a northern two lined salamander, as far as I can tell.
We see these a lot down by the big creek. All you have to do is turn over a couple of medium sized flat rocks to find them.
Look at the length of that tail!
He's a northern two lined salamander, as far as I can tell.
We see these a lot down by the big creek. All you have to do is turn over a couple of medium sized flat rocks to find them.
Labels:
creek,
salamander
Wednesday, May 16, 2012
Martha Stewart doesn't live here.
The truth about our place is that generally, it's a mess. We've always got something going on somewhere and if we manage to get it cleaned up, then the grass is too long or the weeds have grown up where they don't belong.
That said, we manage to have a few corners tucked here and there that are useful for photo ops to make this place look like it came right out of the pages of Martha Stewart.
As long as you don't look too closely. That's the corner of our back patio under the apple tree. On this particular day, it was the only corner of the property that didn't look like a total and complete disaster.
Most of the time our flower beds are weedy. The patio has weeds growing between the bricks. The veg garden is strewn with metal stakes, bricks, trowels and various and sundry other things that I may or may not need up there in the next few weeks.
The studio is a constant disaster. That's what it's for. It was clean once, but that was a long time ago.
The house is small. From it, we run two businesses and homeschool. Two bedrooms, one bath. The house is usually clean for approximately 10 minutes late on Friday morning. Then we're done cleaning and start living again.
The basement smells like an old basement. Musty at best. Mildewy during the monsoon season. Packed full [and I mean full] of wood and woodworking tools. Mostly wood.
There is duck poop on the front walk. The chair on the front porch is dirty with dog sweat. Really dirty. It's Tibby's chair.
I could go on.
Martha Stewart doesn't live here.
We live here.
We LIVE here. And WORK here.
Welcome to the country.
Tuesday, May 15, 2012
New Garden Beds......again.
Just when I think I've finally got enough space in the veg garden, I go and decide that we're never going to be able to find sweet potato starts this year and I plant carrots and basil where the sweet potatoes would have gone.And then a good friend calls to say that she found some sweet potato starts and hurry over there before they're gone.
So we had to go get some because last year we didn't get any sweet potatoes and it would have been two whole years in a row without our own sweet potatoes and that wold have been bad.
The girls don't agree.
Whatever.
So I looked at Eric and said, 'I think we need another bed.' and he didn't even flinch. He said, 'Let's do it.'
And I wanted to cry because I'm a little tired of digging and hauling gravel this year already.
Enough already!
So we called Quincy to get more gravel and sand because we had finished the last loads.
Just FYI, there are over 7 tons of gravel and sand each when he delivers. That means that we have moved 7 tons of gravel by hand since January. And 7 tons of sand since last summer.
By. Hand.
As in, one shovel full at a time.
I should be totally buff.
Anyway.
The story is the same. This is what it looked like before we started. I didn't get a Before pic, because I was too busy digging already and I wanted to get it over with.
First we have to decide where we want it, then we have to dig the grass out. See all that grass to the front and left of the potato towers? It had to go.
I did it all in one 5 hour shift.
Tip: Take motrin before you start. It helps.
After I dug the grass out, I have to carve the clay down so it's smooth and the water drains right.
The grass in the center rectangle got covered by the sweet potato bed, some more geotextile and 12 inches of sand and chicken dirt. I didn't bother digging it out.
After we line the paths with geotextile to keep the weeds down, then we load the paths full of gravel. Eric did the vast majority of gravel hauling. Vast majority.
And he loaded the bed full of sand and chicken dirt.
Then I planted the sweet potatoes.
Then we surrounded the whole blasted garden with deer fence to keep things out. It works pretty darn well. Too bad deer fence won't keep the weeds out.
That pool ladder in the middle of the garden is an extra we had around so I put it to use to hold the sprinkler. Works like a charm - easy to drag around and keeps the sprinkler high.
The end.
Labels:
garden,
gravel,
paths,
sweet potatoes,
vegetables
Monday, May 14, 2012
Kale
I grew kale this year. Actually, I planted it in the cold frame in October so we would have kale during the winter.
It stayed 4 inches high. Both types - the short stuff and the tall stuff.
This could have something to do with the fact that I planted a LOT of seed and didn't thin it.
In February, I thinned it out and planted it in the garden. It loved the cool weather. It hates the hot weather.
What a prima donna [How do you spell that!?] It faints over 75 degrees.
Anyway.
When I buy kale at the store, it's leathery and sometimes pretty tough. This homegrown stuff is so not leathery or tough. It cooks like a dream - quickly, like a manly spinach. I love it sauteed with butter or olive oil and lots of garlic.
This is definitely a keeper. We're going to plant this again in the fall and in the winter cold frame.
Labels:
garden,
kale,
vegetables
Sunday, May 13, 2012
Strawberry Rhubarb Cream Cheese Coffeecake

The strawberries, like everything else around here, are early this year.
They're beautiful! And delicious. We had these in a strawberry rhubarb cream cheese coffecake.
I'd have taken a pic, but we ate it too fast.
De. Lish.
Here's the recipe anyway.
Strawberry Rhubarb Cream Cheese Coffeecake
- 1/2 cup butter
- 1 1/3 cup sugar
- 2 eggs
- 2 cups plus 1/4 cup flour [divided for batter and fruit]
- 1 tsp baking powder
- 1/2 tsp salt
- 1 cup milk
- 1 8oz pkg cream cheese cut into small cubes
- 2 cups rhubarb, washed and sliced into 1/2 inch pieces.
- 2 cups strawberries, washed hulled and sliced.
- 1/2 cup flour
- 1/2 cup sugar
- 1/4 cup cold butter
Preheat oven to 375. Grease 9x13 pan.
Toss the fruit with 1/4 cup of flour and set aside.
Cream the butter and sugar. Beat in the eggs.
Combine flower baking powder, salt in separate bowl and gradually add to the butter/egg mixture alternating with the milk. Begin and end with the flour mix.
Fold the fruit and cream cheese into the batter and pour into the greased 9x13 pan.
Topping: Cut flour, sugar and butter together until crumbly with a pastry blender or in your food processor. Sprinkle over batter.
Bake for 60 minutes or until golden and a toothpick comes out clean.
Warning: This is extremely delicious and very addictive. You can cut the recipe in half. You can use any kind of fruit you want. We've tried it with mixed berries, too. Mmmmm.
Labels:
coffeecake,
cream cheese,
food,
recipes,
rhubarb,
strawberry
Saturday, May 12, 2012
Potato Towers
We were at a friend's place a year or so ago and he had two tall boxes in his garden. I asked him about them and he said they were potato towers and that, in theory, one could grow 100 lbs of potatoes in a 5' tall tower.
Cool!
We did a bit of research about them and found several sites where people had tried it and had great success. [And we found one site at the University of Oregon where they said it was a myth and impossible to grow potatoes that way. Apparently they never even tried it. Okaaayy. I'd be peeved if I were an Oregon taxpayer.]
Eric built two towers, using 2x4s for the posts and 2x6 or 2x8 for the side panels - whatever he had laying around.
I put the towers over newspapers and lined them with more paper to keep the blasted grass and weeds out of the edges.
The idea is to start with one level of sides, plant your potatoes, then as the greens grow up, to keep adding dirt/fill so that no more than 4-6 inches of green shows.
The stems will keep producing potatoes as long as you cover them quickly while they're new. If they get too long, they won't make potatoes, even if you cover them up later.
Add more wood to the sides to keep the fill in. Eric is screwing it in so it's easy to take apart for next year.
When you get to the top, let the greens get as big as they want and keep it good and watered. I'm toying with the idea of putting some soaker hose of some kind in the middle. Not sure yet.
Since I took this photo last weekend, we have added two more levels of wood. I have to check the greens EVERY DAY because they are shooting out of the ground. You want to cover the stems as new as possible.
One of the sites we saw recommended using late variety potatoes for the tower, so that's what we used.
What will we fill with? See those straw bales between the towers? Those are what we used over the winter for the cold frame. They're kind of wet and old and clearly are growing fungus in places, but I wanted to see if that would work, so we're using them. I'll layer with sand, too for good drainage.
How do you harvest? Unscrew the wood from one side and empty it out. We've heard tell that you can undo the bottom and start harvesting from the bottom if you like, but you've got to put the soil back. We'll be harvesting from the top or near the top anyway.
So far this is really fun. We'll keep you posted.
Labels:
potato towers
Friday, May 11, 2012
Oil Slick
When we moved here, I dug a fire pit and lined it with creek rock.
Some of the rocks were beautiful blue things. When we lit the fire,
the blue rocks exploded.
Oil shale.
It's all over here. After a good rain, when the creek bottom is scrubbed clean, it's blue. It's really pretty.
And when the weather is wet, we get little oil slicks in places where the water collects off a hill or in a bog.
Oil shale.
It's all over here. After a good rain, when the creek bottom is scrubbed clean, it's blue. It's really pretty.
And when the weather is wet, we get little oil slicks in places where the water collects off a hill or in a bog.
Thursday, May 10, 2012
Iris Bog
We have a wet mushy place on our property where the creek comes out from under two ginormous beech trees. It's a perfect place for siberian iris and mint and a nice swamp rose. The iris are blooming now. It's hard to get a fabulous nature mag type pic because this place has a microclimate all its own. The iris don't bloom at the same time - even though they're all the same kind. Weird.
You can see the clumps of iris and imagine how pretty it would be if they all decided to bloom at one time.
There are two types of mint growing in the bog - apple mint and peppermint. I'm betting the bees find it this year. Mint flowers are lovely.
Wednesday, May 9, 2012
Things that come down the road
We get all kinds of interesting things on the road. All kinds. Once, we were driving through downtown Solsberry, and there was a donkey in the middle of the road, outside Yoho's. He had wandered away from a neighboring house. I wish I'd had the camera.
Lately we've been seeing a lot of these.
Box turtles. Here's a cool page talking about the species and subspecies of Indiana box turtles.
See if you can figure out which one this is.
Tuesday, May 8, 2012
Jack in the Pulpit
This is our south woods. The big creek runs right through it. It's quiet and peaceful and beautiful and we're always finding cool things there.Like unusual wildflowers.
And humongous snapping turtles with their babies hanging on to their backs.
And salamanders under the rocks.
And parts of old tractors.
And not too far away from the creek, there's a sinkhole with two washing machines in it. Weird. One washing machine I can see, but, really. Two??
It's our plan to figure out a way to haul out the washing machines. Eventually. I shudder to think of what else might be down there.

Anyway.
This isn't about the sinkhole or the creek or the turtles.
It's about Jack in the Pulpit.
Lily found them - just a few.

They camouflage well, don't you think?
Labels:
creek,
jack in the pulpit,
wild flowers,
woods
Monday, May 7, 2012
Blackberry Heaven
The first thing to move in after we did was the blackberries. Our place had been grazed by cattle for over a century. We did not have a single blooming dogwood or redbud on this place. We did not have a tractor either, so the big mowing stopped when we moved here.
And the blackberries moved right on in. These are the classic 'brambles'. The berries are good, but smaller than commercial blackberries. The seeds are bitter, so it's best to make jelly and syrup with it and take the seeds out.
I mow around the big patches as closely as I can so that they're easier to get to to pick. That also helps control them - a bit.
We have a tractor now and as soon as it's up and running and we learn how to drive it, then we have plans for maintaining the blackberries in a more reasonable way.
Here's a pic of some of the berries on the big hill. Blow it up for a better view. They're blooming now and the whole hill looks and smells wonderful.
Here's a pic of just one of the patches. The canes at the center are around 8 feet tall. We have other patches where the canes are taller.
Scary.
We've got those scheduled for 'maintenance' first.
Maintenance will consist of mowing off 4' rows. in three sections. One section will be path [grass]. One section will be mowed right away to let grow up over the year so that we can harvest next year [2013]. In the fall after harvest, we'll mow off what we picked on this year and let it get started growing for the following year [2014]. Then it's just a matter of keeping the paths always mowed and then mowing this year's berries after harvest so they can get going again.
Why 4'? Because that's what I can lean into to pick through. And if we lose a year for some reason, a 4' row would be easier for me to take out with the little riding mower.
Labels:
berries,
blackberries,
brambles
Subscribe to:
Posts (Atom)


