Showing posts with label eggs. Show all posts

Tuesday, March 11, 2014

Egg White Only


Here's the range of eggs we've been getting lately.    I like the colors.   The big eggs were laid by [from L to R] Americauna [red], Barred Rock, Buff Orpington, Americauna [black], Saxony duck.

That tiny egg - How cute is that?   We have no idea who laid it and we don't think it was a song bird - it was far too cold for birds to be nesting when we found this in the nesting box in the coop.   The spots indicate it's probably from a Barred Rock. 

Whatever it is, it's probably an egg-whites-only egg.  We get them once in a while.  Like practice eggs.  


Sunday, March 9, 2014

Spring Means Eggs

We have five hens and seven ducks.   Plus a couple of roosters and four drakes.  

They poop a lot.  

And in theory, they lay a lot of eggs.   In a perfect world, we'd be getting a dozen eggs a day.

It's not a perfect world.  

During the winter they take a break from laying.   We used to think it had something to do with the light, but after this year, I'm pretty sure it has a lot more to do with what's available to eat.   All the snow cover this year has meant slim pickings on the ground.   We feed them table scraps and chicken feed, too, but they won't lay until they can scratch around in the yard and creeks a bit, too.   

Finally,  finally!  they've started to lay again.   We're getting about four eggs a day and they seem to be picking up speed.  Fast. Yesterday we found three duck eggs in the chicken yard frozen in the ice.   The silly things would prefer to lay there than in their nests in the coop.   The warm eggs melt enough ice to cradle them, then the ice freezes solid and we can't get them out without breaking them [though they usually freeze, swell and break on their own first.]

This blue egg is from Larkus, one of our Americaunas.   Her eggs are very thin shelled and lately have had a ring of tiny bumps around the middle.  It's likely that when things green up again, the bumps will go away and her eggs will be smooth again.  

Friday, July 26, 2013

Squash Bugs

These are squash bug eggs.  Here is a pic of the hatched out adult buggers.   You don't want them to hatch out though.

We are very vigilant about checking the backs [and sometimes tops....and on occasion stems] of each squash leaf for these eggs.  When we find them, we pinch them off and squash them, put them in water and feed them to the chickens.  

The lighter golden they are, the fresher they are.   The darker they are, the closer to hatching they are.  

Check your plants every few [FEW!] days and you'll be able to control them.

Wednesday, May 15, 2013

Eggs in a Nest

This is a mourning dove's nest.  They make lousy nests in dumb places.  This one was in a cedar tree (good place) right next to the path (bad place) and every time we walked by, it scared the bird out of it.  Eventually she abandoned it with these two eggs in it.  The eggs were gone a couple of days later

Friday, May 10, 2013

Hive Split

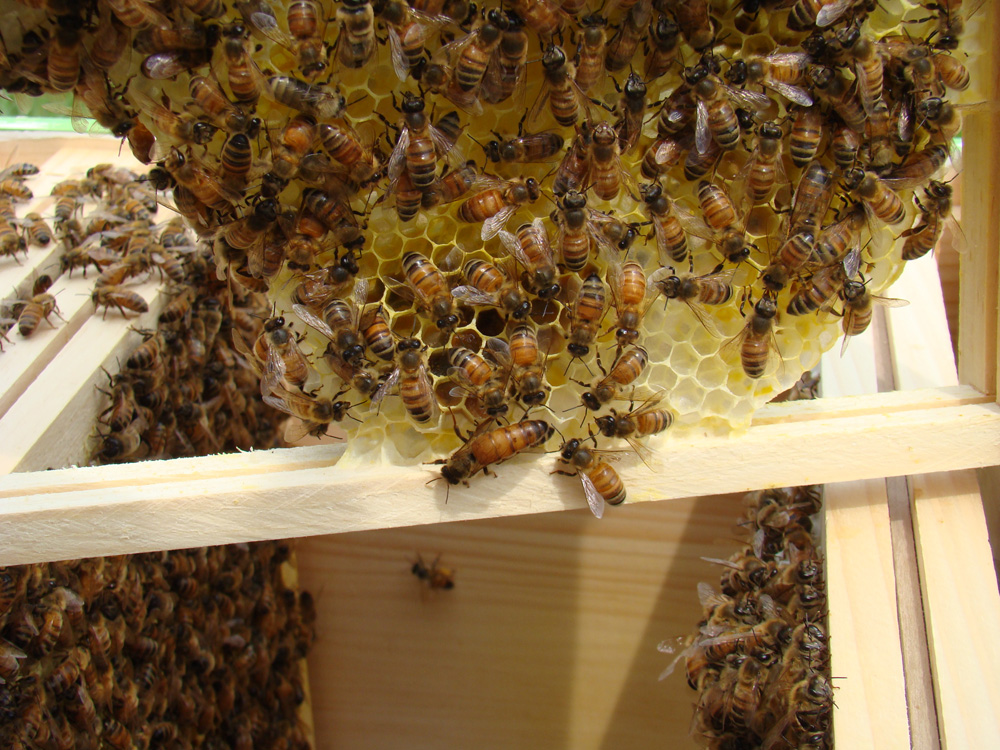
May 1st I did a complete hive inspection of our remaining hive with Lily assisting.  I had seen a lot of mouse poop in the sugar we fed in February and feared there was a mouse nest in the bottom box, so I knew we'd have to do a complete inspection top to bottom to clean out whatever was in the bottom.

Also, now's the time to do splits, so I was planning on taking at least a nuc's worth off and hopefully splitting two nucs worth off.  

There were a lot of bees in the top box, so I just took the whole box off and set it aside on a spare SBB [screen bottom board.] between the Tardis and the lang.

In the bottom box there was a lot of evident mouse damage.   You can see how the mouse started on one side and ate the honey through center to the wax capping on the far side.  Smart, but seriously aggravating.
This is what I found in the bottom of the box. A whole lot of wax cappings, dead bee parts, mouse droppings and other debris.

But no nest!   The mouse must have had a nest elsewhere and just come in from the top regularly to feast. The debris was a couple of inches deep on the bottom.   I cleaned it all out.

I went through every frame in the bottom box and there was no brood at all.   I knew then that I wouldn't be getting more than one nuc's worth of split, but since we're down to only one hive, I figured that was better than nothing. 

I  left one frame of honey on the south end and left the rest of the frames out.  I'd be replacing them with the split.

The other box was full of bees. I decided to do an even split and a walkaway.

A walkaway is where you take some of the bees out and put them in a new hive and leave them alone to make a new queen.

An even split is where you take the frames and deal them like cards - one frame for the old hive, one for the new hive, etc. 

There were five frames full of capped brood, larvae and eggs.  I could see where the first brood had emerged already and those spaces were full of larvae again.   Good queen!

Click the pics for closeups of the larvae.


Here's a close-up of the eggs.  They look like grains of rice in the bottoms of the cells.  The cells are yellow because the bees are tracking pollen all over everything right now.


We did sight the queen - and she's gorgeous.  Very calm. 

We ended up putting her in the Tardis with two frames of brood.The other three frames of brood I left in the lang.


I made a couple of mistakes that you can learn from. 

1.  Lots of beeks talk about checkerboarding - where you put an empty frame between the drawn or full stuff to encourage the bees to expand the hive.   I did that with the brood - put empty drawn comb between the brood frames.

MISTAKE:   You want the brood in a tight cluster because it's easier for the bees to keep it warm.  I just split the hive, so there are many fewer bees to keep the brood warm and this is Indiana - no telling what the weather is going to do for the next few weeks.

Checkerboarding is fine for honey supers, but not for brood.   I went back in a few hours later and took the empties out and tucked the brood frames next to each other.   I thank Michael Bush's book for making this clear to me [The Practical Beekeeper - link on my sidebar] Having that book handy is like having a 24/7 mentor.

2.  I put the queen and two frames of brood in the Tardis, with 7 more frames of honey and partials and the follower board.   

Pollen that fell out of some cells during the move
MISTAKE:  The Tardis is in a different place - all of the field bees are going to come back to the lang, which will leave a lot of bees with the 3 frames of brood in the lang, but will leave the Tardis short handed.   Short handed for keeping the brood warm in a big box. 

I went in the next morning to see how much action there was in the Tardis and while the brood was well covered, there just weren't a lot of bees coming and going, so I quickly went back in and removed 4 frames.   Now they have a frame of honey, 2 frames of brood, then 3 more frames of honey and partials - 6 in all, then I put in the follower board to make it a much smaller space to keep warm.   [A follower board is a removable wooden wall in the shape of a frame that you use to make the space smaller or bigger as you need to.]


I figure that the two hives are now on roughly equal footing for different reasons.

The lang has no queen, but they have three frames of brood in various stages, plus eggs, plus all the extra field bees.

They were super busy coming and going the next day and I think they'll do fine.

I'll keep an eye on things and after three weeks I'll go in and make sure they've got queen cells. 

The Tardis has fewer bees and only two frames of brood, but she has the queen. And she's a good queen.   I'm hoping that will make up for it.

Also, the Tardis has a window at the back so I can easily monitor the numbers.  If I need to shake a few extra bees into the hive from the lang, I can. 


When I was all done, I put the rest of the bee candy on the tops of the frames in both hives and put supers around them, then put rocks on the landing board in front of the Tardis entrance so they'd have to go around them to exit and enter.  They'll re-orient.   Also those bees were fanning like crazy during the relocation [pic], so I think any bees that moved with the queen will stick with her.  


Fingers crossed everything will be fine and they'll be ready for the main flow in a few weeks.


Monday, April 1, 2013

Eggs

We have a bunch of chickens.   Most of them are old and don't lay, which is actually a little bit aggravating, but what can you do?   It's not like they've got a lot of meat on them for eating.  Plus K2 turns a little green when we talk about eating her babies and since she hand raised most of them, we let them hang out until they die on their own.  

All of which means we aren't getting many eggs.

But one day last week, K2 brought in this batch of eggs.
They are a white duck egg, a green chicken egg and a tiny beige chicken egg.  
Once in a while a chicken throws a little practice egg like that little one.  Egg white only.  Weird. 

Here they are in a row with another brown egg:
From L to R:  duck, chicken: Americauna, chicken: Buff Orpington, chicken: probably Barred Rock.

The Americauna chicken, whose name is Lark, lays really big eggs.   And she's really noisy while she's doing it.   Can't say as I blame her.  

Ducks lay really big eggs all the time.   We're moving toward more ducks and fewer chickens.  The ducks forage on their own and take less feed.  They're less destructive of the garden.  The saxony ducks that we prefer are more reliable layers than the chickens.   Since we lost all but one of our laying ducks last year, we've got a new batch of saxony ducklings coming in May.   Next year we'll have reliable layers again. 

How did we lose them?    They decide to brood and they hide in the grass, under the old woodpile, and heaven only knows where else.  They disappear.   We thought we'd let them raise a brood their way but the coons and foxes found them.   No fun.  Next time we let them brood inside the coop or not at all.   This means we'll spend a lot of time watching them during brood season to find their nests.


Tuesday, December 18, 2012

Freezing Eggs for Long Term Storage

We have chickens and ducks.

They lay eggs.

It's what they do.

In the spring and summer, they lay lots of eggs.

Lots. Of. Eggs.

We have eggs coming out our ears.  

We can't eat that many and we're not really interested in selling them so last summer, I decided to freeze them to see if they'd keep that way.    It totally worked!

First we beat three eggs and measured about how much that made:   3 eggs = 1/2 cup-ish of beaten egg goo.  2 eggs = 1/3 cup-ish.   Ish - because eggs are different sizes.  

Then we cracked a whole lot more eggs and beat them.  

Then we labelled some ziplock type freezer bags clearly so we'd know how many eggs were in a bag.    We did some 3 egg bags and some 2 egg bags.  

Then we measured them into the bags.  [It was messy.]   Make sure they're closed tightly.

Then we stacked the bags so they'd be flat.

Then we froze them.

Freezing was easy, the big question was how they'd work when thawed.

A word about thawing eggs:  do not thaw these things in a microwave - they'll cook.   You don't want that.  

Thaw them in the fridge or maybe in hot water if you need them faster.   

Frozen eggs thaw thick.   [Thounds like I'm lithping.]  What I mean is that when they thaw, the eggs don't get thin and runny - they stay sort of custardy.     It turned out not to be a big deal.    They incorporate just fine in cakes and cookies and even a dutch pancake.  

Bottom line - this was a great way for us to preserve the egg bounty of May and June in the freezer to use now when we're lucky to get a few eggs a week.  


Thursday, May 3, 2012

Flower Lang - Day 26: Comb Issues

It was great to have Lily there to do the camera thing so we could focus on the bees.    Thank you, Lily!

I've divided the inspection into two posts this time -- one post for each hive -- so I can talk about different things without overloading you with bee info.   We'll start with the Flower Lang.

The Flower Lang has comb issues. 

They're the ones who built the extra comb on the side of the hive.   We've had to do a lot of comb repair in this hive.    Mostly because they're building wonky, but once because I broke a comb off.   Last week we repaired 4 combs.

This is what we found when we opened the hive this week.

See how it's bent? 

It's not supposed to be bent like that.


That's one of the combs we repaired last week.  It looks like the comb rolled sideways a bit and crumpled at the bottom.   Soft comb'll do that.

In the meantime, the bees started a new comb from the top.  They'll meet soon.

This is the other [south] side.   I'm pretty sure that's drone comb at the bottom between the rubber bands.   Drone cells have domed caps, they're wonky sizes and irregularly placed. 

We decided to bend that soft comb back straight and cut out the crumpled stuff at the bottom.  


I used a knife to cut out the crumpled stuff at the bottom of the north side.  

Notice that I left the bees on while I worked.  They're much happier that way.

Much.  Happier.  


This is what it looked like when I was done.


Last week's repair.  This is a frame that we repaired last week.  I think it's the one I broke.   It stayed put enough for the bees to draw all that new comb above it.   There's lots of capped brood under those bees and eggs in the new edge comb.


That blasted end comb.  Once again, the bees got creative with the end frame.    We cut the little part out and then cut the big comb out and put it between two rubber bands to center it on the frame.   Hopefully they'll get it straight in the frame.   I'm not holding my breath. 

The good news is that we are getting a lot of experience doing cut-outs...sort of.   Only I'd be happier if we weren't cutting them out of their own frames.


Queen.  Here's the queen at the bottom of the comb just getting on the wood frame.  It's easier than I thought to find the queens.  The other bees give the queens some space.  The queens don't hurry, but they're always on the move.

Eggs.   We saw plenty of eggs in the brood comb where the first batch had hatched already and in the new comb.    This is new comb.  Blow up the pic to see eggs and some small larvae.  The eggs look like rice; the larvae look like the letter C.


Here's a better pic of some new eggs.  They really showed up in this piece of comb.


Frozen Brood
At the bottom of the hive we found a little piece of comb that had broken off [sorry no pic!]  In it were two small/medium larvae, dead and black. Way too small to have been capped.  It smelled a bit rotten.   I stuck a twig in it to see if it would string out [like American Foul Brood does], but it didn't much.    I guessed that this bit of comb broke off before the freezes we had early last week and that these poor guys got frozen.   A bit of internet research netted me this fabulous chart which confirmed that it was likely that these guys had indeed died from the cold.  


And now a gratuitous pic of a big pollen basket.  Look at the size of that thing! 

If you're interested in what color pollen comes from what plant, check out this wiki page.  


Tuesday, April 17, 2012

Bees - Day 12 check

We were so excited to do our first real check of the hives.   This time we put on our veils because we weren't sure how docile the bees would be. 

And we used the smoker.    Can I just say right now that so far the hardest thing about beekeeping is keeping the stupid smoker lit?   Geez. 

The first hive we checked was the Tardis.    We took out two empty frames on the far end so we'd have room to move things around and put them on the frame holder outside the hive.    Then we took out each frame in turn to see how things were going.  When we were done looking at it, we put it back in the hive scooted over to the side so we could pull out the next one.

We were happy to find 6 frames partially filled with comb.

It was beautiful.

White, white comb.   Covered with bees.   The bees on this comb were thick and we had to brush them off to see anything.

See that bright red pollen cell in the center?  They keep some  pollens separate.  Some is red, most is yellow, some is creamy.


So we brushed them gently into the hive.   And underneath, on the bottom halfs of the combs we found lots of eggs.

If you blow the pic up you can see what look like grains of rice in the cells.  Those are eggs.

That yellow thing?   Pollen.

At the top of each comb we found glistening stores of uncapped honey and below that loads of pollen.

Honey is concentrated by evaporation, eventually it will reach the right concentration and then the bees cap it so that it doesn't become diluted by the humid air.    Cool, huh.


We saw lots of different pollens on the bees.


Here's some white.   Look at the size of those baskets.


And here's some yellow.

I wanted to get some better pictures, but the bees move constantly and quickly and it was really hard to get anything decent.  I'll keep trying.   You wouldn't believe the size some of the pollen baskets get.


Anyway, we looked carefully through all 6 frames for the queen, but never found her.    I wasn't surprised.   It takes a certain skill to be a queenspotter and I imagine that will take time.

When we were done, we put the frames back where they were, pushed them tightly together, put the lid back on and moved to the Flower Lang.

We lit the smoker, again.   Opened it up and the first thing we saw was a bit of burr comb on the south side.

That comb running perpendicular from the frames to the side of the box, doesn't belong there.

Rookie mistake.   When the frames are all in the box, there's still about an inch of wiggle room.   You need to push the frames together to one side or in the center so that you won't get burr comb.

I pushed them to one side - the north side.   But the bees like the warmer, south side to put their brood against so, they built comb where they wanted it.

The bees will do what they want and not what you want.

We started at the other end of the hive and left the burr comb for last.   I removed 3 frames from the other side and started looking at what the bees were doing.

Interesting.    The first frame I pulled out had this in it.   A lovely little piece of comb on the edge of the frame, with bee space behind it and between it and a bigger piece of comb on the other side.

Not going to work. 

And sure enough when I put the frame back in, it fell right off.

Not to worry.   I knew how to fix it.


I put rubber bands around an empty frame like this.


Then I tucked the comb in the frame with the rubber bands to support it.


Neat trick, huh!   I learned that by watching vids on the forum at beemaster.com.   

The comb will stay there quite nicely and the bees will fill in around it, where I want them to.

Now that comb on the other side of the first frame we pulled out was too far to the other side. 

So I took a knife and carved it down level with the top of the frame so it wouldn't bump out.

I was afraid that these two combs were wonky because all the others were first, but when we looked, the ones in the middle were just fine. 

Lucky.

We took out all the other frames and looked at them and they all had plenty of eggs, pollen and uncapped honey.   Then we got to the last one with the burr comb.  

I cut the burr off the last frame so we could take it out.  And this is what we found behind it. 

An entire comb on the wall of the super.   With bee space behind it.

It had to come out.    So I put my gloves on because there was no way I was going to get all those bees out of there first,  and I wanted to concentrate on getting the comb out not not getting stung because I crowded the bees.


I cut straight down the side of the super and was happy to see that it was connected by only 3 inches or so of wax.  

You can see the section that was connected.   It looks like the bottom stroke of a capital Q in the pic.

This frame was all pollen and honey.  No eggs.  No surprise.  No room to move around much.  Plus, the bees typically keep the stores to the outer edge of the hive and the brood in the middle.

I repaired this comb the same way I did the other, by tucking it between rubber bands in a frame.   Then I put that frame back on that side of the hive, only I pushed the frames tight together on that south side this time.   Hopefully the bees will get the hint.

When the bees fill this frame in, they'll chew the rubber bands off, or when I go back in, if there's plenty of comb around this one supporting it and connecting it to the frame, I can clip them off and get them out of the bees' way.


All in all, it was a very interesting inspection.    We found no capped honey or brood yet in either hive, but it's only been 12 days.   We'll do another frame inspection next weekend and we hope to find plenty of capped brood and capped honey.  

In the meantime, I have got to spend some quality time with the smoker practicing keeping it lit. 

Saturday, January 21, 2012

The Chickens Are Hard on the Coop

If you look at the coop behind Bob and the ladies, you can see where they've pecked a hole right in the structure [at the far left in the pic.]   The hole to the right used to be a nice rectangle, with a door.  They've enlarged it and the door no longer fits.   This year we're going to have to replace that side of the coop.

It's a good thing they lay so much.

Speaking of laying.  Rumor has it [at chickensintheroad.com] that we can freeze eggs.   Break them, beat them a bit and then freeze them.   I'll bet we could beat a bunch and freeze them in ice cube trays.

One cube = one egg. 

What do you think?
Related Posts Plugin for WordPress, Blogger...