Showing posts with label comb. Show all posts

Friday, January 24, 2014

0 for 3

The arctic vortex killed the last 2 of our hives.  Eric had skirted the bottoms and put up extra wind and weather protection, but those plunging temps [-20 here with much lower wind chills] were too much. We started the winter with 3 hives - 2 regular sized ones  and one tiny one, tucked up well for the winter and with plenty of food.  The first hive died early in December.

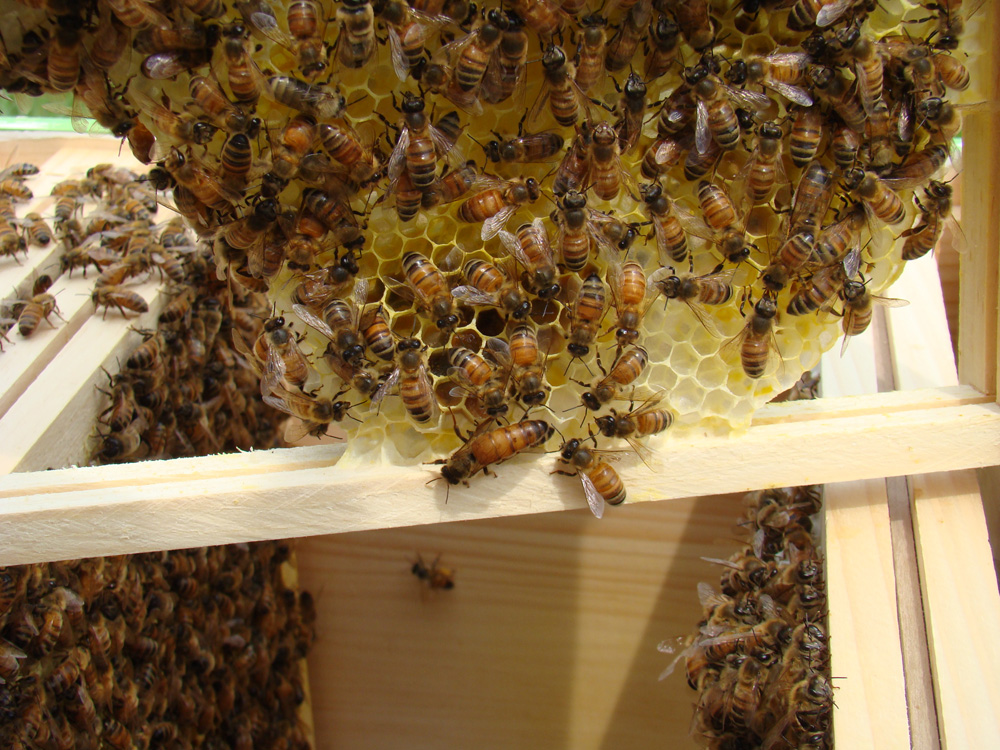
Here is a pic [above] of some of the dead bees from the nuc.   You can see the queen in the center with the dark solid butt.

The temp here was 50 a few days after the cold snap [Cold snap.  Hah.  Now that's an understatement].  So we checked the bees and when we found nothing but deadouts, we cleaned them out.   There was a pair of mice in one hive.   We kicked them out and closed up the entrances so they couldn't get back in.   We pulled all the frames except for the two straightest ones in each hive.  I left those in in case we're lucky enough to get swarms this year.

The bees had plenty of candy left, so we tossed that out for the other critters to snack on.  We even saw a bee from a wild hive come to check it out.  I'd love to get those genetics!


We took all the frames inside to strip for honey and wax.   I got 7 pints of honey and about 2 lbs of wax

We thought all the colors in the comb were really pretty. 

Our next decision was whether to try again this year with bees or just throw in the towel.  Beekeeping is EXPENSIVE.  If you start, be aware that the cost for bees, equipment and extras can add up fast.   There are ways to cut costs, but trying to keep an apiary going for a few years is no small investment in money or time. Just sayin.

I love having bees.   We love what they've done for the gardens.  So, we thought we'd give it another year.  I put in an order for 2 more nucs.  They're expensive this year [$165 each], but we're getting Indiana queens and by getting nucs instead of packages, we're getting a 6 week head start, which will translate into bigger hives going into the winter.    I'd like to be able to overwinter the majority of my hives eventually and I'd also like to get a real honey harvest [60-200lbs of honey per hive]. 

Wish us luck.   Clearly we need it.


Monday, July 22, 2013

Wonky Comb


Bees will  do what bees will do.    They're 'supposed' to be building straight comb along the frame.

Ha!

These guys built crooked and started 4 combs on this one frame.

This is a comb from another hive.   It's straight, but upside down. 

Crazy bees.

I cut out the wonky comb in the first hive to get them going straight.  Next time I checked, they had built crooked again - only three combs instead of four.  That's progress, but still..... This time I left it.   It's in a super that'll be harvested and crushed, so who cares.   It's not worth the aggravation to me or the bees now. 

The upside down comb I left.   It's an inefficient way to construct comb and the bees know it.  Last time I peeked, they had corrected and were happily building the right way. 

Thursday, May 3, 2012

Flower Lang - Day 26: Comb Issues

It was great to have Lily there to do the camera thing so we could focus on the bees.    Thank you, Lily!

I've divided the inspection into two posts this time -- one post for each hive -- so I can talk about different things without overloading you with bee info.   We'll start with the Flower Lang.

The Flower Lang has comb issues. 

They're the ones who built the extra comb on the side of the hive.   We've had to do a lot of comb repair in this hive.    Mostly because they're building wonky, but once because I broke a comb off.   Last week we repaired 4 combs.

This is what we found when we opened the hive this week.

See how it's bent? 

It's not supposed to be bent like that.


That's one of the combs we repaired last week.  It looks like the comb rolled sideways a bit and crumpled at the bottom.   Soft comb'll do that.

In the meantime, the bees started a new comb from the top.  They'll meet soon.

This is the other [south] side.   I'm pretty sure that's drone comb at the bottom between the rubber bands.   Drone cells have domed caps, they're wonky sizes and irregularly placed. 

We decided to bend that soft comb back straight and cut out the crumpled stuff at the bottom.  


I used a knife to cut out the crumpled stuff at the bottom of the north side.  

Notice that I left the bees on while I worked.  They're much happier that way.

Much.  Happier.  


This is what it looked like when I was done.


Last week's repair.  This is a frame that we repaired last week.  I think it's the one I broke.   It stayed put enough for the bees to draw all that new comb above it.   There's lots of capped brood under those bees and eggs in the new edge comb.


That blasted end comb.  Once again, the bees got creative with the end frame.    We cut the little part out and then cut the big comb out and put it between two rubber bands to center it on the frame.   Hopefully they'll get it straight in the frame.   I'm not holding my breath. 

The good news is that we are getting a lot of experience doing cut-outs...sort of.   Only I'd be happier if we weren't cutting them out of their own frames.


Queen.  Here's the queen at the bottom of the comb just getting on the wood frame.  It's easier than I thought to find the queens.  The other bees give the queens some space.  The queens don't hurry, but they're always on the move.

Eggs.   We saw plenty of eggs in the brood comb where the first batch had hatched already and in the new comb.    This is new comb.  Blow up the pic to see eggs and some small larvae.  The eggs look like rice; the larvae look like the letter C.


Here's a better pic of some new eggs.  They really showed up in this piece of comb.


Frozen Brood
At the bottom of the hive we found a little piece of comb that had broken off [sorry no pic!]  In it were two small/medium larvae, dead and black. Way too small to have been capped.  It smelled a bit rotten.   I stuck a twig in it to see if it would string out [like American Foul Brood does], but it didn't much.    I guessed that this bit of comb broke off before the freezes we had early last week and that these poor guys got frozen.   A bit of internet research netted me this fabulous chart which confirmed that it was likely that these guys had indeed died from the cold.  


And now a gratuitous pic of a big pollen basket.  Look at the size of that thing! 

If you're interested in what color pollen comes from what plant, check out this wiki page.  


TARDIS - Day 26: Capped brood.

Just to remind you, we took Lily with us this time to take the pics while we inspected the hives.    It was great to have Lily there to do the camera thing so we could focus on the bees.    Thank you, Lily!

I am happy to report that there was only one little bit of burr comb on this hive and we decided to leave it.   The bees are going to do what the bees are going to do.   We'll make sure it stays straight on the frames, but those little bump outs are not worth messing the comb for.

Unless someone with a lot more experience tells me otherwise.    Then I'll happily reconsider.


This week, this hive was all about capped brood.
Glorious, glorious capped brood.


We could see where the first batch of new bees has hatched out and new eggs have been laid in those cells.    This is great news.   Our blackberries have started blooming and the more bees there are, the better.  This is one of our best nectar flows of the year.    Acres and acres of blackberries.


Hopefully there will be enough new bees fast enough to store a lot up for the winter.  We'll see.


Here's a closer look at what's going on in the frames.    Blow it up for a good look.

The larvae are large and white and curled around in the cell.

The honey is shiny.   The capped honey has a smooth cap - different from the bumpy caps on the capped brood.

If you look closely you can see that the brood is capped with mini hexagons.  [It's easier to see in the second pic at the top]


When we pulled apart some of the frames, the bees festooned in three places.   It doesn't happen all the time and I'm always intrigued when it happens.   I need to find out why they do that.


The very last frame was one we had repaired last week.  The bees are doing their best to join it.


Almost there.  Only a bee width away from joining.


And here's the queen.   It was very cooperative of her to stand right next to that other bee so you can see the difference in appearance. 

We named her Liz X.   You Doctor Who fans can explain why.   

[We need a star whale hive....]

Tuesday, April 24, 2012

Hives - Day 19 Check

Blow these pics up for great details
Confession:    I was really tempted just to give you a couple of nice pics, brag that we found both queens and loads of capped brood and leave it at that.  

The truth is, I did just about everything wrong this time that I could.  Yep.  Pretty much I demonstrated that I have no bee finesse yet at all. 

At All. 

I felt like a bull in china shop.  Plus we were fighting the camera with veils and gloves.  Nothing went right.  Geez.   I should rename this part of the blog:  Rurification: We make stupid bee mistakes so you don't have to!

One thing - this time Eric started the smoker with a torch.   It totally worked!  Thanks, you guys at Beemaster!   A bunch of you said to fill it, torch it, pump the bellows like crazy, get a good flame, then put something on top [I used a skein of scrap yarn].   We had a charcoal briquet, some sumac berries, a bit of toilet paper and toilet paper roll, and some cardboard it in from previous attempts to light the blasted thing when Eric torched it this time.   We had plenty of great cool smoke for the whole inspection.   Woo-hoo!    Now I just have to learn how to use the torch all by myself.  

Anyway.   Here's the awful truth about how things went today.  

We opened the Tardis hive first, and the first thing I saw was burr comb.  Drat!  And this had been the hive that had great comb with no problems last time.   


We investigated and long story short,  when we put splines in the top bars, where the foundation is supposed to go, we put them in too low and the bees built off to one side instead of straight down the middle.  


LESSON:  If you use splines, leave only 1/16 inch or less showing.    We moved all the rest of the splines up so that they barely showed in the empty frames and on any that we had to do repairs on.


The bees were unhappy when I started messing with the frames and I really wanted to see how our repairs from last time worked before I did the same thing on the Tardis, so we closed that hive up and went to look at how the Flower Lang was doing with the repairs we had done on it. 

Remember that little comb on the frame with the double comb?   We repaired it by putting it in a frame with rubber bands.  It had come out anyway and was lying in the bottom of the hive.   And those rotten bees had built another little comb on the frame where we had taken the first one off.   Erg.  And they had built up the place on the other side that I had carved down. 

Really, what was I thinking?  I was nuts to think that they wouldn't.  

LESSON:   Cut out those burr comb bumps, don't carve them down and expect them to not come back.   This means I might have to wait until the comb is attached well enough to support it even if it's missing a bit of the center section.  Next time I'm going to carve it down a bit further for a few weeks until there's a lot more comb attached to the sides.   I'll keep moving the new [soft] comb to the center.  Then I'll cut out the bump out completely.

The next stupid thing I did was tilt a frame over on its side when the comb wasn't fully attached.  It was full of honey and brood and broke right off.   Dumb, dumb, dumb.

LESSON:  Don't tilt the frame until it's fully attached at all sides.  Better yet, don't tilt the comb at all.

It took a while to repair, and the temp was only in the 50s, so there's a good chance some of the brood got chilled.   Chilling the brood could kill it or cause deformities.   Another dumb mistake.  I wish I had realized that before I got done with the inspection.

LESSON:  Don't mess with the bees on chilly days.   Don't take out the frames.  Stay inside and read about bees and stupid beekeeper mistakes instead.

In all, in that hive, we had to repair 5 frames of comb.   I tried to leave the bees on the comb while I worked, but that wasn't always optimal for my concentration or their safety. 

When we got to the last frame, next to the wall that they had put burr comb on before,  we found that they had attached this comb it to the wall again with just a couple of inches of burr, but no extra comb on the wall this time.  And they had done a very interesting patch around to the comb in the frame.   It had sagged a bit in the center, so I centered it.  I have no clue whether it will work or not.


The good news about this hive is that we found lots of capped brood and a bit of capped honey.  And we found the queen.   We knew she was there, but it was nice to be able to spot her.    She's large and gorgeous.

When we were done, we scooted the frames together and closed it all up and moved back to the Tardis.   Lily came out and took over the camera while we were looking at this hive.   She took these last pics.

The Tardis had some comb on 8 of the frames, nowhere near full frames, but still lots of comb.   And plenty of capped brood!    We didn't see any capped honey in this hive.  

We did find the queen in this hive, too.   This makes me really, really happy, because I want to be a good queenspotter. 

And also, truth be told,  I felt like spotting the queen was the only right thing I did in this whole inspection. 

This hive had that one frame with a bit of burr comb on it.   I decided to just cut that section out completely and adjust the soft outer edge to the center.   We put rubber bands around it to support it just in case something happened after we closed things up.    I hope it works.

If some of you experienced beeks are so disgusted that you want to take my bees away, I wouldn't blame you.   So far, I've been a pretty pathetic beekeeper. 

Tuesday, April 17, 2012

Bees - Day 12 check

We were so excited to do our first real check of the hives.   This time we put on our veils because we weren't sure how docile the bees would be. 

And we used the smoker.    Can I just say right now that so far the hardest thing about beekeeping is keeping the stupid smoker lit?   Geez. 

The first hive we checked was the Tardis.    We took out two empty frames on the far end so we'd have room to move things around and put them on the frame holder outside the hive.    Then we took out each frame in turn to see how things were going.  When we were done looking at it, we put it back in the hive scooted over to the side so we could pull out the next one.

We were happy to find 6 frames partially filled with comb.

It was beautiful.

White, white comb.   Covered with bees.   The bees on this comb were thick and we had to brush them off to see anything.

See that bright red pollen cell in the center?  They keep some  pollens separate.  Some is red, most is yellow, some is creamy.


So we brushed them gently into the hive.   And underneath, on the bottom halfs of the combs we found lots of eggs.

If you blow the pic up you can see what look like grains of rice in the cells.  Those are eggs.

That yellow thing?   Pollen.

At the top of each comb we found glistening stores of uncapped honey and below that loads of pollen.

Honey is concentrated by evaporation, eventually it will reach the right concentration and then the bees cap it so that it doesn't become diluted by the humid air.    Cool, huh.


We saw lots of different pollens on the bees.


Here's some white.   Look at the size of those baskets.


And here's some yellow.

I wanted to get some better pictures, but the bees move constantly and quickly and it was really hard to get anything decent.  I'll keep trying.   You wouldn't believe the size some of the pollen baskets get.


Anyway, we looked carefully through all 6 frames for the queen, but never found her.    I wasn't surprised.   It takes a certain skill to be a queenspotter and I imagine that will take time.

When we were done, we put the frames back where they were, pushed them tightly together, put the lid back on and moved to the Flower Lang.

We lit the smoker, again.   Opened it up and the first thing we saw was a bit of burr comb on the south side.

That comb running perpendicular from the frames to the side of the box, doesn't belong there.

Rookie mistake.   When the frames are all in the box, there's still about an inch of wiggle room.   You need to push the frames together to one side or in the center so that you won't get burr comb.

I pushed them to one side - the north side.   But the bees like the warmer, south side to put their brood against so, they built comb where they wanted it.

The bees will do what they want and not what you want.

We started at the other end of the hive and left the burr comb for last.   I removed 3 frames from the other side and started looking at what the bees were doing.

Interesting.    The first frame I pulled out had this in it.   A lovely little piece of comb on the edge of the frame, with bee space behind it and between it and a bigger piece of comb on the other side.

Not going to work. 

And sure enough when I put the frame back in, it fell right off.

Not to worry.   I knew how to fix it.


I put rubber bands around an empty frame like this.


Then I tucked the comb in the frame with the rubber bands to support it.


Neat trick, huh!   I learned that by watching vids on the forum at beemaster.com.   

The comb will stay there quite nicely and the bees will fill in around it, where I want them to.

Now that comb on the other side of the first frame we pulled out was too far to the other side. 

So I took a knife and carved it down level with the top of the frame so it wouldn't bump out.

I was afraid that these two combs were wonky because all the others were first, but when we looked, the ones in the middle were just fine. 

Lucky.

We took out all the other frames and looked at them and they all had plenty of eggs, pollen and uncapped honey.   Then we got to the last one with the burr comb.  

I cut the burr off the last frame so we could take it out.  And this is what we found behind it. 

An entire comb on the wall of the super.   With bee space behind it.

It had to come out.    So I put my gloves on because there was no way I was going to get all those bees out of there first,  and I wanted to concentrate on getting the comb out not not getting stung because I crowded the bees.


I cut straight down the side of the super and was happy to see that it was connected by only 3 inches or so of wax.  

You can see the section that was connected.   It looks like the bottom stroke of a capital Q in the pic.

This frame was all pollen and honey.  No eggs.  No surprise.  No room to move around much.  Plus, the bees typically keep the stores to the outer edge of the hive and the brood in the middle.

I repaired this comb the same way I did the other, by tucking it between rubber bands in a frame.   Then I put that frame back on that side of the hive, only I pushed the frames tight together on that south side this time.   Hopefully the bees will get the hint.

When the bees fill this frame in, they'll chew the rubber bands off, or when I go back in, if there's plenty of comb around this one supporting it and connecting it to the frame, I can clip them off and get them out of the bees' way.


All in all, it was a very interesting inspection.    We found no capped honey or brood yet in either hive, but it's only been 12 days.   We'll do another frame inspection next weekend and we hope to find plenty of capped brood and capped honey.  

In the meantime, I have got to spend some quality time with the smoker practicing keeping it lit. 
Related Posts Plugin for WordPress, Blogger...