Showing posts with label honey. Show all posts

Sunday, June 11, 2017

Spring Honey


It's been a busy year in the apiary!  We've done some splits and I caught a swarm all by myself. [Exciting!]  I now have 8 colonies, and all are doing pretty well.   We've expanded the size of the apiary to accommodate our growing numbers and I'm excited to be getting some honey.

This is our spring harvest.   We got 6.5 quarts [very little compared to what commercial beekeepers will get off a single hive].   I'm hoping to get that much more before the end of the season.    The harvest is small because I've been producing a lot of bees instead of honey.

I study beekeeping every single day.  I have learned a lot more this year, but still feel pretty ignorant about beekeeping and bees. I'm still trying to work out what is a good working size for our apiary.  If I can get these colonies through the winter, then next year I should be able to focus on a few hives for big honey production.

In the meantime, there are a lot of stings and sweet rewards.

Sunday, October 9, 2016

Honey Harvest!

It's the time of year when I need to do one last big inspection on the bees so I can combine hives, treat, think, evaluate, etc. before the winter.

I had 6 hives:

#1 The big Mother Hive - Russian x local queen
#2 Bedford nuc lg
#3 Bedford nuc sm - never took off.  Queen problems.
#4 1st swarm from Mother Hive
#5  split from Mother Hive to stop swarming.  [didn't work]
#6  after swarm from #5.   Stayed small [1/2 med box] but nice queen and good laying pattern.

I was delighted to find that #1 had filled me a whole super of honey.   First time for a real honey harvest.   #5 had filled a partial.  In all I had about 1 1/3 medium boxes of honey from the two hives.

We crush and strain by hand.   It took Claire and me about 1 1/2 hours to get it all done and cleaned up.   It's messy.   Seriously, seriously sticky and messy.

Even though the bees have been all over the goldenrod this year, we had plenty of rain and they were late filling the supers, I was amazed at how LIGHT the honey is.   It is sharp tasting like clover honey.   Since the bee yard has been smelling so good and like goldenrod, I expected darker, stronger goldenrod honey.   Huh.  We had a lot of asters, so maybe that was it.

At any rate, I'm very grateful.   I had wondered if I'd ever get a full super from any hive ever.   In all we got 10.75 pints of honey.  [That's 1 1/3 gallons.]

In other hive news:
#3 had gone completely queenless, no brood at all, but they had stored some honey.   I combined it with #6 by taking out the honey and putting it in #6, then putting #6 on top of #3 with newspaper between.   In a week, everyone should be up in #6 and we can pull #3 off the bottom and button them up for the winter.  

I took the extra boxes off everyone else to reduce defensible space.   The nights are chilly now and they're clustering well.  

Now I have 5 hives left.   They look good.   We'll put sugar bricks and quilt boxes over them in the next month or so and probably wrap them in tar paper, too.


Saturday, September 24, 2016

Fig, Honey and Walnut Jam

I have gotten more than 50 little figs off my Chicago Hardy fig tree so far this year.   They're a little smaller than a golf ball, but gorgeous and sweet and I'm so excited that I can grow figs here!

I knew I'd need at least 40 for this recipe, so as they ripened, I chopped them up and froze them.    Worked like  a charm and I think they were sweeter coming out of the freezer than fresh.

Notes:  I started with this recipe from Food.com.   The original recipe called for 2 cups of honey, but unless you're using really, really mild honey [not easily available anywhere], the honey totally takes over the flavor.  I wanted fig jam, not fig flavored honey.   So, here's what I did:


Fig, Honey and Walnut Jam
www.rurification.com
3 cups chopped figs [About 40 Chicago Hardy figs, stems removed]
1 cup honey
2 Tablespoons lemon juice
1 cup chopped walnuts

Directions:
Put figs, lemon juice and honey in a wide bottom saucepan.   Bring to boil, turn down the heat and simmer until thick.  45 minutes or so.   I cooked until it started sheeting off the spatula.  Add walnuts and simmer for another 15 minutes or so.   Put in jars with clean lids.  Store in refrigerator.  Yield: 2 pints.

[I processed my jars of jam for 10 minutes to can it, but I'm not a canning expert so this is me not telling you what to do, but only what I did.]


Sunday, August 30, 2015

Ricotta Tart with Honey Cinnamon Glazed Figs

I have figs!

Two years ago I planted a Chicago Hardy fig tree.   In November.   Right before that nuclear winter we had that lasted forever - you know, the one with the Polar Vortex from hell. 

That winter.

And the next spring, the fig came up anyway.  So here's my shout out to Stark Bros where I got the fig and where I get a lot of my fruit trees/plants.   Great stock and they'll replace if the plants don't make it a year. 

The plant died back to the ground, but that spring the fig bore 3 whole figs, which got the size of marbles and then fell off before they ripened.   

Last winter the fig died back again all the way to the ground, but popped up this spring when the ground warmed up.   I have dozens of tiny figs along the branches.    And one ripe one.

The figs get suddenly larger when they ripen, then they turn that color and droop.  And when they are ripe, I will make this tart.  Again.  I made this recipe up myself.   It is delicious.   I plan on eating it several more times this season.

Because I have figs.

 Ricotta Tart with Honey Cinnamon Glazed Figs
www.rurification.com

1 dozen or so very ripe figs [California Mission are fine]
1 lb ricotta cheese
1/4 cup white sugar
3 eggs
1 tsp vanilla
1/4 tsp cinnamon for the filling + 1/4 tsp more cinnamon for the glaze
1/4 cup honey
 Your favorite pie or tart crust for bottom of tart/pie plate.

Directions: 
Preheat oven to 350.  Make the crust and put it in the bottom of a tart or pie plate.

Filling:  Mix the ricotta, eggs, sugar, vanilla and 1/4 tsp cinnamon well.   Put into pie crust.

Topping:  Wash and slice the figs in half.   Arrange the figs cut side up around the top of the filling, fat ends out, skinny ends pointing to the center.

Glaze.   Heat the honey and 1/4 tsp cinnamon in the microwave for 30 seconds.   Mix it as well as you can [it won't want to mix].   Pour/spread glaze evenly on all figs and around the top of the tart. [If you LOVE this glaze, feel free to make more.   It's good when it's baked and oozing all over the place.]

Bake 60 minutes.   Cool.    Delicious at room temp or chilled. 

Monday, February 9, 2015

Marmalade Recipe Roundup

It's Februrary and that means it's marmalade season.   I love marmalade.  Nothing is as beautiful this time of year as a jar of citrusy sunshine.

I love marmalade on toast.   Also, on pancakes.  Also, on Blueberry Steel Cut Oats with yogurt.  Also, on brownies.   Also, on ice cream.    Also, on brownies with ice cream.


I love marmalade!  

Here are a few tips and recipes to get you started.   


And once you have the jam made, here are some fabulous things you can do with it!

Orange Marmalade Cranberry Jammy Oatcakes

Eric's Jam Bars

Blintzes


Want the recipe for these Marmalades and a whole lot of other terrific jam recipes?   Check out my ebook:  A Simple Jar of Jam  at www.rurification.etsy.com.   You can preview the book by clicking the link on the sidebar.  Every purchase helps support this site.  Thank you!

Wednesday, April 2, 2014

Kumquats

Confession.   I think kumquats are adorable.

A. Dor. A. Ble.

So I've been wanting to preserve some for a long time.   Just 'cause they're cute.

Even though I didn't know what they actually tasted like. 

Especially when I found a few links to some kumquat jam recipes at Food in Jars. [halfway down the link list in that post.]   Seriously beautiful food. 

So, when I found these tiny ones at Trader Joe's up in Indy last weekend, I grabbed a box, then came home and preserved a very small batch - just one pint jar - with honey and vanilla.

I'm going to just come right out and say this:  Kumquats are weird. 

The peels are the sweet fruity part and the insides are sour.   Very sour.   They're sort of an inside out marmalade experience - you know, the citrus, sour, bitter mashup.   They need sugar and lots of it.

Here's how I preserved these beauties:

Kumquat Preserves
www.rurification.com

12 oz. box of kumquats, washed, with stem bits removed.
1/2 cup water
1/2 cup honey
1/2 cup sugar
1 vanilla bean, sliced so the seeds are exposed

Bring to boil, then reduce heat to simmer.  Let simmer until peels are transparent - about an hour.

It made just one pint.

Notes:    I was hoping that they'd keep their shape, and they probably would have if I hadn't cooked them so long.

I cooked them so long because that's the best way to candy those peels.  The longer they cook in sugar water, the better they taste.

They're still pretty puckery.   You could leave out the water and add another 1/4 - 1/2 cup of honey and probably get a nice and very balanced preserve.  Next time I find some of these, I'm going to try that. 


Saturday, March 22, 2014

More Lemon Honey Tea Stuff

Turns out we love the honey lemon tea concentrate that we made in the fall.    Especially with slices of fresh ginger dropped in the jars.  

Hello, sunshine!

I used an entire pint jar of the creamed honey we discovered in the pantry [see yesterday's post] and a bag of lemons.  I couldn't pour the honey, so I just spooned it in the jar between layers of lemons.   I got 2 1/2 quarts of lemony-honey goodness started.  It sat out for a few hours until the juices filled the jars, then I tucked them all in the fridge.

Friday, March 21, 2014

Creamed Honey


We harvested some honey from our deadouts in January and tucked it away in the pantry.

Now it looks like this. 

This is creamed honey.  

All honey will eventually crystallize - especially when temps get below 55 degrees  or so.  Creamed honey happens when the honey crystallizes into tiny, tiny crystals instead of the big rock candy type crystals.    So, creamed honey is named for its looks, not its content.  There is no cream in creamed honey.

What probably happened was that the honey in the combs was just starting to crystalize from the cold winter temps.  Then we brought it in and warmed it up and mixed it up and it ended up creamed instead.

Happy accident!   This stuff is shelf stable and spreadable.    Much easier to keep on a spoon.   It will melt nicely when heated or mixed with liquid.  [See tomorrow's post]

Friday, January 24, 2014

0 for 3

The arctic vortex killed the last 2 of our hives.  Eric had skirted the bottoms and put up extra wind and weather protection, but those plunging temps [-20 here with much lower wind chills] were too much. We started the winter with 3 hives - 2 regular sized ones  and one tiny one, tucked up well for the winter and with plenty of food.  The first hive died early in December.

Here is a pic [above] of some of the dead bees from the nuc.   You can see the queen in the center with the dark solid butt.

The temp here was 50 a few days after the cold snap [Cold snap.  Hah.  Now that's an understatement].  So we checked the bees and when we found nothing but deadouts, we cleaned them out.   There was a pair of mice in one hive.   We kicked them out and closed up the entrances so they couldn't get back in.   We pulled all the frames except for the two straightest ones in each hive.  I left those in in case we're lucky enough to get swarms this year.

The bees had plenty of candy left, so we tossed that out for the other critters to snack on.  We even saw a bee from a wild hive come to check it out.  I'd love to get those genetics!


We took all the frames inside to strip for honey and wax.   I got 7 pints of honey and about 2 lbs of wax

We thought all the colors in the comb were really pretty. 

Our next decision was whether to try again this year with bees or just throw in the towel.  Beekeeping is EXPENSIVE.  If you start, be aware that the cost for bees, equipment and extras can add up fast.   There are ways to cut costs, but trying to keep an apiary going for a few years is no small investment in money or time. Just sayin.

I love having bees.   We love what they've done for the gardens.  So, we thought we'd give it another year.  I put in an order for 2 more nucs.  They're expensive this year [$165 each], but we're getting Indiana queens and by getting nucs instead of packages, we're getting a 6 week head start, which will translate into bigger hives going into the winter.    I'd like to be able to overwinter the majority of my hives eventually and I'd also like to get a real honey harvest [60-200lbs of honey per hive]. 

Wish us luck.   Clearly we need it.


Thursday, January 2, 2014

Hidden Opportunities

We lost one of our hives early in December and since there's really nothing to do with it until things get warmer, I just covered the entrances and let it be.  But when my sister and her family came last week, I realized that a winter deadout is a fantastic hidden opportunity to teach people, especially kids, about bees.

First off, I knew for a fact the middle hive was a deadout because Lily and I had already opened it to make sure a few weeks ago.  We thought the nuc was a deadout too and had opened it only to find that not only was it alive, but defensive.   On this day, we left the nuc completely alone and opened only the hive I knew was already dead.


The day was cloudy and in the lower 50s.  We did see a couple of bees from the big hive come out for exercise.  I had the boys put their ears to the back of big live hive and then I knocked so they could hear the hum.  

Then we opened the deadout.  We showed them propolis and how the bees had sealed up all the cracks. 

We talked about how winter bees are all girl bees and how they kick the drones out when it gets cold but the queen lays more when it starts getting warmer.   We talked about how drones don't have stingers. 

The boys got to hold dead bees.   They thought that was really cool.  I showed them how fuzzy they are and where the stingers were and that an insect has three parts:  a head, thorax and abdomen.   

We showed them how the cluster was arranged like a ball in the hive and then we pulled out a frame with bees on it and show how they were arranged in the cells and over the cells to make the cluster.   We looked for the queen but couldn't find her.   We did see dead brood and showed them the capped brood under the bees.

Eric explained how when bees are born they start out as nurse bees, then progress to foragers and finally water carriers.  

I pulled out a frame of honey and cut some off so everyone could taste it.   The wax was crispy from the cold, but the honey was gooood.

We showed them the pollen stores and some unfinished nectar and the capped honey and a couple of places where the caps were shredded and honey must have been robbed out.  We talked about how bees make honey from nectar.

They wanted to know what killed the bees, so we talked about varroa and Eric pulled the bottom board so we could show them a few.   We talked about how a varroa on a bee is like a tick the size of your fist on you, passing on diseases like Deformed Wing Virus and that those things will weaken a hive so it won't make it through the winter.  

We talked about where the hive entrances are and how you stay in the back of the hive when you check things.   They asked tons of questions and it was one of those times when you can see learning happening.     I think from now on, whenever I have a deadout I'm going to make a point of inviting people over to look it over.   It's a great way to teach people about bees.


Thursday, September 26, 2013

Early Autumn Beehives


I like the look of the beehives surrounded by some of our goldenrod.  You can't tell from the pic, but there's a nicely mowed clearing where the hives sit.   I was tickled to see this view from a distance away and down the hill from the hives - off on a side that I usually don't see the hives from.


The hives smell terrific this time of year.   Goldenrod honey - fall honey - has a strong, distinctive odor that you can smell several feet away from the hives.   I love that smell.   

Monday, September 16, 2013

Honey Peach Thyme Glaze

I saved a few peaches back to try a  new recipe and was very happy with how it turned out.

This glaze is sweetened with honey instead of white sugar and the thyme perfectly compliments the other flavors.   I'm thinking this would be fabulous on a slow roasted pork shoulder cut.  Mmmm.


Honey Peach Thyme Glaze
www.rurification.com

4 cups peach chunks
2 sprigs thyme
extra water if necessary so the fruit doesn't stick
4 tablespoons low sugar pectin
1 cup honey

Heat the peaches, thyme, pectin and water to a full rolling boil that can't be stirred down.  Boil hard for one minute.  Add honey.  Return to full rolling boil. Boil hard for one minute.  Remove thyme sprigs.

Ladle into clean jars and cover with clean lids and rings.  


Note:  I left the peaches in chunks, but if you want a smoother consistency, you can puree the peaches before you start.

Happy glazing!

Thursday, September 12, 2013

Lemon Honey Tea Concentrate

I love all sorts of lemon pickles and preserves.   The top shelf of the fridge and sometimes the window sills are crowded with lemon pickles in various stages of fermentation and preservation

So I was kind of excited to see another type of lemon preserve over at the blog Twenty Two Pleasant.   [It's a lovely blog with some of the best photography I've seen in a blog.  It'd be worth your while to click around and look at her gorgeous pics.]

Twenty Two Pleasant made Lemon Honey Tea Concentrate after she saw it here and it was so beautiful and sounded so good that I had to try it, too.   All you do is slice up lemons, put them in a jar and pour honey over them.  If you like ginger as much as I do, you can add some thin slices of ginger to the mix, too.

After a time, the honey and lemons meld into a jam-like consistency which you can use as a lemon tea concentrate by putting a spoonful in a mug and then pouring hot water over it.    Easy squeezy.

Generally, lemon pickles take a few weeks to do their thing, so start now and be patient.    By the time cold weather hits, it'll be ready to dip into.  Honey is anti-bacterial and that combined with the high acidity in the lemons makes this an almost fool-proof preserve.   As the lemons do their thing, they'll start to float.   That's normal.  

You can bet that I'll have a few jars of this stuff around all winter long.   Mmmmm.

Sunday, August 18, 2013

Honeyed Onion Garlic Jam


Last year I made some fabulous Onion Garlic Jam.   I added bacon to it and had some super fabulous Bacon Onion Garlic Jam.   It was to die for.    Lily and I loooooved it and pretty much ate all of it ourselves.   *burp*   And did not regret one tiny mouthful.    

It's heaven.  


This year I decided to make some more only instead of using the white sugar, I wanted to sweeten it with honey.    Mmmmm.    It is fantastic!   So, here is a recipe for Honeyed Onion Garlic Jam with no white sugar.  Yay!

Honeyed Onion Garlic Jam
www.rurification.com

  • 2 large onions [the sweeter the better], sliced
  • 1 full heads of garlic, peeled.
  • 2 T butter
  • 2 T oil
  • 2 T balsamic vinegar
  • 1/2 cup white wine vinegar.   I use my own.
  • 1/2 cup honey
  • 3 T real maple syrup.  I use my own.
  • dash of pepper
  • 1/4 tsp salt 

Cut the onion up in thin slices, then cut the slices down in length to a couple of inches.  I like that texture in the finished product. 

Don't mince the garlic.   If you leave them bigger, you can use them as a gauge to see how done things are later.  When the onions are truly caramelized, everything will be very very soft and fall apart when pressed with a spoon.  This is easier to see in the garlic cloves.  Let them be your guide.

Put the butter, oil, onion, garlic and balsamic vinegar in a heavy pan on low.   I have a 1-10 range of settings on my stove and I put it at between 2 and 3.    Cook the onions and garlic until they are caramelized - at LEAST an hour or more.  My last big batch took 4 hours because I did a huge batch all at one time. 

Make sure things are soft and falling apart!

To your lovely brown mix of caramelized goo, add the vinegar, honey, maple syrup, salt and pepper. You can turn the pan up to medium heat while you cook this down to the consistency you want.   When you drag a spatula along the bottom of the pan, you should see some space behind it before the juices gather round again.  Once you see that space, then it's done.   It will thicken up a lot when it's cold.

You can steam or water bath can this jam to keep it long term.   10 minutes for jellies.  

Want to turn this into Honeyed Bacon Jam?  While the onions are caramelizing, cut 4 slices of raw bacon short-ways into 1/2 inch or smaller pieces.  Fry it up until crisp.   Let it drain on a paper towel until it's cool.  Once it's cool, crumble it into bits.  When the rest of the jam is done, add the bacon to it and stir it up well.  Since Bacon Jam has bacon in it, don't try to can it.  Just keep it in the fridge.  Trust me, it won't last long anyway. 

Sunday, April 14, 2013

Swarm Trap

I had a lot of frames with a bit of honey from the hive that died, so I saved three of them to put in a swarm trap.    I'm using a nuc from Kelly as a trap.   Three frames with a bit of honey, two empties and some lemon grass oil on a piece of paper in the bottom.

It's a luxury condo for bees.   They'd be crazy not to move in.  The first warm days we had and my bees were all over this thing robbing it out.   I hope a swarm finds it.

The truth is, swarm traps are kind of a crap shoot.    I have the nuc, I have the lure, I have the extra frames.   So we figured we'd try it.   We're not holding our breath that we'll get a swarm this year.

That said, our chances of getting a swarm are much greater if we actually set out a trap, so we're better off with this than nothing at all.

Eric put the trap about 8 feet up in a honey locust near the house, on an old deer stand.   We'll be able to see it easily from the house.   The warm days that we've had have seen bees all over it.  It must smell really good.

Fingers crossed we get some good feral bees in there. 

Thursday, April 4, 2013

Honey Almond Butter Cookies


Here's another great recipe using honey instead of sugar.  It's a classic peanut butter cookie recipe only made with almond butter instead.  Mmmmm.

If you haven't tried making your own almond butter, now's the time to try it.  It's easy.  

Really.   Mmmmm.

These cookies are quick and delicious and the dough can be made ahead and refrigerated for later.


Honey Almond Butter Cookies
www.rurification.com
  • 1/2 cup butter, soft
  • 1/2 cup almond butter
  • 3/4 cup honey
  • 1 egg
  • 2 3/4 cup flour
  • 1/2 tsp baking powder
  • pinch of salt
Heat oven to 375 degrees.   Grease a baking pan.

Sift together the flour, baking powder and salt.  Set aside.   Mix other ingredients in a mixer.  Beat well.   Stir in dry ingredients.    Form dough into balls.  Flatten with a fork or the bottom of a glass.

Bake for 10-12 minutes until blonde, but not brown. 


If you don't have almond butter, these would be good with peanut butter instead.

Tuesday, April 2, 2013

Deadout Honey Harvest

Our deadout had a lot of honey still in it and even though we opened up the hive for the bees from the lang to rob it out, the weather was weird and the bees were just as interested in their own sugar supply upstairs in their own dry hive and they mostly left the deadout alone except when it was really warm, which it hasn't been.

So I took three frames of honey and pollen from the deadout and put them in the lang and then decided to harvest the rest of the honey in the deadout ourselves.

In March.

When it's cold outside.   Snowing even.

People who know suggest that the best temperature to harvest honey is around 90 degrees.

Hahahahaha!   HAHAHAHAHA!   I laughed in the face of our 30 degree outdoor temp and 65 degree indoor temp. 

And then I crushed all the comb and put it in big pans in the oven, set on the lowest temp, which happens to be 170 degrees, which is warmer than 65 degrees.   And I let it warm up. 

While it warmed up, I set up the new bucket and double sieve unit that I got us for Christmas from Betterbee.com.  It cost about $65.

The sieve has two parts - the top one sits inside the finer one which has props to keep it up on the bucket.   I loved that.


The 6 gallon bucket has a gate at the bottom to let the honey out when it's all done filtering.

We were hoping that this would be a lot easier than the way we did our first harvest in October.

Because that was kind of a mess.   And time intensive.   And labor intensive.   


Crushing was no problem, but the trick was to keep it warm while the honey was actually straining out of the comb and to do that, Eric rigged a sunlamp to shine on the stuff in the strainer.

We took the warm comb out of the oven and piled it in the strainer and let the light shine on it.

The heat system worked like a charm.   A charm, I tell you!   It kept things just warm enough to flow easily.

Then we walked away and did other stuff while it strained.

A miracle.  


As the honey strained, we added more of the crushed comb until all that was left was a big pile of wet sticky comb.

So we put a plastic lid on it from a gallon bucket for ice cream, then covered that with a big plastic grocery bag and put 2 nice 7.5 lb weights on it overnight. 

In the morning the honey was pushed out and it was ready to bottle.

Using the gate on the bucket was fabulous.   It went fast and was not messy at all.   Once it was all empty, it cleaned up quickly and easily.

This was seriously the best honey money we've spent so far.    I was able to do most of the harvest by myself and able to do other things while it strained.   So much less work than the first time.  

We harvested 14.5 lbs of honey this time.   I didn't swear once.  

I highly recommend something like this for the hobbyist beekeeper.   If you're harvesting honey from just a hive at a time or so, then this works great.

One thing I wish was that the strainer fit over the whole bucket so you could invert one bucket over the other and let it sit overnight.   As it is, I think we can pack a gallon ice cream bucket with warm crushed comb and it will fit right in the strainer upside down to drain by itself [if we line the bucket with plastic and put holes in the bottom of it so air can suck in as the honey goes out - so a vacuum doesn't form.]


Friday, February 8, 2013

Honey Mustard


A couple of days ago I told you how I made mustard this year.    I took that mustard and decided it needed some honey.   Lots of honey.   

I made honey mustard.     It's .... beyond anything [Name that movie.]  Not too hot, not too sour, not too sweet.   Mmmm.

Here's the link to the post from a couple of days ago that explained how I made the mustard.  Go there if you need to see what I actually did. 


Honey Mustard
www.rurification.com

1/4 cup mustard seeds
1/2 cup white wine vinegar
6 Tablespoons honey.

You might need to soak the seeds in the vinegar for a day to soften them.  Blend well.  A stick blender works well to grind it - stop when it reaches the consistency you want.   Let sit for a day to meld the flavors.  


Thursday, January 31, 2013

Honey Vanilla Orange Marmalade

We got a bit of honey from our bees last year and I thought it would be nice to pair it up with some orange marmalade.   And then I thought I'd jazz it up a bit more and add a vanilla bean.

Hello, Sunshine!    This is a brilliant improvisation on the marmalade theme.  It was easy, too.


Honey Vanilla Orange Marmalade
www.rurification.com

4 oranges, sectioned and zested
1 cup water
1 cup honey
1 cup sugar
1 vanilla bean [or a half if you want more honey flavor to shine through]

Zest the oranges first and boil the zest in the water and honey while you're sectioning the rest of the fruit.  Cut the vanilla bean in half and slice up the half to release the seeds.  Put all of the ingredients together in a large pot and boil until it reaches 220 degrees or the gelling temp you need for your altitude [see my Jam page, tab above, for that information.] Remove the vanilla bean.   Ladle into jars.   Process 10 minutes for canning. 


Note:  You can keep that vanilla bean and use it again, or you can drop it in a jar of sugar and let the sugar absorb the flavor.   That's what I do.   That sugar makes some amazing cookies.   And is great in tea.   Or in another batch of jam - like strawberry.  Mmmm.


Want the recipe for this Marmalade and a whole lot of other terrific jam recipes?   Check out my ebook:  A Simple Jar of Jam  at www.rurification.etsy.com.   You can preview the book by clicking the link on the sidebar.  Every purchase helps support this site.  Thank you!


Thursday, October 18, 2012

Honey Harvest

I told you before that it's common for bees to rob other hives during this time of year. Given the prevalence of Pirate Bees around here, we decided to pull the supers and condense the hives for winter.

First, we went through the hive bodies and removed the few empty or mostly empty frames down below and subbed in the honey filled frames from the super. Our goal was to have 100-150 lbs of honey in the hives as they prep for winter, per Michael Bush's advice.

The Tardis is a nice hive with a lot of bees. It is a horizontal hive body, 22 frames wide, mostly full. In addition, it had 15 frames in the supers with comb and honey, many of them not fully drawn out. We pulled 1 empty and 1 partial from the bottom box and put in two full frames of uncapped honey from the super to make sure they'd be full up for the winter, but to also give them something to do - finish it off and cap it - before it gets regularly cold.

The Lang had fewer bees and a few more empties in their 2-deep hive body.   [That's two deep boxes stacked on top of each other.]  They had not drawn any comb in their super, so we shared frames with the Tardis.   We subbed the empties in the Lang's hive body out for full ones from the Tardis's super.

Note: The frames in the supers are mediums - shorter than the deeps in the hive bodies. It's not a big deal. A medium full of nectar is still way more than an empty deep and when they're done cappig that, they'll draw comb off the bottom of the medium so that it'll be the same length as the other frames.

In the end, after packing the hive bodies of both hives with full frames, we had frames left with harvest-able honey on them.

Which means....we harvested our first honey from the hives at the beginning of this month. We got about 10 medium frames of honey. Most of them weren't full so our total take after extracting was about 23 lbs. This is what how it went:

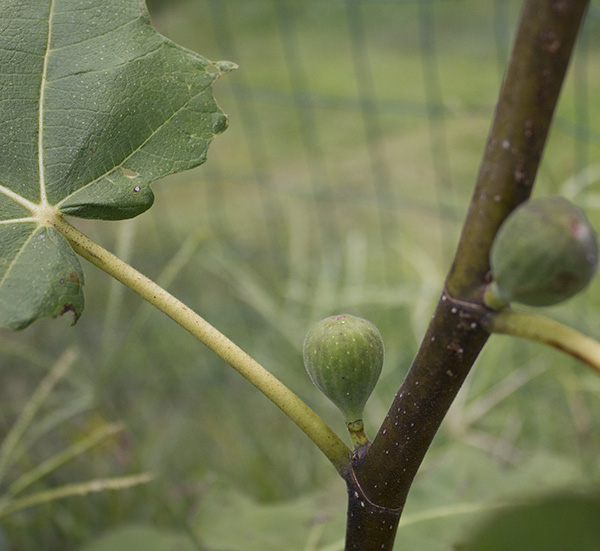
We waited until after a few frosts to pull the supers because we hadn't used a queen excluder and they were raising drones in several spots in the supers. Once it frosted a few times, they reduced the brood cluster and pulled the drones all by themselves and filled up the old drone comb they had drawn with honey. I was greatly relieved. [And the truth is, I hadn't even thought of it until we opened things up and the drones were gone. I was glad we waited to pull the supers.] We will definitely do it that way from now on.

Once we pulled the supers off, we had to hide the frames from the bees, which immediately moved in and started robbing. They'll do that.

I took each frame to the front of the hive and brushed/knocked off the bees, then speedily left the hive area and took the frame to a large clear plastic box with a lid. The box was big enough to hold the frames upright with room to stack a couple extras on top. We chased the bees away and got the frame under the lid as fast as possible. It was a good system and we ended up with only 6 bees in the box in the end. It was easy to get them out before we took it in the house. Mostly, they couldn't wait to get out of the box and were happy to zoom away as soon as we opened the lid.

Once we got all the bees out and the frames in the house, we decided to heat the oven a bit, then turn it off and then turn the oven light on. The oven light will keep the oven at around 90-95 degrees - perfect for honey extraction.

I loaded my monster roaster up with frames. It's big enough to fit 5 frames in upright. The light kept them nice and warm.

Then we got a hair dryer and warmed up the pan we crushed in and the pot we strained in.

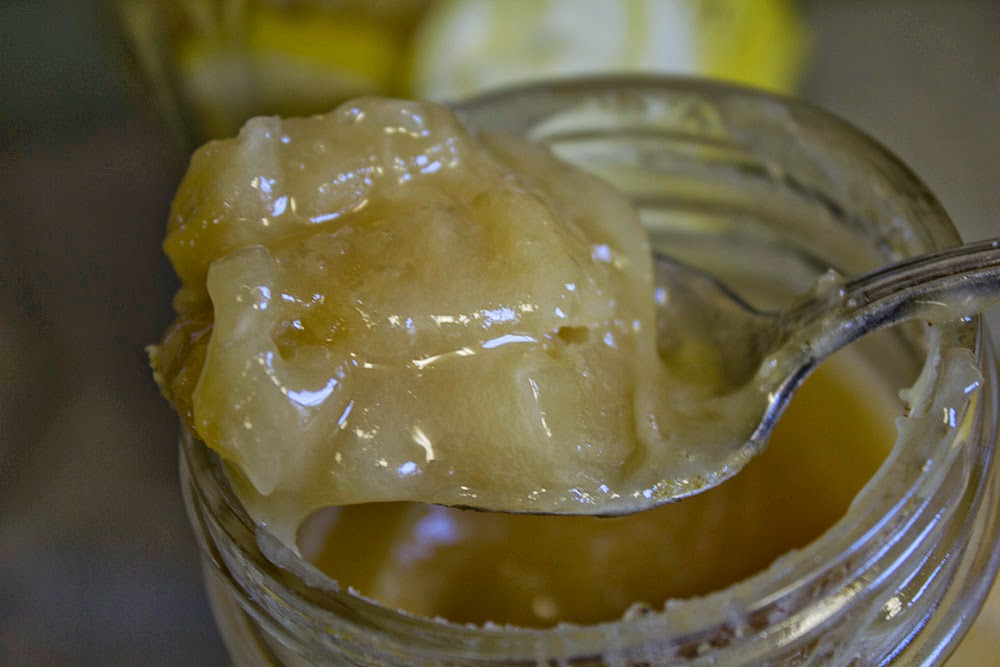
Crushing was easy. I cut the comb out of the frames into my biggest pyrex roasting pan and crushed it with a large pestle. Easy.

It was awesome.

It was sticky.

It was really, really sticky.


Straining was not easy. Since we've never done this before and since extracting equipment is not cheap, we did everything by hand with what we had around here. Nothing fancy.

Now we understand why people invest in extracting equipment.

Basically, this is what we did. I do NOT recommend doing it this way yourself unless you want to spend all day...All...Day...extracting honey and still end up leaving too much in the wax.


We lined the chinois with cheesecloth, then put the crushed comb inside. Then we twisted it closed and squeezed and squeezed and used the chinois mallet to squeeze more....all the while heating things up with the hair dryer.

It took for freaking ever. And even then we didn't get enough honey out.


In the meantime, just to test out other methods, I loaded a narrrow mouth quart jar full of crushed stuff and put a piece of cheesecloth over the top. Then I turned it upside down over a wide mouth quart jar.

It was supposed to drain from the top jar into the bottom jar. And it did. Sort of. About 1/3 a cup, leaving the rest of the quart hanging in the top jar. Then it stopped draining, I'm assuming because it created a vaccuum in the top and the honey was too thick to let the displaced air from the bottom up into the top. So that was an epic fail.

It took us 5 [Five!]  hours to extract the honey from only one super. Not exactly my idea of efficient. Also, we ruined 4 cheesecloths. Also, we got wax stuck in the bottom of the chinois, which had to be boiled out later. Also, we got honey everywhere.

Everywhere.

As in EVERYWHERE.  Because honey just does that.

The good news is that honey cleans up easily.

Next year, assuming the bees survive the winter and that we get more honey , we'll get the glorified bucket system that they have at Walter T. Kelly.

It's still a low budget solution and much cheaper than these bigger extractors:

Next year, we'll crush all the comb, and put it in buckets. Then we can strain it a bucket at a time, overnight with some weights on the top to really squeeze it out. And I can sleep at the same time, which seems like a much more efficient use of my time.

The good news is that we did get a harvest this year and we learned two ways not to strain honey. The bad news is that I learned that lesson in the first hour and we still had another 4 hours to get the job done. No fun..

The last thing was did was render all of the extra wax in the crockpot as we strained and that totally worked.  I'd been saving any burr comb trimmings in the freezer all year.   We just put all the wax pieces in the crockpot with 3 cups of water and turned it on high.   When it all melted, I strained out the floating stuff and then poured it through a double layer of heavy duty paper towels secured over a plastic sour cream container.    I let it all cool.   There was a thin layer of leftover wax on the water in the crockpot and a lovely layer of strained wax under the paper towels in the bowl.    We lost a little wax in the process, but ended up with a couple of nice hunks to use in salve this winter.

Next goal: Overwintering.   We'll keep you posted.
Related Posts Plugin for WordPress, Blogger...