Showing posts with label plants. Show all posts
Sunday, May 26, 2013
Elderberry Progress
All six of my elderberry starts are alive. This is the happiest one. We planted it just up from the chicken coop at a place that gets a lot of run-off from the hills in the spring and then the veg garden all summer.
I think it likes it there.
Labels:
berries,
cuttings,
elderberry,
fruit,
garden,
plants,
vegetables
Monday, September 26, 2011
Eupatorium - Part 3
![]() |
| Boneset |
They are very similar from a distance but there are easy ways to tell them apart.
Eupatorium perfoliatum - boneset- is generally a rougher looking plant, but you can really only tell that if you're very familiar with the two varieties or if they happen to be close to each other.
![]() |
| Boneset leaves |
They're not going to be close to each other because their habitats are significantly different. Boneset likes open places and plenty of sun; White Thoroughwort likes shade.
Boneset is a taller plant. It gets about 36 inches tall if it's happy. The ones around here are typically 30 - 36 inches.
Tradition has it that boneset is called that because it was actually used to help bones heal.
Here are pics of boneset. White flowers. Look closely at how the leaves grow around the stem in the pic on the right. It looks like the stem is growing right through the leaves. Remember the Latin name - perfoliatum? That means 'through the leaves'. 'Per' = through. 'Foliatum' = leaves.
![]() |
| Eupatorium album |
Now, here is the pic of White Thoroughwort. It's much daintier plant. They are shorter, from 18-24 inches around here.
Notice that the leaves are heart shaped. They are opposite [the pairs are opposite each other on the stem] but the leaves have stems and the main stem of the plant does not look like it's growing through the leaves at all.
Here's some more plant Latin for you. Album [or alba] = white.
And here's some plant Old English for you. Wort = plant. You'll see a lot of the common names for wildflowers have 'wort' in them. It's the Old English word, originally 'wyrt', for 'plant'. The theory is that it came from an even older Indo European word - wra:d.
Now you know.
Labels:
plants,
wild flowers
Tuesday, September 13, 2011
Sumac
![]() |
| Winged sumac bob |
The branches bloom and form dense clusters of red berries, called 'drupes'. The name 'sumac' comes from the Old Arabic word for 'red'. The cut branches make a beautiful fall arrangement that will dry on its own and last for months. The dried drupes have been used throughout the world as a cooking seasoning [sumach] and they are very popular in middle eastern cooking. We harvest the drupes to make the best lemonade you can imagine.
There are three common varieties of sumac here: Smooth sumac [Rhus glabra], Winged sumac [Rhus copallina] and Staghorn sumac [Rhus typhina]. Staghorn stems and drupes are covered with fine velvety hairs. Winged sumac has little wings that grow up along the twigs between sets of leaves. Smooth sumac is .... smooth. No hairy stems or drupes. The red drupes of the smooth sumac are often covered with a milky or waxlike substance - it's delicious!
Note: A lot of people freak out about these plants, believing that all sumac is the poison sumac. Poison sumac has white or gray berries - 'Berries white, take flight!'. Not red berries. Not red berries covered with milky wax. It's easy to tell these plants apart. Really easy.
![]() |
| Winged sumac with bobs |
Smooth and winged sumac drupes are often waxy or covered with a milky substance. The best flavor is in that wax but it's tricky to get it dry enough to store. Be patient. Keep them in a very dry place.
Lemonade. Our favorite way to use sumac is in lemonade. Here's how:
![]() |
| Sumac bobs soaking for lemonade |
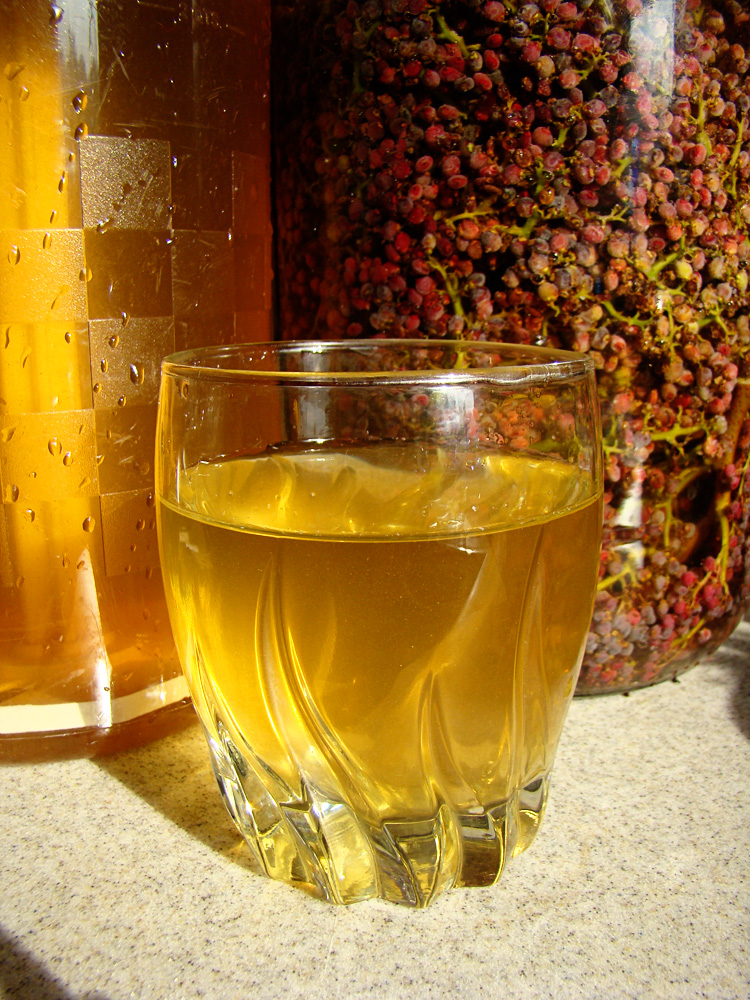
Pack the bobs into glass gallon jugs - pack them tightly. Fill with cool water and set them in the sun for a few hours. If the weather is cool and cloudy, then use lukewarm water and soak them overnight.
Note: Do NOT fill the jars to the top. As they soak, the bobs release bubbles and the jar will overflow if the water level is too high. You might want to put the jar in a dish to catch the overflow.
After a few hours, the water will be a beautiful light amber color. Strain the water through a fine mesh tea sieve as you pour it out of the jar. It will be cloudy for a while. Don't worry about that. We got just over 2 quarts of juice from each of these jars.
Add 1 to 1 1/2 cups of sugar to sweeten [to taste]. Stir well and enjoy. This is the best lemonade ever. I much prefer it to regular lemonade.
![]() |
| Sumac lemonade |
Concentrate: To concentrate the juice, soak a gallon of bobs the first day, then use that same water to soak another gallon of bobs. Remember, the longer you concentrate, the more likely you are to introduce bad stuff into the water. I don't concentrate unless I'm going to cook with it and it will be pasteurized in the cooking.
Canning. I have tried to can sumac juice so that I wouldn't have to use my scarce freezer space for juice. I concentrated the juice, then I boiled it and put it into jars and processed them for canning. It worked beautifully - but the flavor was changed in a significant way. I don't like the cooked juice nearly as much as I like the fresh juice. If I want to preserve sumac juice, I'm going to freeze it.
Experimenting. I used some of the concentrate to make sumac jelly and to make sumac lemonade bars [with a lemon bar recipe]. In both cases, the wonderful subtle flavor of the juice was lost. The sugar overwhelmed the flavors and the finished product was unimpressive and too sweet.
Other uses. Sumac leaves have a lot of tannin in them. Rumor has it that they're good for dyeing and will give either a yellow dye or grey dye depending on the fiber and mordant. Someday soon, I'm going to use the berries to dye with. I'll let you know how it turns out.
Labels:
food,
plants,
recipes,
sumac,
wild flowers
Sunday, July 17, 2011
Swamp Rose
We live in the southwest Indiana highlands. That means that there are actual hills where we live, unlike in northern Indiana, where I grew up, and where it is so flat that you can see from South Bend to Chicago unless it's planting or harvest time and the tractors and combines are in the way.
Though we do have hills down here, we don't have lakes. Naturally occurring lakes do not exist in Indiana, I was told in a limnology class, though we have lots of man made ones. Thank heaven for the man made ones. Even though we don't have lakes, we have plenty of wet land. And we have plenty of wetland plants.
My favorite is rosa palustris, the swamp rose.
Here's one that showed up by the small creek. It's a small one.
These babies love wet places and in our Squishy Meadow, one has grown to more than 20' x 30'. Pic below.
That is a single giant rose. Or maybe a colony. I don't know what the correct term is.
There's one down the road in the middle of a beaver pond that is even bigger. Really.
They have single pink flowers that smell delicious - lighter and more citrus-y than damask roses. I much prefer their fragrance over the bottled 'rose' fragrance.
So, there you have it. A rose to know.
Though we do have hills down here, we don't have lakes. Naturally occurring lakes do not exist in Indiana, I was told in a limnology class, though we have lots of man made ones. Thank heaven for the man made ones. Even though we don't have lakes, we have plenty of wet land. And we have plenty of wetland plants.
My favorite is rosa palustris, the swamp rose.
Here's one that showed up by the small creek. It's a small one.
These babies love wet places and in our Squishy Meadow, one has grown to more than 20' x 30'. Pic below.
That is a single giant rose. Or maybe a colony. I don't know what the correct term is.
There's one down the road in the middle of a beaver pond that is even bigger. Really.
They have single pink flowers that smell delicious - lighter and more citrus-y than damask roses. I much prefer their fragrance over the bottled 'rose' fragrance.
So, there you have it. A rose to know.
Labels:
flowers,
plants,
wild flowers
Sunday, June 26, 2011
Road Trip - Michigan: Wetland
Every morning, a very large bunch of turtles slides up on the shore of the neighbor's sea wall to sun. They stay there all day unless there's a lot of boat traffic back and forth along the channel.
The only thing I love as much as birds is plants. And I especially love wetland plants. It's a texture thing.
I could look at these all day long. Some day, I'm going to have a lake house and take long walks every day and sit and paint what I see and I"ll fill my walls with the paintings and be happy just looking at them.
The only thing I love as much as birds is plants. And I especially love wetland plants. It's a texture thing.
![]() |
| Lilies in a garden pond |
![]() |
| Lilies in the lake |
![]() |
| Path along the lakeshore |
![]() |
| Lakeside pool |
![]() |
| Lake house side yard |
![]() |
| Cattails in high water pool |
Tuesday, March 15, 2011
Forcing
I was hoping to do a post on how to force bulbs. You know, one of those posts with beautiful photos, beautiful flowers in beautiful containers, all wrapped up in a Martha Stewart-esque house.
So
Not
Happening
I've decided to give you the pics that I have anyway to illustrate the fact that not everything that I try to do works. Sometimes the project is lame. Sometimes the photos are bad. Sometimes the cat attacks the plants. My life is just as messy as yours.
Here's how to force bulbs:
Step 1: Assemble your pot, bulbs and something to keep the bulbs from moving around in the bottom of the pot. I used sand. You can use dirt, sand, gravel or those cute little glass thingies that go in vases.
Step 2: These are mini tulips. They're supposed to be only 4 inches high - perfect for an indoor pot. Plant them and watch for the green to leap out of the pot. These sprouted little green noses overnight.
Step 3: Wait. This photo is about 2 weeks in. Notice that they are way more than 4 inches high and already starting to flop a bit. Tulips are notorious for flopping. What you can't see in this photo is the end of the leaf that the cat has been eating. I think the cat has exacerbated the floppiness.
Step 4: Ta DA! Flowers. These look a little wild because some of them are dying already and the cat ate some of them. Turns out everyone likes tulips. Deer, chipmunks, cats, people. I read somewhere once that in Holland during the war, people ate tulip bulbs. I have never been hungry enough to try one.
Next year I'll do another post and hopefully it will be more Martha-esque.
So
Not
Happening
I've decided to give you the pics that I have anyway to illustrate the fact that not everything that I try to do works. Sometimes the project is lame. Sometimes the photos are bad. Sometimes the cat attacks the plants. My life is just as messy as yours.
Here's how to force bulbs:
Step 1: Assemble your pot, bulbs and something to keep the bulbs from moving around in the bottom of the pot. I used sand. You can use dirt, sand, gravel or those cute little glass thingies that go in vases.
Step 2: These are mini tulips. They're supposed to be only 4 inches high - perfect for an indoor pot. Plant them and watch for the green to leap out of the pot. These sprouted little green noses overnight.
Step 3: Wait. This photo is about 2 weeks in. Notice that they are way more than 4 inches high and already starting to flop a bit. Tulips are notorious for flopping. What you can't see in this photo is the end of the leaf that the cat has been eating. I think the cat has exacerbated the floppiness.
Step 4: Ta DA! Flowers. These look a little wild because some of them are dying already and the cat ate some of them. Turns out everyone likes tulips. Deer, chipmunks, cats, people. I read somewhere once that in Holland during the war, people ate tulip bulbs. I have never been hungry enough to try one.
Next year I'll do another post and hopefully it will be more Martha-esque.
Saturday, February 19, 2011
Wednesday, February 9, 2011
Plant Guides
I have so many plant guides that I'm going to have to split them up into several posts. We'll start with basic plant ID guides today.
The absolute best wildflower guide is Newcomb's Wildflower Guide. Hands down. Really. I'm not kidding. In order to ID a plant, you have to look at three things first:
One of the most common field guides is Audubon's Wildflower Guide. It's fine, but it's organized by color, then flower shape. Colors are unreliable, especially the pink-purple-blue range. Like all the Audubon field guides, this one has photos of real flowers; however, the photos don't always show leaves and leaves are a very important part of plant ID. We still use this guide, but only as a support to Newcomb's.
We also have the Peterson Field Guide to Medicinal Plants and the Peterson Field Guide to Wildflowers. I don't know if they're good or not because I don't ever need them.
For trees, I use the Audubon Field Guide to Trees and I like it well enough that we've never bothered to get another one. It's divided into leaf types. There's also a section on flowers, seeds, cones, fruit and fall color. Focus on the leaves, go to that section of the photos, find your tree and look it up. I've always found what I've been looking at.
Since we have plenty of mushrooms around here and some of them are edible, we picked up a couple of mushroom guides as well. We like the Audubon Field Guide to Mushrooms very much. They make it very clear which ones are poisonous and just how poisonous they can be. We gather chantrelles with confidence and our kids can use the guide well enough to know what not even to touch.
The absolute best wildflower guide is Newcomb's Wildflower Guide. Hands down. Really. I'm not kidding. In order to ID a plant, you have to look at three things first:
- the flower type [4 petals, 5 petals, oddly shaped, etc.]
- the plant type [no leaves, basal leaves, vine, etc.]
- the leaf type [entire, toothed, etc.]
One of the most common field guides is Audubon's Wildflower Guide. It's fine, but it's organized by color, then flower shape. Colors are unreliable, especially the pink-purple-blue range. Like all the Audubon field guides, this one has photos of real flowers; however, the photos don't always show leaves and leaves are a very important part of plant ID. We still use this guide, but only as a support to Newcomb's.
We also have the Peterson Field Guide to Medicinal Plants and the Peterson Field Guide to Wildflowers. I don't know if they're good or not because I don't ever need them.
For trees, I use the Audubon Field Guide to Trees and I like it well enough that we've never bothered to get another one. It's divided into leaf types. There's also a section on flowers, seeds, cones, fruit and fall color. Focus on the leaves, go to that section of the photos, find your tree and look it up. I've always found what I've been looking at.
Since we have plenty of mushrooms around here and some of them are edible, we picked up a couple of mushroom guides as well. We like the Audubon Field Guide to Mushrooms very much. They make it very clear which ones are poisonous and just how poisonous they can be. We gather chantrelles with confidence and our kids can use the guide well enough to know what not even to touch.
Subscribe to:
Posts (Atom)