Showing posts with label foundation. Show all posts
Friday, March 14, 2014
One Wall Up
The first wall of the new construction is up. Eric built the wall flat on supports at 'floor' level inside the new addition and then stood it up. Then he end nailed it in.
That's what the very tall unit in front of the wall is for. He ran a rope from a tree, up and over the 'crane' and tied it off to the top of the wall, then hoisted it that way.
The crane is bolted to the rim joist in front of the room and there were three extra 2x4 supports so that the thing wouldn't pivot under the load.
It worked like a charm. Eric did most of the lifting, then I steadied the rope while he pulled the slack out of the last little bit to finish raising it. We'll have to do that for a couple of the other walls that are built in places where the foundation is too tall to build on the ground next to the house.
You can see how much higher the new floor will be compared to the old 'sunken' living room. I am greatly looking forward to having a house where all the floors are level and go smoothly from room to room on a floor. Also, I'm looking forward to 8ft ceilings instead of 7ft ceilings.
Yay!! Our first new wall! And just in time for our 25th wedding anniversary today.
Labels:
addition,
crane,
foundation,
house,
raising wall,
wall
Monday, December 9, 2013
House Update

The sill plates are on the foundation. They'll need some sealing up, maybe some extra caulking and then we can build walls.
Walls!
Next: Remove the old aluminum siding from the west side of the house.
Labels:
foundation,
house,
sill plates
Tuesday, November 19, 2013
Finished Filling the Moats
We finally finished filling the moats.
Halleluia. Or however that's spelled.
It took about 8 tons of gravel to do the east side and the drainage into the front yard.
Which means it took about 15 tons of gravel to fill things so far.
We moved it all by hand. In two days. Please be impressed.
These are pics of the drainage from the house into the yard. Luckily there's a good slope down to the road from the house, so the moats got much shallower and faster to fill as we moved forward. We thank heaven for small favors.
Labels:
drainage,
foundation,
gravel,
moat
Saturday, November 9, 2013
Sealing the Foundation
As you know, we're working on a big foundation project. Here's a recap, if you're interested.
The next step in our foundation project is to give it some moisture protection. There are a lot of options out there for that and Eric finally decided that we'd do two things.
1. Install a moisture barrier. There are a number of options for this, and in the end we went with a layer of Platon.
2. Improve the overall drainage next to the foundation and direct it away from the house. We laid drainage tile when we finished the footer. We had talked about laying another layer of tile next to the foundation, but the Department of Redundancy Department decided that was unnecessary. So, we decided to put in loads more gravel next to the foundation.
Platon is the same kind of stuff you can use between a concrete slab and subfloor. It has bumps that keep a layer of air between the plastic and the concrete.
Eric attached the Platon to the foundation with ceramic coated washer head screws.
Then we hauled gravel. And hauled more gravel. And hauled more gravel. In a day, the four of us were able to finish and fill one whole moat on the west side of the house.
Tibby is a little sad that she can't hide in the moat anymore. It kept her away from the horseflies and out of the wind. She's moved back into her dog house.
The next step in our foundation project is to give it some moisture protection. There are a lot of options out there for that and Eric finally decided that we'd do two things.
1. Install a moisture barrier. There are a number of options for this, and in the end we went with a layer of Platon.
2. Improve the overall drainage next to the foundation and direct it away from the house. We laid drainage tile when we finished the footer. We had talked about laying another layer of tile next to the foundation, but the Department of Redundancy Department decided that was unnecessary. So, we decided to put in loads more gravel next to the foundation.
Platon is the same kind of stuff you can use between a concrete slab and subfloor. It has bumps that keep a layer of air between the plastic and the concrete.
Eric attached the Platon to the foundation with ceramic coated washer head screws.
Then we hauled gravel. And hauled more gravel. And hauled more gravel. In a day, the four of us were able to finish and fill one whole moat on the west side of the house.
Tibby is a little sad that she can't hide in the moat anymore. It kept her away from the horseflies and out of the wind. She's moved back into her dog house.
Labels:
foundation,
gravel,
house,
platon,
seal
Wednesday, October 9, 2013
The Foundation Pour
Previously on Rurification....
Last fall we dug out the foundation and poured new footers. This spring we put in drainage. We spent the summer putting forms up for the new foundation.
These are the foundation forms on the east side of our house, ready to take the concrete.
Once again, Eric made a couple of mega sawhorses to support the giant chutes. We actually rented a chute extension this time because the foundation forms are a lot smaller space to hit.
The concrete truck showed up at 11am.
We started in the southeast corner. Our tools of choice were a regular garden hoe, long 2x2s, and a bunch of garden shovels of varying sizes.
This pour did not go as smoothly as the last one. The 80 degree plus heat worked against us and even though we were using thinner concrete [5 inch slump], we had to work more slowly and it seized up fast and caused some problems. Our site is a tricky one and the truck couldn't get where it would be easy to pour.

On top of that, these forms were 4 feet or so higher than the footer, so we had much less slope to work with. Gravity is your friend. On this pour day, gravity was on vacation and did not come over to help.
In the end it took much longer and we used a much thinner mix than we had planned. We had to push it by hand and shovel to where we needed it on the west side. It was tricky, strenuous and messy work and it took all of us to get it done. We never panicked and stayed cheerful through the whole job.
We had ordered 8.5 yards of concrete and we used it all. By 4:30 all the concrete was in and we were cleaning up.
Clean up took a long time. We had to spray everything down right away or consign it to yard sculpture status forever.
Concrete is super messy work. All of us looked like this - concrete everywhere, with gloves that were covered in concrete, and globs in our hair. I didn't even bother washing my pants. I just took them off and threw them away.

We are so relieved that this part is done. Woo-Hoo!!
Next steps:
Last fall we dug out the foundation and poured new footers. This spring we put in drainage. We spent the summer putting forms up for the new foundation.
These are the foundation forms on the east side of our house, ready to take the concrete.
Once again, Eric made a couple of mega sawhorses to support the giant chutes. We actually rented a chute extension this time because the foundation forms are a lot smaller space to hit.
The concrete truck showed up at 11am.
We started in the southeast corner. Our tools of choice were a regular garden hoe, long 2x2s, and a bunch of garden shovels of varying sizes.
This pour did not go as smoothly as the last one. The 80 degree plus heat worked against us and even though we were using thinner concrete [5 inch slump], we had to work more slowly and it seized up fast and caused some problems. Our site is a tricky one and the truck couldn't get where it would be easy to pour.

On top of that, these forms were 4 feet or so higher than the footer, so we had much less slope to work with. Gravity is your friend. On this pour day, gravity was on vacation and did not come over to help.
In the end it took much longer and we used a much thinner mix than we had planned. We had to push it by hand and shovel to where we needed it on the west side. It was tricky, strenuous and messy work and it took all of us to get it done. We never panicked and stayed cheerful through the whole job.
We had ordered 8.5 yards of concrete and we used it all. By 4:30 all the concrete was in and we were cleaning up.
Clean up took a long time. We had to spray everything down right away or consign it to yard sculpture status forever.
Concrete is super messy work. All of us looked like this - concrete everywhere, with gloves that were covered in concrete, and globs in our hair. I didn't even bother washing my pants. I just took them off and threw them away.

We are so relieved that this part is done. Woo-Hoo!!
Next steps:
- seal the foundation
- finish the drainage [fill in the moat]
- rebuild the front deck so we can use the front door again
- take the old aluminum siding off the house
- start framing
Labels:
concrete,
foundation,
house
Saturday, October 5, 2013
Prepping for the Foundation Pour

Last fall we dug out the foundation and poured new footers.
This spring we put in drainage.
We spent the summer putting forms up for the new foundation.
These are PolySteel forms. We got them years ago as leftovers from someone else's building project. Follow the link for a full description of how terrific these are.
Eric spent a lot of time and worry getting these set just right so the foundation would be level all the way around and everything would be prepped for the sill plates to go right on so we can get things under roof before the new year.
Next step: Pouring the foundation.
Labels:
forms,
foundation,
polysteel
Wednesday, May 1, 2013
Foundation Progress

As you know, we're working on our foundation. Last fall we were here. Ginormous moats around the house.

Then we poured the footer. [That's K2 checking the level. It looks like she's doubling up in agony, but she's not.] We learned a lot about concrete.
Then we had winter. The Long Winter in which we got actual snow a lot of times and it like to never got warm again.
And the sides of the moats caved in some on top of the footers. It was a pain.
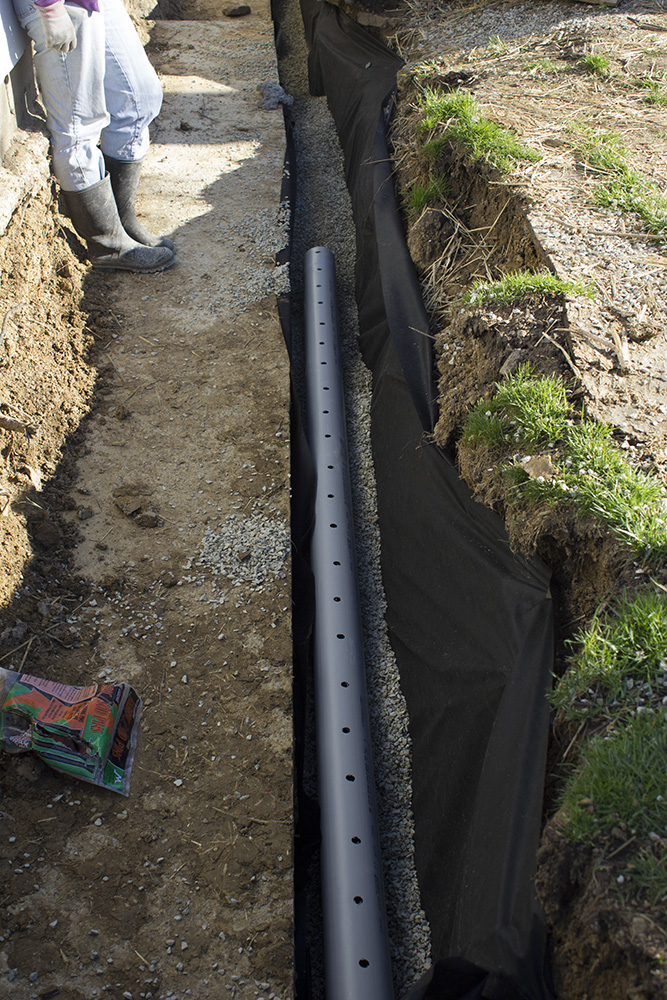
But then it got warm and we dug the new collapsed dirt out and put some drainage in next to the new footer. Because we're responsible home owners and we Never. Want. To do. This. Again. Ever.Ever.
In this pic you can see the new dirt on the footer in the left of the hole. We lined the rest of the hole [the right side of the hole] next to the footer with geotextile to inhibit root growth around the drainage.
Roots are not your friend. Unless you're gardening, but this, my friends, is not gardening.

Anyway. Next we put a layer of gravel in the bottom of the hole and then laid drainage tile on that.
Since there was quite a change in elevation, we stepped the drainage down at the 'steps' with 45 degree joints. We glued everything. We checked and double checked the level to make sure everything was headed down toward the road.
Then we wrapped the pipe with more geotextile to keep the damned roots out and covered the whole mess with gravel up to the level of the top of the footer.
Pouring gravel into the space was interesting. We could have just dumped in on the footer and raked it into the pit, but rakes put holes in the geotextile and we wanted No Holes.
So Eric grabbed a couple of pieces of thin plywood and we put those in the hole and could dump the gravel right in. Most of the time someone stood behind the boards to steady them.
The boards guided the gravel right into the hole and all we had to do was smooth it out. Worked brilliantly for both wheel barrow loads and fast shoveling from places we couldn't get the wheel barrow close enough.
I am thrilled to report that the drainage around the new footer is done. We've got some finessing around one end where it drains to the road, but we're ready to move on to the next stage in the process.
Next stage: Building the forms for the actual foundation.
Following Stage: Pouring the new foundation.
Labels:
drainage,
foundation,
house
Saturday, December 22, 2012
Pouring a New Footer
Earlier this month, on the last few warm days we had in a row, we finally poured our new footer.
You may recall that we've been digging.
And digging.
And digging.
And then digging some more.
Footers are a lot of work.
Once the digging was done, we had to put in the forms so the footer wouldn't fill up the whole hole.
If we were in a place where we actually had drainage, letting the footer fill the whole hole wouldn't be a problem. But we don't have drainage.
We have clay.
Which means we have to install drainage. And if we fill the whole hole with concrete, then we'd have to dig next to it - all the way down! - to put in drainage so that moisture wouldn't collect around the new footer and foundation and cause the same problems we're trying to fix now.
And let me tell you, we're over the digging. Over. It.
So, Eric built forms in the holes to keep the concrete from filling the whole hole, leaving some space on the outside of the footer, so when it's all done, there will be just enough space to backfill with gravel [We love gravel.] and lay some super duper fabulous drainage tiles so that the moisture won't collect around the new footer and foundation and cause the same problems we're trying to fix now.
Then we called the concrete guys and ordered 13 yards of concrete and George came and looked at the site to see if we could get the trucks close enough to the site to use their chutes.
There was good news and bad news.
The good news was that we could get close enough in a couple of places.
The bad news was that we couldn't get close enough in other places. Which meant hauling concrete by the wheel barrow load to where we needed it.
I don't know about you, but the idea of hauling six yards of concrete uphill in a wheel barrow just doesn't sound like my idea of fun. In any universe.
So Eric built a super duper concrete chute out of plywood and 2x4s. And a super duper very tall sawhorse to support the chute as the concrete poured out of the truck's chute onto our chute, then down our chute to the hard-to-reach places in the holes.
Then we crossed our fingers and prayed a lot that it would work because nobody, No. Body., wanted to haul six yards of concrete uphill in a wheelbarrow.
Not even the kids. Weird, huh.
And guess what. It totally worked! The only concrete we had to haul with the wheelbarrow was the last tiny bit of the first load, which had been mixed thick especially for the steps in the footer where it changed levels. Eric moved only 5 wheel barrow loads to the steps on the other side of the house, with Lily spotting and helping support so that the wheelbarrow and all didn't all pitch in the hole when they dumped.
The rest was poured with the chute.
We all helped. Just so you know, one man, one woman and two teenaged girls can pour a footer if they communicate well and are willing to work hard and fast. We hit a couple of tricky spots and both times, the driver of the truck [It took 2 loads of concrete to get it all done] hopped out and gave us a quick hand. [I hope those guys have an extra special holiday!]
Mostly, it went like this: We'd line up the truck chute with our chute. When Eric gave the signal, I shouted to the driver to let it come. Once the concrete hit our chute, K2 and I pulled it down the chute faster with rakes. Lily and Eric raked it and smoothed it in the forms and let me know when to slow and stop. I let the driver know when to slow or stop. When one section was done, we moved the chute to the next section. When we got to the lowest area, the truck could get up close and dump and that went a lot faster. Once the east side was done, there was just enough left in the load to do the steps on the west side. That truck cleaned up and took off.
We had an hour or so between loads. Eric scrambled to get the rebar laid in the west hole and I scrambled to get the new concrete level before it stiffened up too much to move. We had just finished when we heard the 2nd truck coming.
We used mostly 4" slump (more on that in a later post) in the first hole and in the steps on the west side of the house. Because we had already poured the steps on the west side with the thick stuff, it was pretty well set up by then and we could use 6 or 7" slump in the second load. It poured a lot faster and set up a lot slower.
Let me tell you this about working with concrete. You think dirt is dirty? It's nothing compared to concrete.
Concrete is wet and dirty. And it dries you up so that after a couple of hours you're starting to cough and get chapped. But you can't stop working because that stuff starts to cure Right Now and you have to get it level Right Now if you want it level.
And we need it level. So Eric leveled as we poured and then when we had to move the truck to a different area, it was my job to finish leveling, while Eric moved to the next section.
K2 and I worked together to do the leveling. Luckily it only needed to be level, not beautiful.
The bottom section of the east side was easy to level. There were forms on both sides. All I had to do was run a 2x4 across the top and make sure it was full, full, full. Up the rest of the hole, there was a form only on one side. This means there was nothing on one side to prop the board on to get a level. Also, nothing to stand on, on that side.
To be honest, I was afraid I'd fall in head first. The concrete was so stiff already on the east side that it wasn't a problem. I laid big boards and plywood on the concrete and floated [rafted] backward as I smoothed. The west side was wetter, but I had some experience by then. Once I got in a groove, it worked well and in the end, it's all good and level. It rained for the next 3 days and there is only one place that's about a 1/4 inch low on one side. Nothing to fret over.
It needed to stay above freezing for 7 days to cure right. It was wet and well above freezing for the next 4 days, then when it got cold, we put some straw and plastic over the footer. It's in the ground, which kept it warm-ish and the curing process releases some heat, so the blanketing was enough to keep it right for the rest of the 7 days.
Footer done! The first truck had arrived at 2pm. The second left at 6:30pm. It took a full hour and a half to clean up all the tools, wheel barrows, etc. We were all done and in the house by 8pm. Whew!
Foundation next. Eric will build forms [no digging!] and get things so they'll attach to the bit of old but good foundation in the front. There will be forms on both sides of the foundation [easy to level during the pour]. We already have the chute, but we might not need it. There are no steps at the top of the foundation, so we can just pour it in one end and move it along to the other end. With the four of us and a bit of experience under our belts, we should manage just fine. It will be heavy work, but not back breaking.
Now we need warm weather. We don't want to risk goofy curing because of a serious cold snap, so if we have to wait a couple of months, no problem. We want this foundation to last. And last.
You may recall that we've been digging.
And digging.
And digging.
And then digging some more.
Footers are a lot of work.
Once the digging was done, we had to put in the forms so the footer wouldn't fill up the whole hole.
If we were in a place where we actually had drainage, letting the footer fill the whole hole wouldn't be a problem. But we don't have drainage.
![]() |
| Southeast end forms |
Which means we have to install drainage. And if we fill the whole hole with concrete, then we'd have to dig next to it - all the way down! - to put in drainage so that moisture wouldn't collect around the new footer and foundation and cause the same problems we're trying to fix now.
And let me tell you, we're over the digging. Over. It.
![]() |
| West side forms |
Then we called the concrete guys and ordered 13 yards of concrete and George came and looked at the site to see if we could get the trucks close enough to the site to use their chutes.
There was good news and bad news.
The good news was that we could get close enough in a couple of places.
The bad news was that we couldn't get close enough in other places. Which meant hauling concrete by the wheel barrow load to where we needed it.
I don't know about you, but the idea of hauling six yards of concrete uphill in a wheel barrow just doesn't sound like my idea of fun. In any universe.
![]() |
| Pulling the concrete down the chute with rakes |
Then we crossed our fingers and prayed a lot that it would work because nobody, No. Body., wanted to haul six yards of concrete uphill in a wheelbarrow.
Not even the kids. Weird, huh.
And guess what. It totally worked! The only concrete we had to haul with the wheelbarrow was the last tiny bit of the first load, which had been mixed thick especially for the steps in the footer where it changed levels. Eric moved only 5 wheel barrow loads to the steps on the other side of the house, with Lily spotting and helping support so that the wheelbarrow and all didn't all pitch in the hole when they dumped.
We all helped. Just so you know, one man, one woman and two teenaged girls can pour a footer if they communicate well and are willing to work hard and fast. We hit a couple of tricky spots and both times, the driver of the truck [It took 2 loads of concrete to get it all done] hopped out and gave us a quick hand. [I hope those guys have an extra special holiday!]
Mostly, it went like this: We'd line up the truck chute with our chute. When Eric gave the signal, I shouted to the driver to let it come. Once the concrete hit our chute, K2 and I pulled it down the chute faster with rakes. Lily and Eric raked it and smoothed it in the forms and let me know when to slow and stop. I let the driver know when to slow or stop. When one section was done, we moved the chute to the next section. When we got to the lowest area, the truck could get up close and dump and that went a lot faster. Once the east side was done, there was just enough left in the load to do the steps on the west side. That truck cleaned up and took off.
![]() |
| Eric checks the level in the first section |
We used mostly 4" slump (more on that in a later post) in the first hole and in the steps on the west side of the house. Because we had already poured the steps on the west side with the thick stuff, it was pretty well set up by then and we could use 6 or 7" slump in the second load. It poured a lot faster and set up a lot slower.
Let me tell you this about working with concrete. You think dirt is dirty? It's nothing compared to concrete.
Concrete is wet and dirty. And it dries you up so that after a couple of hours you're starting to cough and get chapped. But you can't stop working because that stuff starts to cure Right Now and you have to get it level Right Now if you want it level.
![]() |
| Smoothing with a 2x4 |
And we need it level. So Eric leveled as we poured and then when we had to move the truck to a different area, it was my job to finish leveling, while Eric moved to the next section.
K2 and I worked together to do the leveling. Luckily it only needed to be level, not beautiful.
The bottom section of the east side was easy to level. There were forms on both sides. All I had to do was run a 2x4 across the top and make sure it was full, full, full. Up the rest of the hole, there was a form only on one side. This means there was nothing on one side to prop the board on to get a level. Also, nothing to stand on, on that side.
![]() |
| K2 checks the level. I'm trying not to fall in. |
It needed to stay above freezing for 7 days to cure right. It was wet and well above freezing for the next 4 days, then when it got cold, we put some straw and plastic over the footer. It's in the ground, which kept it warm-ish and the curing process releases some heat, so the blanketing was enough to keep it right for the rest of the 7 days.
Footer done! The first truck had arrived at 2pm. The second left at 6:30pm. It took a full hour and a half to clean up all the tools, wheel barrows, etc. We were all done and in the house by 8pm. Whew!
Foundation next. Eric will build forms [no digging!] and get things so they'll attach to the bit of old but good foundation in the front. There will be forms on both sides of the foundation [easy to level during the pour]. We already have the chute, but we might not need it. There are no steps at the top of the foundation, so we can just pour it in one end and move it along to the other end. With the four of us and a bit of experience under our belts, we should manage just fine. It will be heavy work, but not back breaking.
Now we need warm weather. We don't want to risk goofy curing because of a serious cold snap, so if we have to wait a couple of months, no problem. We want this foundation to last. And last.
Labels:
concrete,
footer,
foundation,
house
Saturday, November 17, 2012
Dirt
![]() | |
| Half of one hole, about half finished |
After 30 hours of digging with the backhoe, we've been finessing the holes to just the right shape and levelness. I figure it took another 30 hours or so with a shovel.
All of us.
It's exhausting.
It's dirty.
Here's the thing about dirt. Dirt is dirty. It makes everything around it dirty, too.
Like my boots.
And my pants.
And my hair.
The kids. The pets.
The grass around the house. I hate dirty grass.
The back room floor where we keep our boots.
It is unglamorous. Personally, I don't think the Beverly Hillbillies look suits anyone. We've been looking like that a lot lately. So has the house.
It's really, really hard work. And here's the thing about that. I'm not all that big on getting exercise via hard physical workouts - I prefer long walks. I'm not a 'work out at the health club' type of person. But if I am going to work out that hard for that long, until my joints and muscles scream in pain, and then sustain that level of activity for 10, ten!, hours, then, by golly, I want something to show for it. Something like a nice big hole.
I look at those holes and there is a part of me that is so proud of them, I could burst.
Labels:
digging,
foundation
Monday, November 12, 2012
Foundation
We're digging big holes so we can address some foundation issues.
'Issues' is another word for 'problems'.
Our foundation has big issues.
This means our foundation has big problems.
Big. Problems.
Like no drainage. So much moisture was being held in the clay soil around the foundation that after we dug out the foundation, the soil under the house started/continued leaching out.
Moisture is a bad thing.
And don't you love these cracks?
Oh, wait. Those aren't cracks. That's where there's just no mortar between the blocks.
Oops.
Then there's the footer. The footer should be 8-10 inches thick. This footer is thick enough.
But it's not deep enough under ground. It should be below the frost line. Our frost line is 30 inches down.
Oops.
Then there's this little beauty. A footer that's only 4 inches thick. Sitting at 4 inches below the soil.
The surprise on the other side of this area of the house was that there was no footer at all.
None.
Which is why we're fixing things.
'Issues' is another word for 'problems'.
Our foundation has big issues.
This means our foundation has big problems.
Big. Problems.
Like no drainage. So much moisture was being held in the clay soil around the foundation that after we dug out the foundation, the soil under the house started/continued leaching out.
Moisture is a bad thing.
And don't you love these cracks?
Oh, wait. Those aren't cracks. That's where there's just no mortar between the blocks.
Oops.
Then there's the footer. The footer should be 8-10 inches thick. This footer is thick enough.
But it's not deep enough under ground. It should be below the frost line. Our frost line is 30 inches down.
Oops.
Then there's this little beauty. A footer that's only 4 inches thick. Sitting at 4 inches below the soil.
The surprise on the other side of this area of the house was that there was no footer at all.
None.
Which is why we're fixing things.
Labels:
foundation,
house
Subscribe to:
Posts (Atom)