Showing posts with label house. Show all posts

Sunday, January 8, 2017

A Door Where Once There Wasn't

Going....
Lest you thought we had stopped all work on the house, I am here to reassure you that not a single picture frame in this house is level due to the continuous sawing and pounding happening still.

Seriously.   Not one stinking picture frame stays level for more than a day.   I'd blame it on the traffic, but...there is no traffic here.

Actually, there was a traffic jam once, a long time ago.  In the winter.   When, within a few minutes of each other, the gas truck and the school bus both went off the road on the hill just past us.  It stopped traffic for hours.  People still talk about it and it's been like 30 years ago.


Going...
At any rate, one of our current house projects is the moving of some doorways for...reasons.   Briefly:  We had to cut a new door from the area outside the bathroom to the living room, which used to be our bedroom so we could seal up the old door from the little hall in front of the basement stairs to the living room [which used to be our bedroom].  We'll be putting structural stuff in that hallway [that's the short version.]  Then we [and by 'we' I hope you know I mean Eric] sealed up the door that used to go from the the bedroom/livingroom to the hallway outside the basement stairs and sealed up the door that used to go from the little hallway in front of the basement stairs into the dining room, so we could move my desk in front of there so we could cut a big door where the pass-through used to be from the hallway in front of the up stairs and front door into the dining room.


Gone!
I know.   It's ridiculously confusing.   The girls will be home in a little while and they'll probably get lost trying to get from the hallway into the living room.   At any rate, we can get to every room and we can also get outside.

There have been a few surprises as Eric cut into the walls - there always are with this place.   We found an old doorway in one of the walls where no doorway had any business being and for the life of us we can't figure out why it was there.  Maybe that's why they boarded it up?   We also found an electric line that had no business being there.   Not to worry, it was discovered and moved without incident.


And not coming back.
There is less dust behind the desk because we moved it and everything on and around it and the law is that if it's moved, it is cleaned, but there is more dust on the desk because sawing.   As soon as I'm done with this post, I'll be dusting.  Again.

By far the most exciting part was when Eric was taking off the last little bit in the middle left there [see last pic] and everything on the walls and desk started dancing right off whatever surface they were on.  Never a dull moment here.

The pics are of the new doorway where the old pass-through used to be just inside the front door.   Pretty nifty.

In case you were wondering, these are not where the doors will be going in the end.  They're just temporary solutions until we get more other stuff done and the old structure ripped out completely.

Also, sawzalls are the Best. Things. Ever.

I'm going to go dust now.

#thisprojectisnevergoingtoend

Monday, September 5, 2016

House Update - Support Beam

Once we got the upstairs floors done and the windows and doors trimmed out we took a bit of a break from major construction.  

Our idea of a break is to do massive gardening, thinking, hauling, mulching, more thinking, figure out how to get ductwork  to the upstairs bedrooms so we could all survive the summer, disconnect the ductwork to the front end of the house, install ductwork to the upstairs [yay! a.c.!], more thinking, more hauling, digging, canning, move the master bedroom upstairs to the guest room, move the living room to the old master bedroom including the actual furniture that almost didn't fit through the actual doors, pull up the laminate flooring in the living room, rip off some of the aluminum [!] siding on the front of the house, cut a 'door' in the old front wall of the house, seal up the old hallway to the front room to keep the mess out of the house, gut the old front room, dispose of the debris....

It wasn't much of a break.

Especially since the next part involved mixing, by hand, a ton of concrete.  Not kidding.   Eric is my hero.

The concrete was for two footers and two piers [inside the front section of the house] upon which will rest a load bearing support beam.  Load bearing is a scary thing.   It means it holds the house up.    Hence all the thinking.   This is not something that we want to screw up.

Here's a pic of  Eric in what used to the be the front room.  Piers poured.  He was just getting ready to lay the boards down to build the I-beam that will support the center of the second story.

Wait.

'But, Robin!   How?..', you ask, 'HOW is the second story staying up now if he's just now building the beam??'  

An excellent question.   There's another beam in the floor of the second story that runs the entire length of the house and it's resting on stuff it needs to rest on.  The second story is safe. Those piers are dead plumb under the upstairs beam.  Once this new beam is in and a support wall between it and the beam above, the house will be EXTRA sound.   We like extra.

Here's a pic of the roof situation in the front of the house.  You're looking straight up into the ceiling of what used to be the front room.  

WARNING!   This pic is confusing.   Also, it's blurry.  Sorry about that.  It was darkish in there.  I've labelled a bunch of stuff and then tried to explain it below.   You can click to biggify the pic.


Explanation:  Start from the top of the pic on the left side.

  • See the new beam?   That beam runs the length of the house.   It's in the floor of the second story.   The new ceiling joists [which are also the floor joists of the upstairs] are on top of that new beam.
  • You can see the plywood decking above the new ceiling joists.   That is the floor decking for the new upstairs.
  • The blue round things are old light fixture innards on the old ceiling joists of the front room.   Notice that the old ceiling is about 2 feet LOWER than the new ceiling is.   [Don't get me started on the ceilings of the old house.]
  • On the right side of the pic you see the Old Roof Decking and the Original Roof Rafters.   Yes. That's part of the original old roof, tucked under the new addition.   Eric stripped the roof when we put the second story on, but only took out the peak of the roof and enough to set the new beam and build over the old stuff.  There were excellent reasons. All that old stuff is about to come out very soon.

I kind of love this picture because it really illustrates the careful thinking and bizarre sequence of events we've had to co-ordinate to live in the house comfortably-ish while doing a major renovation.

Eric is a genius.

Sunday, March 6, 2016

Oak Floors

So, there's been an extended period of radio silence here.  Sorry about that.   We've been busy doing the upstairs floors.

The guest room floor is installed.  We used more of the salvaged maple that we used for the other bedrooms upstairs.

The common room is almost done.  We used salvaged oak - from the same house the maple came from.

On the back of the oak we found this stamp:

Henry Buchholz Hinsdale ILL

We did a bit of research and found that Hinsdale is up near Chicago.   Henry Buchholz was a builder and developer in the early 1900s.  He liked oak.   So do we.

The oak floor is going much faster than the maple.   We can't tell if that's just because we really know what we're doing or because it's drier this time of year and we're not fighting swollen wood or what.   At any rate, we're grateful.

This is what's left of the oak today.   Our boards ranged in length from 12 inches to 15 feet long.  One of the things we have to do to make the best use of the wood is to put it together like puzzle pieces so that we don't make cuts and can fit the existing pieces together.   So, we arrange the wood by length.   It's tedious, but worth it when it comes time to lay out the rows for installation.   Layout is my job.   Installation [running the Super Nailer] is Eric's.

Layout involves fitting the boards to the correct length and attempting to get 100 years of mystery gunk off the tongues so the boards fit together well.  Sometimes I can get it off.  Sometimes it's cement.  If it doesn't then Eric goes at it again with the box knife [pic below] before final placement and nailing.

Turns out we had enough oak to do most of the floor upstairs and in front of the stairs. Woo-hoo!  We have enough maple left over to do the rest of the big room upstairs.   We considered getting new oak and keeping it all the same, but neither of us really wants to use the rest of the maple anywhere else in the house and we don't want to toss it, so we decided that we'd have a 'mixed' floor and let that be part of the house's story.  

We probably could have done something fancy to show off both woods up there, but we didn't know exactly how much square footage we had to begin with or how much maple we'd have left over after the guestroom without doing a way more intensive count than anyone wanted to do, so we winged it.    When we started with the oak, we looked at the stack and said, 'If we can get from the bookshelves all the way over to the stairwell with oak, then we can do the other area in maple and at least the oak and maple areas will make sense.'   We'll have exactly enough oak.  The floor upstairs won't match, but it's a good story. 

Friday, August 28, 2015

Lily's Antique Door

A year ago I got some old doors from a local salvage place. I was thrilled.  $25 each.   What a deal.

Not.

More than $200 in paint strippers [yes, plural] and hours of stripping later, I decided that would be the last batch of painted doors I'd be getting, unless I was planning to just paint over them.

Stripping [in any sense of the word] is not my idea of a good time.

I was so disgusted by the whole process, that I didn't get any 'before' pics.   You'll just have to imagine 8 layers of paint over a beautifully shellacked original finish.   The stripper killed the original finish.   The door hardware was covered with layers of paint as well and had to be stripped.  The lock was full of mud and bug guts.

The door:  Turned out to be fir under all the paint. I'm guessing the original finish was Garnet Shellac.  Gorgeous, red.   I can't get that here made up, but I can get the Amber and Clear.  [I'm not interested in cooking up my own yet.  Maybe later.]   So,  I went out and got some Varathane Red Chestnut stain and stained the door. 

If you look at the pic of the finished door, right, you'll see lots of black lines.   This door was stored in a barn and over the years it swelled and cracked the paint, then fungus got in there and started some spalting.  I love it.   I was able to save most of the spalting by not scrubbing too hard during the stripping.

Also, if you look really hard, you can see bits of paint I didn't get out.  I worked on these doors for hours, using maybe 6 coverings of stripper.   Enough already.  Plus I like being reminded of the door's past.  Plus, you already know my Let's Get On With It Already philosophy. 

In the end, the spalting looks great with the Red Chestnut stain and a coat of Amber shellac on top of that.   I love it.   Love. It.

The Lock.  Mortise lock full of crap.  Full story here.   I gerry rigged a fix, then when it came time to put it back in the door, it didn't quite fit, so I finessed a bit and now it fits and works great.

The Door Hardware.   This stuff was covered with almost as much paint as the doors.   Decades of it.   I gave it a long bath in hot soapy water [a couple of days' worth] then pulled out the paint with a bamboo skewer.   You can see bits of the old 'japanned' finish left under there, but way too much of the base metal showing....and rusting.   As much as I wanted to keep that old finish, in this climate, we'd have been fighting rust constantly, so we decided to spray.

Long story short, I went with Rust-Oleum's metallic paint in Oil Rubbed Bronze.   Note:  It doesn't say oil rubbed bronze on the can.   You have to just look at the cap.   Basically, this is black paint with bronze-y sparkle in it.   Tip:   Spray the backs first, then flip and do the tops.   This stuff dries fast, so you can do the other side in about 15 minutes.

In person it comes off as brown, not black, but it's really hard to photograph.

Still, it wasn't the look we were after, so we decided to highlight with some paint I had around the studio.  I grabbed a pot of  Versatex pearlized bronze pigment. There are other metallics also:  silver, bright gold, copper... This stuff is designed for silk screening paper and fabric [which is why I had some.]  We tested it on an iron rosette from another door and it dried fine and would not rub off at all.   A product that is designed more for this kind of thing is Amaco's Rub 'N Buff.  Check out all their colors, here.


The process is simple.   Sit down and apply with your fingers.  Stop when you think it's enough.  Since this is Lily's door, she was in charge of highlighting as much as she wanted.

When it looked right, she stopped.    We let it dry overnight, then installed everything the next day.

Et voila'!   I like how it changes in different lights.   Look up at the first pic again to see how it looks in a different light. 

Lily's bedroom door is done.    Claire's is up next with a whole different set of issues.

Tuesday, August 18, 2015

House Update: Bedroom Floors

I know it's been forever since I've given you an update on the house, but the truth is drywall is boring.

Drywall mudding is boring.   Also dusty.

Painting is boring.   Also messy.

Sorting antique flooring is boring.    Have I told you about this flooring?   I found it at a salvage place, without nails [!], for 69 cents a square foot.  About a thousand square feet of 2-1/4 inch maple and oak antique flooring from a 1910 house up near Chicago.   [With the miller's name stamped on the back.  Henry Buchholtz.]  Also, every board was numbered and labelled with the room it came out of.   Cool!   We brought it home, wiped it down and stored it for a year in the basement.   Then we had to haul the blasted stuff out of the basement to the upstairs, which meant up the basement stairs, through the house, outside and up the ladder, over the roof, through Claire's closet.   Piles and piles of flooring.  Also, it was very hot.  There was a lot of complaining.    

I wanted to sort by number/room, but I was out-voted.   Okay, the truth is, I caved to all the glaring.   We sorted by length and end configuration:  flat, tongue, groove.   Flat/flats here, flat/grooves there, flat/tongues here, tongue/grooves there.   Then it was just a matter of being as efficient as possible with the sizes so that we wasted as little wood as possible.   Once the wood was laid out by size, it wasn't too hard to find a board very, very close to the size we needed.  

Laying antique flooring is not boring, but it is a big pain in the everywhere.  Old boards have gunk in the grooves.   They are bent.   They had been refinished once before so the tops didn't match up when nailed down.  It took weeks to get the floors laid.    If you ever need tips for laying antique flooring, then give us a shout because Eric is expert now.  Triangle jigs are your friends.

Then there was hand planing the worst of the unevens down.   That was my job.   I used this Bosch 6 Amp 3-1/4-Inch Planer .  I am a great planer.   [After the first 15 minutes or so of getting used to the crouching, pushing and noise.]  Planing was kind of fun actually.   It's the loud power tool thing.  Also, planing is dusty.

Then there was the sanding with the monster sanders that we rented from Menard's.   Sanding is boring.   Also dusty.  Also really exhausting.

We had to make some important decisions during the sanding.   Most importantly, how perfect do we want the top to be? 

Answer:  Not perfect.   It's old wood.   With a lot of stories [my favorite is the very old ink stain we found in between two boards.   Very old.   The top stain had been sanded off when the floor was refinshed earlier [1970s?], but I am dying to know Who spilled that ink and when?]  There are places where the old finish is still there where the boards were uneven and the megasander just didn't get down that far.   There are places where the awful dark walnut finish from the last re-finishing  didn't come quite all the way off. [Who in their right mind would finish light maple flooring with a walnut finish?   I ask you!]   There are nail holes from when the floor was originally laid in the original house.   There are cracks and dings in some of the boards.   I want those stories to stay there.   I want to look at that floor and be reminded of all the people who walked on it and worked on it for the last 100+ years.  I love every imperfection.

Also, I'm lazy and there's just only so much sanding I can stand before Let's Freaking Move On Already.

Then there was the cleaning of all the dust.   Three times, just to make sure we got as much as possible off the walls and the floor before the floor finishing.  

In short, we've been so busying doing the house [and the jobs and the garden and the canning and the occasional house cleaning] that there just was not time to document it.   Sometimes you have to choose between doing something and taking pictures of it.

However,  this past weekend,  finally,...FINALLY! we finished the floors.  And I remembered to ask Lily to take a pic so there would be at least a little documentation.   The pic above shows me just starting the first coat of shellac in Lily's room.  Dig that apple green wall color.  It's cheery, I tell you.

This is what we did:

First coat: Amber Shellac, by Zinsser.   I heart shellac.   It's old.   It's fun.   It's got that period look we're after.   Also all of the doors and trim we've salvaged had/have shellac on them, so...matchy matchy!  Also, have you SEEN what shellac does to wood?   Gor. Geous!  

Then:  Light sand with 220 grit,  and wipe down with tack cloth [cheesecloth soaked in wax.  Awesome!]

2nd coat:  More of the shellac in Lily's room.  Claire's room is in a corner of the house with a totally different light, and darker wall color and she only needed one coat.

Then: Light sand with 220 grit,  and wipe down with tack cloth.

3rd and 4th coat:   Sealer, by Zinsser.   It seals up the wax coat in the shellac and preps the surface for the polyurethane that comes next.   Then sand and wipe down after each of these coats.

5th and 6th coats:  Minwax, Ultimate Floor Finish, Water-based polyurethane.  It was a lot more expensive, but everything Eric studied recommended it so we went with it.   We only want to do this One Freaking Time and if you don't pay in quality materials, then you will definitely pay in time and aggravation.  [I know this for a fact.]

Pics of finished floors coming soon.

Monday, January 12, 2015

Installing Windows


We brought some of our new windows home during the holidays.   We went with a stock size so we could afford to get bigger windows.   These are 36x60.   Lots of light!

The trick was how to install these very heavy windows in the 2nd story without dropping one or doing physical damage to any of us.

You have to install windows from the outside of the house so that you can seal them up tight against
the elements.


This means installation happens from a ladder.  But there's no way that even a strong guy can safely carry a big window up a tall ladder, swing it around, caulk the opening and install the window.    Without hurting something.
 

So Eric devised another plan, using two extension ladders, one in front of the other.


He set up a smaller ladder between the big ladder and the house.   He'll climb up the ladder with the yellow rope, which is set at a proper, safe distance from the house.  

The shorter red ladder is for holding the window.  At the top of that ladder, Eric put a Pivit Ladder Leveling tool.   That gave him a place to park the window until we got the rough opening caulked and ready to go.  


It worked this way:

1.  The girls and I carried the window to the rough opening.  Eric climbed the ladder.

2.  It took all three of us girls to lift the window, tilt it and get it through the rough opening, where Eric caught it and parked it on the Pivit, leaning against the house.  Claire and I held onto the window the whole time.

3.  Eric caulked around the sides and top and passed the caulk gun in to me, and I caulked the bottom of the opening.


4. Eric lifted the window into the opening, centered it and Claire and I pulled it into place. 

5. Eric nailed it into place. 

6. We cleaned  the smeared caulk off the windows with mineral spirits.   Installation is messy.

We installed 6 windows over that weekend.   Only 5 more to go and 3 of those are much smaller.  

Wednesday, December 10, 2014

Fascia Board

The fascia board on your house is the board that covers the rafter ends and is the board to which your gutters are connected.  

It's important.

It protects your rafter ends from exposure to wet and therefore rot.

We hate rot.

As you can see from the top pic, installing the fascia happens way up high.  Our boards were 16 ft long and had to be installed at the top of a second story.   

By one guy on a ladder.   Eric. 

Soooo, the first thing he did was make a jig.   Two, actually.  It's a piece of plywood with a notch cut out to hold the board up while he nailed it in place.   He screwed the jigs about 9 feet apart...

 ...and put a pulley between them. 

Then we roped the board in the center and Eric climbed the ladder while I pulled up the board with him. 

It worked brilliantly!

One thing we learned was to make sure the jigs weren't too high.   If they were, then the boards wouldn't slip in easily and that was a pain teeter tottering the heavy board and trying to hang on to the ladder while getting it all steady and then lifting into place.

If you place the jigs a bit low, then the boards pop in fast and you can shove a few shims in the jig under the board to raise the board into place while you nail.

It does mean moving the ladder back and forth a few times and it's slow, but it allows one person on a ladder and one on the ground to do the work safely.    Safe is good.

And now our fascia boards are on.    They'll be covered with metal when the metal roofing goes on.  Then the gutters can go on.

Wednesday, November 26, 2014

Old Roof Out, New Floor In

At last we got all of the new 2nd floor floor joists in and the old roof cut out.

Next we did the decking, which is the subfloor for the new second floor.

Here's a pic of the floor of the new second story.  It's kind of open to the wind and weather.

Which makes it kind of tricky to work up there if you have vertigo.

I have vertigo.    I did not enjoy my time up there, except that one last very warm evening when we were scrambling to get the last of the decking on and the whole thing under tarps before the rain.  [We did that A Lot during this project.]   That last night was glorious.   Beautiful warm late October breeze, beautiful sunset, great company [Eric].  

Then the weather turned cold.   The next step was to raise the exterior walls and enclose the space.  Then the interior load bearing walls.  Then the roof. 

And for all of that, we decided we needed some serious help.   And not just the therapy kind.


Sunday, November 23, 2014

Putting on a New Second Floor

As you know, we've been doing some renovating.   We started by digging and pouring a whole new foundation.

Then we built some new walls around the old house.

Then it was time to put the second floor on top of the new walls.

Just how did we do that with the old roof in the way?, you ask.

That's a good question.   It took a lot of planning.   Very careful planning.   And very careful placement of support columns in strategic places inside the existing house.  Because the first thing we had to do was put in a beam in the new ceiling that goes the entire length of the house [north to south].   Then lay the joists east to west. 

Eric did that through the existing roof.  There was a lot of old roof in the way.  It had to be stripped and sawzalled out.   I love the sawzall.   In the pic above, you can see the rafters of the old roof sticking out of the floor of our new second story. 
 
Here's a view from the ground, up into the floor of the new second story.  

Yes, all of this meant that for weeks we had an open roof. 

No.  The weather did not cooperate.   More on that later.  

Friday, March 14, 2014

One Wall Up


The first wall of the new construction is up.  Eric built the wall flat on supports at 'floor' level inside the new addition and then stood it up.  Then he end nailed it in.  

That's what the very tall unit in front of the wall is for.   He ran a rope from a tree, up and over the 'crane' and tied it off to the top of the wall, then hoisted it that way. 

The crane is bolted to the rim joist in front of the room and there were three extra 2x4 supports so that the thing wouldn't pivot under the load.
It worked like a charm.  Eric did most of the lifting, then I steadied the rope while he pulled the slack out of the last little bit to finish raising it.    We'll have to do that for a couple of the other walls that are built in places where the foundation is too tall to build on the ground next to the house.

You can see how much higher the new floor will be compared to the old 'sunken' living room.    I am greatly looking forward to having a house where all the floors are level and go smoothly from room to room on a floor.   Also, I'm looking forward to 8ft ceilings instead of 7ft ceilings.  

Yay!! Our first new wall!    And just in time for our 25th wedding anniversary today.  

Wednesday, December 11, 2013

Old Siding

It's like something out of Redneck Homes and Gardens, isn't it. 

Hopefully it won't look like this very long.  Here's an over simplified description of what we're going to do --

We put the new foundation just outside the old one, so that we'd have more square footage when we're done. 

We're going to build up and around the old house, then cut the old walls out from the inside with a sawzall.   Piece of cake. 

The west side and living room addition of the house were covered with aluminum siding.   Since we didn't want to be sawzalling through aluminum, we decided to take the aluminum off now.  


The oldest part of the house had originally been sided in clapboard [like the east side and north end of the house still have.]

Lots of mud dauber nests and spider webs.

And those damned Asian lady bugs.

The newer parts of the house have plywood and old insulation board  [cellotex insulating sheathing] under the siding.   

It's sooo attractive.

Next:  We're finalizing the floor plan and then we're going to balloon frame the first floor.   I'll explain balloon framing to you later after Eric explains it to me.  Again.

Monday, December 9, 2013

House Update


The sill plates are on the foundation.   They'll need some sealing up, maybe some extra caulking and then we can build walls.

Walls!

Next:  Remove the old aluminum siding from the west side of the house.  


Sunday, December 8, 2013

House with a Balcony


This house has a lot of character.    I'll bet it can tell a reeeally good story. 

Or twenty.

It's the little balcony on the front that gets me.

Saturday, November 9, 2013

Sealing the Foundation

As you know, we're working on a big foundation project.   Here's a recap, if you're interested. 

The next step in our foundation project is to give it some moisture protection.    There are a lot of options out there for that and Eric finally decided that we'd do two things.

1. Install a moisture barrier.   There are a number of options for this, and in the end we went with a layer of Platon.

2. Improve the overall drainage next to the foundation and direct it away from the house.   We laid drainage tile when we finished the footer.   We had talked about laying another layer of tile next to the foundation, but the Department of Redundancy Department decided that was unnecessary.   So, we decided to put in loads more gravel next to the foundation. 

Platon is the same kind of stuff you can use between a concrete slab and subfloor. It has bumps that keep a layer of air between the plastic and the concrete.

Eric attached the Platon to the foundation with ceramic coated washer head screws.

Then we hauled gravel.  And hauled more gravel.   And hauled more gravel.   In a day, the four of us were able to finish and fill one whole moat on the west side of the house. 

Tibby is a little sad that she can't hide in the moat anymore.  It kept her away from the horseflies and out of the wind.  She's moved back into her dog house.


Wednesday, October 9, 2013

The Foundation Pour

Previously on Rurification....

Last fall we dug out the foundation and poured new footers.   This spring we put in drainage.  We spent the summer putting forms up for the new foundation. 

These are the foundation forms on the east side of our house, ready to take the concrete.


Once again, Eric made a couple of mega sawhorses to support the giant chutes.  We actually rented a chute extension this time because the foundation forms are a lot smaller space to hit.  

The concrete truck showed up at 11am.
We started in the southeast corner.   Our tools of choice were a regular garden hoe, long 2x2s, and a bunch of garden shovels of varying sizes.  

This pour did not go as smoothly as the last one. The 80 degree plus heat worked against us and even though we were using thinner concrete [5 inch slump], we had to work more slowly and it seized up fast and caused some problems.  Our site is a tricky one and the truck couldn't get where it would be easy to pour.


On top of that, these forms were 4 feet or so higher than the footer, so we had much less slope to work with.   Gravity is your friend.   On this pour day, gravity was on vacation and did not come over to help.  

In the end it took much longer and we used a much thinner mix than we had planned.  We had to push it by hand and shovel to where we needed it on the west side.   It was tricky, strenuous and messy work and it took all of us to get it done.  We never panicked and stayed cheerful through the whole job.

We had ordered 8.5 yards of concrete and we used it all.  By 4:30 all the concrete was in and we were cleaning up. 

Clean up took a long time.   We had to spray everything down right away or consign it to yard sculpture status forever.

Concrete is super messy work.  All of us looked like this - concrete everywhere, with gloves that were covered in concrete, and globs in our hair.  I didn't even bother washing my pants.  I just took them off and threw them away.  


We are so relieved that this part is done.  Woo-Hoo!!

Next steps:
  • seal the foundation
  • finish the drainage [fill in the moat]
  • rebuild the front deck so we can use the front door again
  • take the old aluminum siding off the house
  • start framing
We have much more experience framing, so the next parts will be much easier psychologically, if not physically.    If you'd like to volunteer to haul gravel for us, let me know.   Those moats are kinda big.  

Wednesday, May 1, 2013

Foundation Progress


As you know, we're working on our foundation.  Last fall we were here.  Ginormous moats around the house.


Then we poured the footer.   [That's K2 checking the level.  It looks like she's doubling up in agony, but she's not.] We learned a lot about concrete.

Then we had winter.  The Long Winter in which we got actual snow a lot of times and it like to never got warm again.

And the sides of the moats caved in some on top of the footers.   It was a pain.

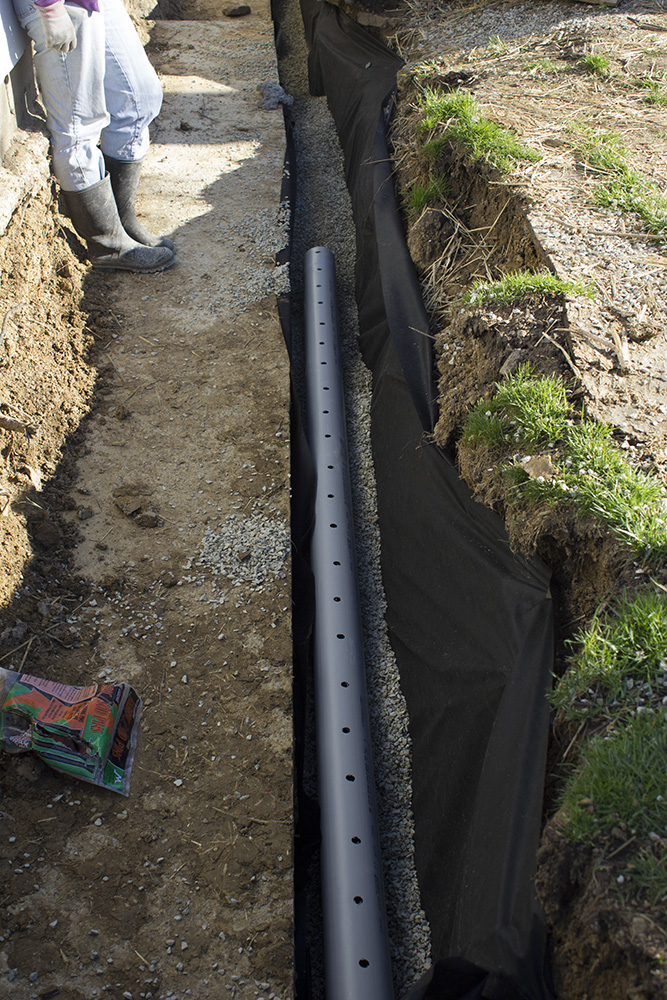
But then it got warm and we dug the new collapsed dirt out and put some drainage in next to the new footer.  Because we're responsible home owners and we Never. Want. To do. This. Again. Ever.

Ever.

In this pic you can see the new dirt on the footer in the left of the hole. We lined the rest of the hole [the right side of the hole] next to the footer with geotextile to inhibit root growth around the drainage.

Roots are not your friend.   Unless you're gardening, but this, my friends, is not gardening.


Anyway.  Next we put a layer of gravel in the bottom of the hole and then laid drainage tile on that.

Since there was quite a change in elevation, we stepped the drainage down at the 'steps' with 45 degree joints.  We glued everything.  We checked and double checked the level to make sure everything was headed down toward the road.

Then we wrapped the pipe with more geotextile to keep the damned roots out and covered the whole mess with gravel up to the level of the top of the footer.

Pouring gravel into the space was interesting.  We could have just dumped in on the footer and raked it into the pit, but rakes put holes in the geotextile and we wanted No Holes.

So Eric grabbed a couple of pieces of thin plywood and we put those in the hole and could dump the gravel right in.  Most of the time someone stood behind the boards to steady them.

The boards guided the gravel right into the hole and all we had to do was smooth it out.  Worked brilliantly for both wheel barrow loads and fast shoveling from places we couldn't get the wheel barrow close enough. 

I am thrilled to report that the drainage around the new footer is done.  We've got some finessing around one end where it drains to the road, but we're ready to move on to the next stage in the process.

Next stage:  Building the forms for the actual foundation. 
Following Stage:  Pouring the new foundation.


Related Posts Plugin for WordPress, Blogger...