Showing posts with label gravel. Show all posts

Thursday, January 11, 2018

Turquoise Barn

© Robin Edmundson, 'Turquoise barn and haybales', watercolor, 18 x 24 inches.  $750, framed.


I got stuck for a while right around the holidays.  I couldn't seem to paint anything I liked and felt way out of whack.   My mentor, the amazing Susan Webb Tregay, suggested that I focus on barns - lots and lots of barns.   For days I painted barns in all the colors.   I didn't try to make them 'good', I just painted them again and again.  I used the backs of a bunch of paintings in my garbage stack.  I tried new pigments, I tried new color combinations.  I whined a lot.  [A lot.]  But every day I painted more.

One day, it was time to pull out the Big Paper.  You know - the good kind, with acres of white staring at you, daring you to make a mistake.   I dove in, adjusting along the way.  Step back, let it dry, come back tomorrow, get feedback.  Adjust again.  Get more feedback.  Adjust again. 

I'm learning to linger over a piece and to not feel like I have to rush it. 

And in the end, I have this.    And of course I want more feedback - tell me if you think the gravel in the road is working.   I tried something new and I'm not sure how I like it or if it works.


Sunday, October 23, 2016

Putting on a Good Front

Eric is currently sawing some joists off the back of the truck.   Works great!   Here's an update on what's happened in the house the last few weeks.

In the last post on the house I listed a few things we wanted to get done before it got cold.  Here's how we're doing.


1.   Tear out old floor and joists.

Done.  The decking went to the dump.   We recycled all the good 2x4s and joists that we could.   They're all on the front lawn now, nail free.  So pretty!  [Ack.  This is why Country Living has never come knocking at my door.]


2.   Dig out new crawlspace.

Done.   Not fun, but less not fun than the first time we did it in the former ell.   This time it was just me and Eric.  The dirt was nasty, hard, and difficult to get out but we didn't have to bucket it and lift it out just us girls.   Eric did a lot of picking first to break it up.  We could shovel it into a wheelbarrow and easily get it out.    In the end, like anything worth while, with patience and one shovel full at a time, we got it all dug and moved.


Notice the concrete pier cylinder in this pic, holding the lower beam between the two downstairs rooms. Working like a charm.


3.  Gravel new crawlspace.  

Done.   Dudes.  Sometimes I wonder at the sheer tonnage of gravel I have moved in this place all by myself, much less the combined tonnage that all of us have moved.   Again, Eric and I did this ourselves and I confess I wore out because we had done a lot of dirt digging first.   It ended up that I filled the wheel barrows, then Eric moved it and dumped it in the hole.   When I got too tired to fill, I went and raked and raked and raked to spread it around the hole.  Pepper and Tibby LOVED it in there.   

In this pic you are looking from the east side of the newly graveled ell through the old living room foundation and into the newly dug and graveled west crawlspace.   I can stand up on the east side and my head barely comes to the top of those joists.  On the west side I have to hunch quite a bit.   Eric assures me that this will be 'quite comfortable' once the subfloor is in and he's putting in the wiring, etc.    I will take his word for it because once the subfloor is on, I'm never going down there unless it's to save someone else's life.  


4.  Pour concrete to join new foundation with old foundation.

Eric did that on his own.  It took three pours around some tricky schedules and some rain.   Got it all done and it looks great.


5.  Build new front wall.

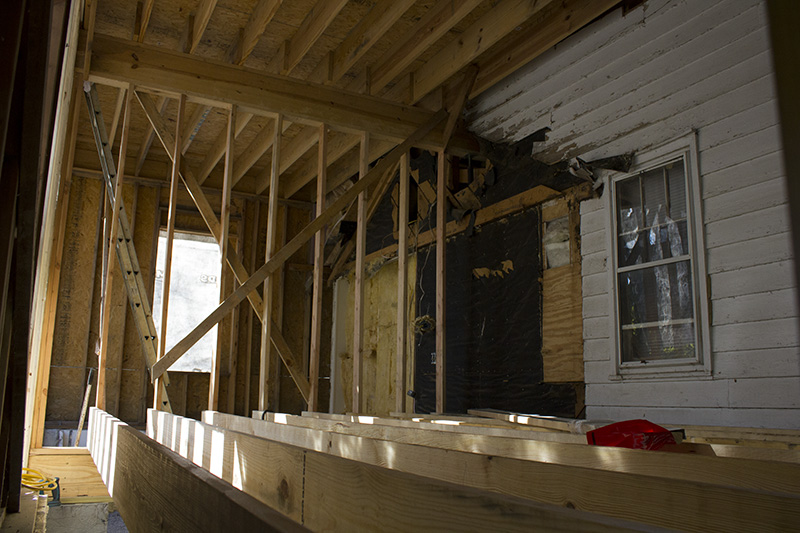
In progress as I write this.   You can see the east side is framed and ready to cover with plywood.  [Ed:  Got slowed down by the south facing window in the west room.   It takes time to frame it right.   Ran out of light, but we did get a few studs in place on the west side of the front wall.]


6.   New inside floor joists and subfloor.

Also in progress.  This is a pic of the joists in the east room.  The floor joists for both rooms will be in by the end of the day.  [Ed: Didn't make it.  Got all of the east room, some of the west.  Then it got dark.]   The subfloor is waiting to be picked up at Menard's and will be in place next weekend.

PROGRESS!!


Next up:
  • Finish framing south [front] wall of house.
  • Finish joists in west room.
  • Subfloor on both floors.
  • Exterior walls all closed up.
  • Windows for these two rooms installed.  [They're ordered!]
  • Insulation in the exterior walls
  • Insulation boards to button up the spaces between the old house and the new house.
Here's a pic of the house-within-a-house that we currently have.   I assure you that as the remodel goes forward, the old house will be entirely dismantled and pitched through doors/windows until there is not one nail of the old house left.    [Though we're hoping that many of the old oak and poplar joists in the oldest part of the house will be nice enough to use as flooring in the hallway and living room.  Fingers crossed!]

Until we get there, we need to button up these spaces for the winter:


This is the east side.   Notice the temporary ductwork that shoots cool/warm air into the guestroom upstairs.   We're going to really insulate that well.


This is the west side.    You can see that Eric filled the top with insulation last year.  That's what's next to the temporary stairway going upstairs.   It worked fine last year.   This year we're going to button up the side space between the old wall and the new wall. We'll likely use insulation board all the way down.  Pretty easy to place and will seal it up nicely until we do that center part of the house above the basement.  

This end of the house is under the guest room and the big room upstairs; the floors have been mighty chilly this month. We're hoping that sealing it up and getting the windows in for some solar gain will warm the upstairs floors a bit.

I'll post more pics soon!

Monday, September 22, 2014

Fall Hive Inspection

Here are the hives all happy in their new site.   The bees took the move in stride and are busy as ever.   We did a full fall inspection early in the month and discovered some interesting things.

The 24 hour mite board check turned up 3 mites from each hive.   Also, some dysentery in the Hello Sweetie hive [probably from some fermented sugar water.]  The mite load is small enough that I don't have to treat this year. 

Both hives had tons of brood - the bottom brood box was pretty much packed full of brood. 

But no honey. 

Both hives had just barely started building any comb in the top box.   Each one had only a partial frame and no honey in it. 

No. Honey.   In Sep-freaking-tember.

I've been feeding all summer, the way they tell you to the first year of a hive.   And this is the most brood I've ever had, so that's great - but no honey is not great.   What do they think they're going to eat all winter?? 

I got on the forum and one of the more experienced beeks took some time to answer my questions and make suggestions.   He noted that I may have a 'benign predator problem' with wasps and hornets and maybe some birds.   'Benign' as in not a bear or teenage boy knocking the hives over and destroying everything, but rather something stealthy making regular small raids and keeping the bees busy doing the wrong stuff.

Which would totally explain why I've never had much brood until this year.   This whole year I kept only one small entrance open at the landing board because late summer robbing is an obvious problem here.  I turned the top entrance up [the one you see opens into the top box which holds the feeder, which the bees use through a screen, so predators can get into the top box, but can't get into the brood boxes.]   I have screened bottom boards for summer ventilation.     The one small entrance is all they have.   Both hives are trying to enlarge it.  We'll put a hardware cloth mouse guard over it soon for the winter.

Since we have a lot of birds, too, I put up some poles with those heavy tinfoil disposable cupcake tins tied to them.  [See pic in previous post.]  They make some noise and the reflection is supposed to scare birds away.  They've helped in the garden, so I put two near the bees, just in case.

The goldenrod flow is still on and a good hive can draw a whole super in a week, so I'm letting them try and feeding them heavy syrup [Michael Bush's 5:3] in hopes that they'll get busy and store some.  It should be warm enough for the next couple of weeks.  If they don't, I'll pull the top box and put on mega candy boards for the winter and keep a close eye on them.   We'll push them together, insulate and wrap the sides up tight with black geo textile for the winter and wrap the bottoms [with slider boards in] to reduce draft.

I'm hoping that the new location will deter the predators and help get them through the winter.    If so, then maybe next year I'll have big hives and a decent honey harvest.  These queens are Indiana queens, so I'm hopeful.  It'll be my fourth year.   I'm ready for big honey.

If the hives don't make it this winter, I'm going to try one more time, with Russian bees that I can get from Kelley Bee Supply in Kentucky.   I hear they're good stock for surviving Indiana winters.   

Tuesday, November 19, 2013

Finished Filling the Moats


We finally finished filling the moats.

Halleluia. Or however that's spelled.

It took about 8 tons of gravel to do the east side and the drainage into the front yard.

Which means it took about 15 tons of gravel to fill things so far. 


We moved it all by hand.  In two days.  Please be impressed.


These are pics of the drainage from the house into the yard.  Luckily there's a good slope down to the road from the house, so the moats got much shallower and faster to fill as we moved forward.    We thank heaven for small favors. 

Saturday, November 9, 2013

Sealing the Foundation

As you know, we're working on a big foundation project.   Here's a recap, if you're interested. 

The next step in our foundation project is to give it some moisture protection.    There are a lot of options out there for that and Eric finally decided that we'd do two things.

1. Install a moisture barrier.   There are a number of options for this, and in the end we went with a layer of Platon.

2. Improve the overall drainage next to the foundation and direct it away from the house.   We laid drainage tile when we finished the footer.   We had talked about laying another layer of tile next to the foundation, but the Department of Redundancy Department decided that was unnecessary.   So, we decided to put in loads more gravel next to the foundation. 

Platon is the same kind of stuff you can use between a concrete slab and subfloor. It has bumps that keep a layer of air between the plastic and the concrete.

Eric attached the Platon to the foundation with ceramic coated washer head screws.

Then we hauled gravel.  And hauled more gravel.   And hauled more gravel.   In a day, the four of us were able to finish and fill one whole moat on the west side of the house. 

Tibby is a little sad that she can't hide in the moat anymore.  It kept her away from the horseflies and out of the wind.  She's moved back into her dog house.


Tuesday, May 15, 2012

New Garden Beds......again.

Just when I think I've finally got enough space in the veg garden, I go and decide that we're never going to be able to find sweet potato starts this year and I plant carrots and basil where the sweet potatoes would have gone.

And then a good friend calls to say that she found some sweet potato starts and hurry over there before they're gone.  

So we had to go get some because last year we didn't get any sweet potatoes and it would have been two whole years in a row without our own sweet potatoes and that wold have been bad.

The girls don't agree.

Whatever. 

So I looked at Eric and said, 'I think we need another bed.' and he didn't even flinch.   He said, 'Let's do it.' 

And I wanted to cry because I'm a little tired of digging and hauling gravel this year already.

Enough already!

So we called Quincy to get more gravel and sand because we had finished the last loads.  

Just FYI, there are over 7 tons of gravel and sand each when he delivers.   That means that we have moved 7 tons of gravel by hand since January.  And 7 tons of sand since last summer.  

By.  Hand. 

As in, one shovel full at a time.

I should be totally buff.

Anyway.  

The story is the same.    This is what it looked like before we started.   I didn't get a Before pic, because I was too busy digging already and I wanted to get it over with. 

First we have to decide where we want it, then we have to dig the grass out.   See all that grass to the front and left of the potato towers?     It had to go. 

I did it all in one 5 hour shift.  

Tip:  Take motrin before you start.   It helps.  

After I dug the grass out, I have to carve the clay down so it's smooth and the water drains right.

The grass in the center rectangle got covered by the sweet potato bed, some more geotextile and 12 inches of sand and chicken dirt.   I didn't bother digging it out. 


After we line the paths with geotextile to keep the weeds down, then we load the paths full of gravel.   Eric did the vast majority of gravel hauling.     Vast majority.  

And he loaded the bed full of sand and chicken dirt.

Then I planted the sweet potatoes.

Then we surrounded the whole blasted garden with deer fence to keep things out.  It works pretty darn well.  Too bad deer fence won't keep the weeds out.  

That pool ladder in the middle of the garden is an extra we had around so I put it to use to hold the sprinkler.    Works like a charm - easy to drag around and keeps the sprinkler high.  

The end.  


Saturday, January 28, 2012

Gravel

We use a lot of gravel.   Tons of it, every year.   We call our favorite hauling guy - Quincy May of May's Hauling - to bring us a load of #11 gravel or sand when we need more.  [I can never remember what size, but Quincy always does.]

We just used the last of our pile when we put in the strawberry beds a couple of weeks ago, and we needed more.    Time to call Quincy. 

The problem is that our pile is up a little hill.  The hill is mostly dirt and even though we've put some big gravel on it, it can still get pretty soft.   And, this is Indiana, where things stay soft for a long time and it takes ages for 'soft' to dry into 'brick'.  So, there are only two times a year when we can get a dump truck up there:  Winter when it's frozen hard and summer when it's dried out.     

This is winter, but it's warm, so it's still soft.  

We've been waiting and waiting and waiting for it to get cold enough and stay cold long enough for the hill to be hard enough to get a dump truck load of a gravel to the top without getting stuck or leaving huge ruts.  [Been there, done that, no fun] 

It was finally really cold for a few days and nights in a row, so Quincy brought me 6.5 tons of gravel.

Now I can dig more drainage around the back of the veg garden.  
Related Posts Plugin for WordPress, Blogger...