Showing posts with label joists. Show all posts

Thursday, May 31, 2018

House Remodel Update #2

As I mentioned in the last post, last Saturday we pulled up the floor in the entryway. 


In addition, the old entryway wall came down.   You can see from this pic that we had to do that before we pulled up that last layer of diagonal sub floor. 

Notice that gap in the floor - that's the current opening/stairs down to the basement.   That will soon be the new hallway.  Which means it has to have a floor. 

Notice the wall in the pic [the one behind the plastic sheeting].  That left side of the wall will be the new doorway into the office, [which right now is our temporary living room.]  We'll be cutting that door in later this week.  You know, after there's a floor there. 

Also notice the ends of the joists sticking out on the left.   That's new floor and new joists will be joined to those, coming over the old floor joists in the entryway [which will be taken out from the bottom].    Confused?   Me, too.  Eric has to explain every step a couple of times, but it is all super structurally sound and working brilliantly. 


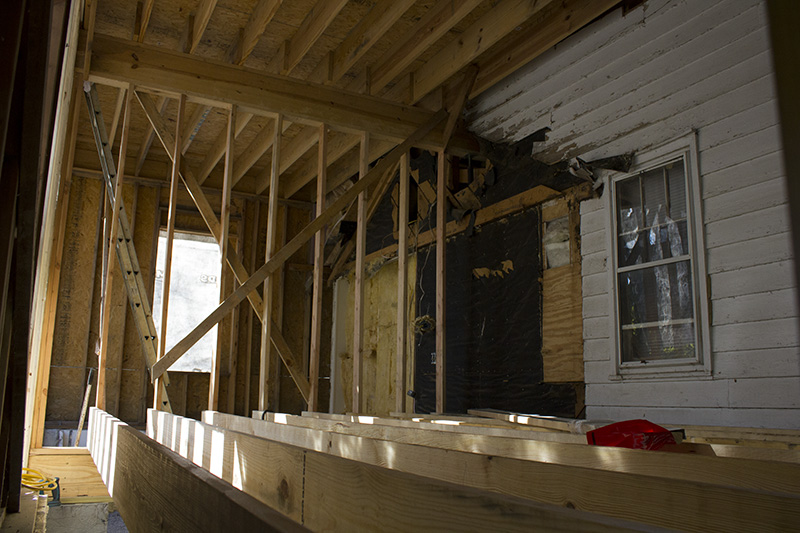
What you're seeing here is the entryway with most of the new joists in.  

That's the living room wall at the back with the plastic sheeting in front of it.  

That's the stairs going up on the right.   

The long joist running up next to the stairs is a beam that the basement stairs will connect to.  

The rest of those joists are tied into the joists that you saw sticking out of the floor in the previous pic.   The new floor will go on those.  


In this pic, Eric is in what will be our new bedroom, where we have the saw [and a pile of stuff that needs to go to the dump.]  The joists that you see go over the old basement stairs, joining the bedroom area, the living room area and the new entryway floor.  This means that in a couple of days, everything will have new joists and subfloor and this entire area will be new construction with new level floors, all joined together. 

Next up: 
  • what to do with the front door
  • new subfloor
  • new hallway walls
  • new stairs up
  • new stairs down
  • under stairs storage
  • deciding what to use for flooring in that end of the house
I'll keep you posted. 


Tuesday, May 29, 2018

House Remodel Update #1

If you are new to the blog and unaware of the huge remodel of the house we have been doing since 2012,  you can find many of the posts here.   They're not in chronological order, but at least you'll get a taste for what it's been like here.

I don't even remember when I posted last about the house, and things have been slowly moving along.   The front addition is in, enclosed, with subfloor, windows and insulation, but no drywall yet.  We'll be using that new area as storage for the stuff we have to take out of the old back addition of the house so we can rip it off and put the new one on.  That will happen by the end of this year.  Yee-Haw!

The big news last weekend was the tackling of the entryway, which is a hub of the new design.   It involves:

  1. ripping out all the crap inside the old roof over the entryway so we can
  2. rip off the old ceiling of the entryway.
  3. rip up 6 layers of old flooring in the entryway
  4. knocking out the old wall of the entryway.
  5. laying new joists over the old basement stairs so we can
  6. build beams for under the new stairway up so we can
  7. build the new stairway up so we can
  8. build the new stairway down to the basement
  9. move the front door 12 inches out to the new wall on the new foundation and up over where the new floor will be [12 inches higher]
Eric tackled the first two things last month.  Done.

On Saturday we did numbers 2-4.  


This is what it looked like when we started.    Notice the old entry hall wall.  The ceiling is already down.  Notice how low that ceiling was compared to second floor.   Notice those crazy steep stairs. 


These are the layers of floor we ripped up.   From the top:
  • laminate [easy]
  • plastic pad [really easy]
  • particle board [pain in the butt]
  • pine tongue and groove  [serious pain in the butt]
  • tar paper  [easy]
  • diagonal pine/poplar subfloor [huge pain in the butt]
You can see that the level of difficulty of removal increased as we got lower.  That wasn't just because we were tired.   

The laminate was the non-glued floaty kind.   Best. Stuff. Ever.  I'm a huge fan of it for many reasons.  

The particle board had to be pried out and it fell apart as we worked.  No fun. We used long crowbars with teeth on the ends so we could pry out the remaining nails without bending over.   These are my favorite tools ever.  They're heavy, but useful in so many ways.  We've used them during every part of demolition here. 

The tongue and groove was nailed in with a reasonable number of nails, but it had to be pried out.  It didn't fall apart, but it took a lot of effort to lift.   We worked in tandem to get under the boards and pry them up with the nails.  Sometimes it worked, sometimes not so much.


The final bottom layer of subfloor was a huge pain.  This area of the house had been a screened in porch and had taken water damage.   These boards spanned the spaces between the joists and were nailed to them.  They did not come out willingly and many of them were in bad shape and cracked under the pressure, leaving most of the nails.  Once this layer was out, the floor was open down to the basement.   It took some planning to make sure that there were no missteps in the spaces between the joists.   Joists were 24 inches apart [as opposed to the 16 inches that is code today.]  I'm not comfortable with open spaces like that, so I stayed away and Eric demolished and handed me the debris to bag.   We took a lot of breaks to vacuum the dust and crap so it didn't fall down into the basement area.   

By the end of the night, all the floor was up and a few sheets of plywood was tacked in place so we could walk safely in case of emergency.   

Next up:  A frame around the new basement entrance and new joists.  Stay tuned.  


Sunday, October 23, 2016

Putting on a Good Front

Eric is currently sawing some joists off the back of the truck.   Works great!   Here's an update on what's happened in the house the last few weeks.

In the last post on the house I listed a few things we wanted to get done before it got cold.  Here's how we're doing.


1.   Tear out old floor and joists.

Done.  The decking went to the dump.   We recycled all the good 2x4s and joists that we could.   They're all on the front lawn now, nail free.  So pretty!  [Ack.  This is why Country Living has never come knocking at my door.]


2.   Dig out new crawlspace.

Done.   Not fun, but less not fun than the first time we did it in the former ell.   This time it was just me and Eric.  The dirt was nasty, hard, and difficult to get out but we didn't have to bucket it and lift it out just us girls.   Eric did a lot of picking first to break it up.  We could shovel it into a wheelbarrow and easily get it out.    In the end, like anything worth while, with patience and one shovel full at a time, we got it all dug and moved.


Notice the concrete pier cylinder in this pic, holding the lower beam between the two downstairs rooms. Working like a charm.


3.  Gravel new crawlspace.  

Done.   Dudes.  Sometimes I wonder at the sheer tonnage of gravel I have moved in this place all by myself, much less the combined tonnage that all of us have moved.   Again, Eric and I did this ourselves and I confess I wore out because we had done a lot of dirt digging first.   It ended up that I filled the wheel barrows, then Eric moved it and dumped it in the hole.   When I got too tired to fill, I went and raked and raked and raked to spread it around the hole.  Pepper and Tibby LOVED it in there.   

In this pic you are looking from the east side of the newly graveled ell through the old living room foundation and into the newly dug and graveled west crawlspace.   I can stand up on the east side and my head barely comes to the top of those joists.  On the west side I have to hunch quite a bit.   Eric assures me that this will be 'quite comfortable' once the subfloor is in and he's putting in the wiring, etc.    I will take his word for it because once the subfloor is on, I'm never going down there unless it's to save someone else's life.  


4.  Pour concrete to join new foundation with old foundation.

Eric did that on his own.  It took three pours around some tricky schedules and some rain.   Got it all done and it looks great.


5.  Build new front wall.

In progress as I write this.   You can see the east side is framed and ready to cover with plywood.  [Ed:  Got slowed down by the south facing window in the west room.   It takes time to frame it right.   Ran out of light, but we did get a few studs in place on the west side of the front wall.]


6.   New inside floor joists and subfloor.

Also in progress.  This is a pic of the joists in the east room.  The floor joists for both rooms will be in by the end of the day.  [Ed: Didn't make it.  Got all of the east room, some of the west.  Then it got dark.]   The subfloor is waiting to be picked up at Menard's and will be in place next weekend.

PROGRESS!!


Next up:
  • Finish framing south [front] wall of house.
  • Finish joists in west room.
  • Subfloor on both floors.
  • Exterior walls all closed up.
  • Windows for these two rooms installed.  [They're ordered!]
  • Insulation in the exterior walls
  • Insulation boards to button up the spaces between the old house and the new house.
Here's a pic of the house-within-a-house that we currently have.   I assure you that as the remodel goes forward, the old house will be entirely dismantled and pitched through doors/windows until there is not one nail of the old house left.    [Though we're hoping that many of the old oak and poplar joists in the oldest part of the house will be nice enough to use as flooring in the hallway and living room.  Fingers crossed!]

Until we get there, we need to button up these spaces for the winter:


This is the east side.   Notice the temporary ductwork that shoots cool/warm air into the guestroom upstairs.   We're going to really insulate that well.


This is the west side.    You can see that Eric filled the top with insulation last year.  That's what's next to the temporary stairway going upstairs.   It worked fine last year.   This year we're going to button up the side space between the old wall and the new wall. We'll likely use insulation board all the way down.  Pretty easy to place and will seal it up nicely until we do that center part of the house above the basement.  

This end of the house is under the guest room and the big room upstairs; the floors have been mighty chilly this month. We're hoping that sealing it up and getting the windows in for some solar gain will warm the upstairs floors a bit.

I'll post more pics soon!

Monday, September 5, 2016

House Update - Support Beam

Once we got the upstairs floors done and the windows and doors trimmed out we took a bit of a break from major construction.  

Our idea of a break is to do massive gardening, thinking, hauling, mulching, more thinking, figure out how to get ductwork  to the upstairs bedrooms so we could all survive the summer, disconnect the ductwork to the front end of the house, install ductwork to the upstairs [yay! a.c.!], more thinking, more hauling, digging, canning, move the master bedroom upstairs to the guest room, move the living room to the old master bedroom including the actual furniture that almost didn't fit through the actual doors, pull up the laminate flooring in the living room, rip off some of the aluminum [!] siding on the front of the house, cut a 'door' in the old front wall of the house, seal up the old hallway to the front room to keep the mess out of the house, gut the old front room, dispose of the debris....

It wasn't much of a break.

Especially since the next part involved mixing, by hand, a ton of concrete.  Not kidding.   Eric is my hero.

The concrete was for two footers and two piers [inside the front section of the house] upon which will rest a load bearing support beam.  Load bearing is a scary thing.   It means it holds the house up.    Hence all the thinking.   This is not something that we want to screw up.

Here's a pic of  Eric in what used to the be the front room.  Piers poured.  He was just getting ready to lay the boards down to build the I-beam that will support the center of the second story.

Wait.

'But, Robin!   How?..', you ask, 'HOW is the second story staying up now if he's just now building the beam??'  

An excellent question.   There's another beam in the floor of the second story that runs the entire length of the house and it's resting on stuff it needs to rest on.  The second story is safe. Those piers are dead plumb under the upstairs beam.  Once this new beam is in and a support wall between it and the beam above, the house will be EXTRA sound.   We like extra.

Here's a pic of the roof situation in the front of the house.  You're looking straight up into the ceiling of what used to be the front room.  

WARNING!   This pic is confusing.   Also, it's blurry.  Sorry about that.  It was darkish in there.  I've labelled a bunch of stuff and then tried to explain it below.   You can click to biggify the pic.


Explanation:  Start from the top of the pic on the left side.

  • See the new beam?   That beam runs the length of the house.   It's in the floor of the second story.   The new ceiling joists [which are also the floor joists of the upstairs] are on top of that new beam.
  • You can see the plywood decking above the new ceiling joists.   That is the floor decking for the new upstairs.
  • The blue round things are old light fixture innards on the old ceiling joists of the front room.   Notice that the old ceiling is about 2 feet LOWER than the new ceiling is.   [Don't get me started on the ceilings of the old house.]
  • On the right side of the pic you see the Old Roof Decking and the Original Roof Rafters.   Yes. That's part of the original old roof, tucked under the new addition.   Eric stripped the roof when we put the second story on, but only took out the peak of the roof and enough to set the new beam and build over the old stuff.  There were excellent reasons. All that old stuff is about to come out very soon.

I kind of love this picture because it really illustrates the careful thinking and bizarre sequence of events we've had to co-ordinate to live in the house comfortably-ish while doing a major renovation.

Eric is a genius.

Sunday, November 23, 2014

Putting on a New Second Floor

As you know, we've been doing some renovating.   We started by digging and pouring a whole new foundation.

Then we built some new walls around the old house.

Then it was time to put the second floor on top of the new walls.

Just how did we do that with the old roof in the way?, you ask.

That's a good question.   It took a lot of planning.   Very careful planning.   And very careful placement of support columns in strategic places inside the existing house.  Because the first thing we had to do was put in a beam in the new ceiling that goes the entire length of the house [north to south].   Then lay the joists east to west. 

Eric did that through the existing roof.  There was a lot of old roof in the way.  It had to be stripped and sawzalled out.   I love the sawzall.   In the pic above, you can see the rafters of the old roof sticking out of the floor of our new second story. 
 
Here's a view from the ground, up into the floor of the new second story.  

Yes, all of this meant that for weeks we had an open roof. 

No.  The weather did not cooperate.   More on that later.  

Related Posts Plugin for WordPress, Blogger...