Wednesday, September 21, 2011

Curry Pickles - New and improved

Curry pickles with curry paste
Remember when we made that first batch of curry pickles?

I tried it again with curry paste instead of powder.   I'm so glad I did.   These were really, really good!  So much better than the first batch.

I made a jar with red long beans and red curry paste. 

And I made a jar with green beans and cukes and green curry paste.

The curry paste was a much improved curry flavor, but they were both medium heat and really kicked the heat up a notch.   Since I've got a low heat eater, next time I'll leave the extra chili pepper out of the jar or use mild heat curry.  

With all the different types of curry out there - Indian, Thai, etc. - and all the heat levels, these pickles are really versatile.   I'm excited to try this with different curries next year. 

I really like this recipe because you don't have to make much.  It's easy to cut in half if you want just one jar.  And if you want to try two different things, it's easy to do a different thing in each jar.   Plus, if you don't like them much, then you can always take the other jar to a potluck.  Someone will definitely like them. 

Here's the revised recipe for you.    Enjoy!

Curry Pickles - New and improved version!

  • Green or red beans - enough to pack 2 pint jars
  • 2 cups water
  • 2 cups vinegar
  • 1 T canning salt
  • 1 rounded tsp of curry paste in each jar.
  • 1 dried chili pepper in each jar.
  • 1 garlic clove in each jar.
Wash and trim the beans and pack them into the jars. Put a chili [if you want the extra heat] and a garlic clove in each jar.   Boil the water, vinegar, and salt.   Pour over beans until they're covered 1/2 inch with liquid.  Process 10 minutes for canning.  Makes 2 pints.

Wait two weeks before opening.  

Tuesday, September 20, 2011

Onion Seeds

I'm working on saving a few seeds this year.   Not an easy task here where the weather gets so humid. 

I can't tell you how many times I've 'dried' seeds, only to find them growing mold 3 months later.    Clearly, I'm not doing something right.   

The remedy is to practice, practice, practice.     This year I'm saving onion seeds.


I planted onions from sets in the Spring, and I got a lot of great onions.   One of them sent up a gorgeous flower and I enjoyed looking at it so much that I didn't cut it.    Later, I realized that I could let it go to seed and then save the seeds.  


Here's a close up of that gorgeous flower in July.

How perfect is that?!   


Now, it's matured and set seed.    I left it in the garden until it turned brown and the seed pods started opening on their own.   The seed is good and mature now, ready to start out on its own.

So, I cut it down and shook the seeds into a bowl.    In a week, I'll put them in an envelope, clip it closed and label it with variety and date. 

I've heard rumors that you can put seed in the freezer to keep it good and dry.    Does that really work?   It won't kill the seeds?   Please comment if you have some experience with freezing seeds!

I"ll likely plant these onion seeds in the cold frame this fall to let them grow all winter.  I hope that they're mature enough to use as sets in March or April.

Monday, September 19, 2011

Book: The Forgotton Skills of Self-Sufficiency

photo: amazon.com
Caleb Warnock has a new book out:   The Forgotten Skills of Self Sufficiency Used by the Mormon Pioneers.  I've read this book cover to cover and am happy to recommend it.

This book is an excellent resource for folks working toward maximizing their gardening year and for folks working toward a self sustaining lifestyle. It's full of great tips and tricks - tried and true by people whose lives depended on it. Topics include seed saving, pollination, cellars, cold storage, greenhouses, grapes and fruit trees, perennial vegetables, long keeping vegetables, chickens, etc.

There is no way one book can completely cover all of the topics addressed, so the author has listed other resources that will help answer the questions that you might have. I had a great time exploring types of geothermal greenhouses after reading about the author's.

If you're already very knowledgeable about many of these topics, then you might find the treatment too cursory, but if you're just starting out, then I highly recommend this book. I consider myself a skilled summer gardener, but I really learned a lot about winter storage, greenhouses, and extending the gardening year.


Here's a link to the book:


Next on my garden reading list is a lot more reading on seed saving. 

Sunday, September 18, 2011

Comfrey: Part 1, Natural Dyeing

Comfrey [Symphytum officinale] is a most useful plant.    We were lucky enough to inherit a couple of wild-ish ones when we moved here.    I say wild-ish because I'm pretty darned sure that the previous owners didn't know what they were, and I know they didn't plant it, but it's not the kind of thing that shows up by itself.   Someone, sometime planted it.

Then it was neglected.  Ignored.  Abused, even.   Poor thing.

But here's the deal:  These things don't die.   They are some of the toughest plants I have ever seen.   Seriously.    When I put in the veg garden, I laid gravel walks.   I dug up one of these that had been in the middle of the path and put 4 inches of gravel on it. 

It lived.   It thrived.  It grew up through the gravel and stayed put.   It didn't die even this summer when it was 9 million degrees and the sun beat down on it for months at a time.    I'd like to be that tough. 

As you can see in the pic above, these are beautiful leafy plants.   They have a wonderful flowers and some day I'll find my photos of them and show you.   Hopefully by the time I write up Comfrey:  Part 2, Medicinal Herb.   Hopefully. 

We used comfrey leaves in our natural dye study group to see what kind of color we could get. 

The pics aren't great, but they give you an idea of what we got.   Lovely sage greens and tan!

Notice that the samples on the left are a lot lighter than the samples on the right.   You're looking at the difference between how this particular dye takes on cellulose fibers [left] and protein fibers [right].    With comfrey, it makes a big, big difference.     With other dyes, like osage orange, it isn't nearly so noticeable.

The cellulose samples were so light, the only color on there was probably from the mordants.

Next time we try it we're going to use alum acetate to treat the cellulose stuff to get better colors.   Fingers crossed!

In the meantime, the protein fibers look wonderful.   [They're greener in person than they are in the pic - a beautiful sage-y green.]

Comfrey dyes more than just fibers.  I've been reading up on using natural stuff to color hand made soap with and comfrey is the most recommended material to use for green.   Here's a tutorial at soap-making-resource.com.  

By the way, if you haven't looked at Jenny Dean's Wild Color website, go there now!   You'll find a wealth of great information and beautiful colors from all kinds of natural dyes.

Saturday, September 17, 2011

Jewelweed - Touch Me Not

One of my favorite late summer flowers is jewelweed, also called touch-me-not.    It grows in the ditches and damp places in the bottoms and along creek sides.   They are our local impatiens - only more exotic looking than the pink and white ones you get at the garden store.  

We have two species: Impatiens pallida, which is yellow; and Impatiens capensis, which is orange with spots.    They are both native to North America.

The yellow one, Pale Touch-Me-Not shows up in limestone regions and southern Indiana is one of the foremost limestone regions in the world.   We're famous for our limestone.  

And our touch-me-not. 

The orange jewelweed is the most common jewelweed.   There's a lot of healing lore around it - though none of that has been officially tested.  [Few native plants have been officially investigated, but that doesn't mean they don't work, only that the medical establishment prefers other sources for medicines, etc.]

Jewelweed's most common homeopathic use is to treat skin ailments such as poison ivy.   The stems of the plant are fleshy and when crushed, impart a lovely cooling gel similar to aloe.  

The common name 'touch-me-not' comes from the fact that the ripe seed pods explode when touched, shooting the seeds out and about.  I've never tried it, but it sounds kind of fun.  

Friday, September 16, 2011

Walking

Every evening, I take a walk down our road to the big blacktop that goes to the town village intersection where our post office is.    The blacktop is a mile down the way.  

There are woods and pastures on either side of the road. 

I pass two houses.  Three if you count the one way off the road.   

Most days I don't see any cars at all, but when I do, they slow down and we wave and maybe chat for a bit.

I often take the dog and most days K1 comes, too.

And while I walk, I think, I plan, I listen, I unwind.  Mostly, I unwind. 

I walk because I love to walk.   I love the rhythm of it.  I love all that coordinated motion. I love it when it's 97 degrees in July.   I love it in the rain.   I love it now that the weather is cooler.

I love watching things along the side of the road change - which flowers are blooming, which are going to seed, which have dried up because it's so dry.

I know where the fields smell like cumarin.   I know where the deer carcass was and approximately how many vultures were enjoying it.   I know where the walnut trees are.   And the hickories.   And the oaks.  I know where the nest of red headed woodpeckers was.   I know which fields have quail.   I know where the dead tree with 5 kinds of weird fungus is.   I know where the one stalk of arum along the whole road bloomed.    I know where the black raspberries ripened first.  

All of these things I would have missed if I had not walked by. 


Thursday, September 15, 2011

Tencel Roving

Aurora
Tencel roving is shiny and beautiful.

And shiny.  

And silvery and shiny. 

I love it.  Especially because it's shiny. 


So I dyed up a whole bunch and put it on my Etsy site.  1 oz bundles.   $6/oz. 

You can spin tencel roving into beautiful fine shiny yarn - it's great plied with wool.  

Or, you can use tencel roving in nuno felting.   Gor. Geous.   

Or you can use tencel roving instead of silk in silk fusion [silk paper] projects.   

You need more fiber in your life.  I think you might need to try some of this.   Here are some more pics to whet your appetite.  

Tex Mex
Pheasant
Vineyard
Iris

Wednesday, September 14, 2011

Crazy Busy

This time of year is crazy busy.

Crazy.

Busy.

The garden is producing and those vegetables don't can themselves.  Jam doesn't just spontaneously appear in the cupboards.   The house does not clean itself.    Yarn does not dye itself.  The grass doesn't mow itself.  Shows do not set themselves up.  The laundry doesn't do itself.

We've got jobs to go to, homework to do, co-ops to teach, meals to cook, weeds to pull, samples to make, books to read, letters to write, scarves to weave.

There are not enough hours in the day to get done everything that I need to do in day.

Unless I quit sleeping.  

I don't think that's a very good option.

So, I need Plan B.

I think about Plan B every evening when I go for a walk.   I go through everything on my list and try to single out those things that are dispensable.

Here's what's dispensable:

...

[cricket noise]

...

Sigh.  There isn't anything dispensable.   It all needs to be done.  I have good reasons for everything on my list. 

So, I muddle through.

Tuesday, September 13, 2011

Sumac

Winged sumac bob
Sumac shrubs [Rhus sp.] are invasive around here [southern Indiana].    They grow from the root rhizomes - like iris do - to form large clonal colonies.  The short trees get about 15 feet tall when they're really happy.  The branches ooze a white sap when cut.  The good news is that they're attractive and the ripe red berries are very useful. 

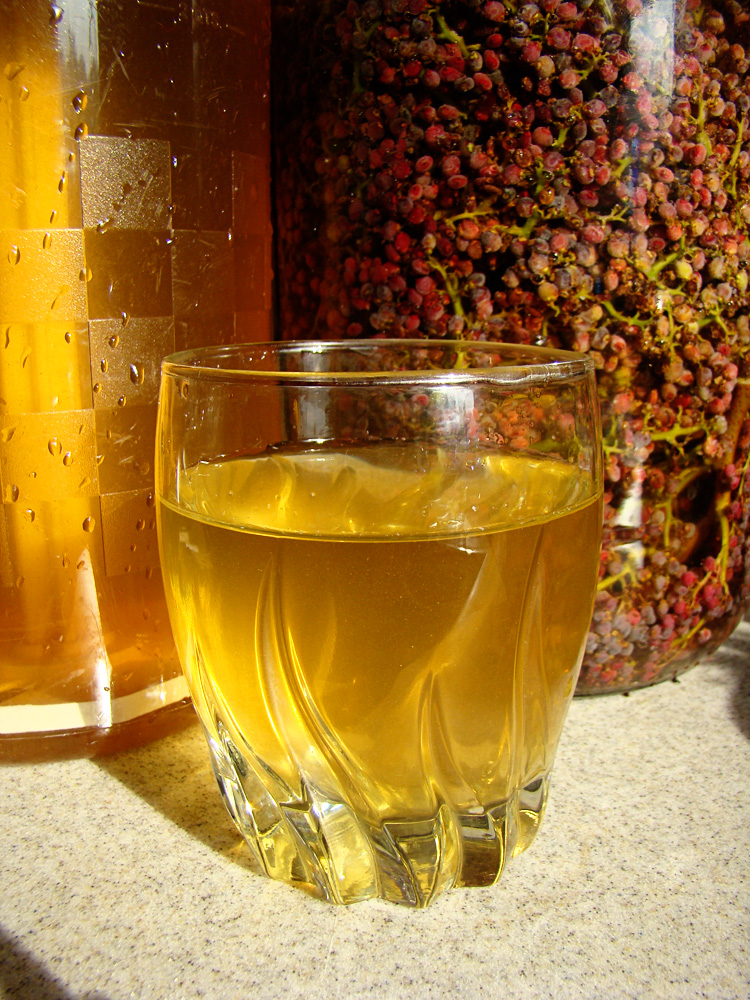
The branches bloom and form dense clusters of red berries, called 'drupes'.  The name 'sumac' comes from the Old Arabic word for 'red'.  The cut branches make a beautiful fall arrangement that will dry on its own and last for months.  The dried drupes have been used throughout the world as a cooking seasoning [sumach] and they are very popular in middle eastern cooking.   We harvest the drupes to make the best lemonade you can imagine.

There are three common varieties of sumac here:  Smooth sumac [Rhus glabra], Winged sumac [Rhus copallina] and Staghorn sumac [Rhus typhina].   Staghorn stems and drupes are covered with fine velvety hairs.  Winged sumac has little wings that grow up along the twigs between sets of leaves. Smooth sumac is .... smooth.   No hairy stems or drupes.  The red drupes of the smooth sumac are often covered with a milky or waxlike substance - it's delicious!

Note:   A lot of people freak out about these plants, believing that all sumac is the poison sumac.   Poison sumac has white or gray berries - 'Berries white, take flight!'.   Not red berries.  Not red berries covered with milky wax.   It's easy to tell these plants apart.   Really easy.  

Winged sumac with bobs
Sumac spice.  To harvest the drupes to use as a spice later, cut the clusters, called 'bobs' and lay them on screens or sheets to dry.   When the drupes are good and dry, rub them off the twig and put them in jars.  Save the little hairs of staghorn sumac - they're tasty! This spice lasts for a long time.

Smooth and winged sumac drupes are often waxy or covered with a milky substance.  The best flavor is in that wax but it's tricky to get it dry enough to store.    Be patient.  Keep them in a very dry place.

Lemonade.  Our favorite way to use sumac is in lemonade.   Here's how:

Sumac bobs soaking for lemonade
Cut the bobs - the waxiest ones you can find - oozing the white stuff over the red [or purplish] drupes.  [If you're using staghorn sumac, then go for the hairiest ones - that's where the flavor is.] Remove all the leaves.  Do NOT wash the berries - you'll wash the flavor off.

Pack the bobs into glass gallon jugs - pack them tightly.   Fill with cool water and set them in the sun for a few hours.   If the weather is cool and cloudy, then use lukewarm water and soak them overnight.  

Note:  Do NOT fill the jars to the top.   As they soak, the bobs release bubbles and the jar will overflow if the water level is too high.   You might want to put the jar in a dish to catch the overflow. 

After a few hours, the water will be a beautiful light amber color.   Strain the water through a fine mesh tea sieve as you pour it out of the jar.  It will be cloudy for a while.  Don't worry about that.  We got just over 2 quarts of juice from each of these jars.

Add 1 to 1 1/2 cups of sugar to sweeten [to taste].  Stir well and enjoy.   This is the best lemonade ever.  I much prefer it to regular lemonade. 

Sumac lemonade
Freezing.   I have had excellent success freezing the juice and using it months later to make lemonade with.    If you can spare the freezer space, it's worth freezing the juice.

Concentrate:  To concentrate the juice, soak a gallon of bobs the first day, then use that same water to soak another gallon of bobs.   Remember, the longer you concentrate, the more likely you are to introduce bad stuff into the water.   I don't concentrate unless I'm going to cook with it and it will be pasteurized in the cooking.

Canning.   I have tried to can sumac juice so that I wouldn't have to use my scarce freezer space for juice.  I concentrated the juice, then I boiled it and put it into jars and processed them for canning.   It worked beautifully - but the flavor was changed in a significant way.   I don't like the cooked juice nearly as much as I like the fresh juice.    If I want to preserve sumac juice, I'm going to freeze it.

Experimenting.  I used some of the concentrate to make sumac jelly and to make sumac lemonade bars [with a lemon bar recipe].   In both cases, the wonderful subtle flavor of the juice was lost.   The sugar overwhelmed the flavors and the finished product was unimpressive and too sweet.  

Other uses.  Sumac leaves have a lot of tannin in them.   Rumor has it that they're good for dyeing and will give either a yellow dye or grey dye depending on the fiber and mordant.   Someday soon, I'm going to use the berries to dye with.   I'll let you know how it turns out. 

Monday, September 12, 2011

A Little Dusty


These oak leaves are on our road.  They are not a fancy variegated type.    They're just plain dusty.

Everything is dusty.    The grass is dusty.   The gardens are dusty.   The cars are dusty.  The porch is dusty.   The house is dusty.   The trees are dusty.   The dirt is dusty. 

These are the conditions that produced the Dust Bowl of the 1920s.  Regularly disturbed soil and hot dry weather.    The county comes by to grade our road a few times a year - to get the potholes out of it and to smooth out the washboards.   They dump more gravel if need be.    Sometimes they make it better, sometimes they just rearrange the mess.   Always, they make more dust.

Sunday, September 11, 2011

Elaeagnus umbellata - Autumn Olive

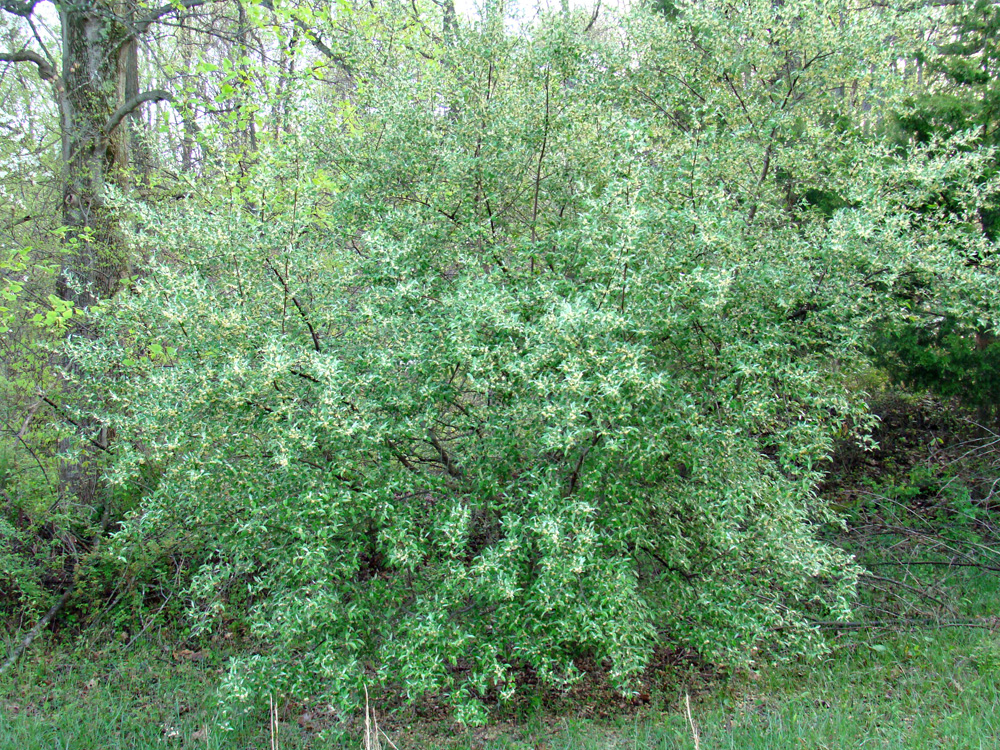
Elaeagnus umbellata shrub - 10 feet tall


Not long after we moved onto our place, after the cows had been gone a while, and after we stopped raising sheep, we noticed more and more little shrubs with silver leaves popping up.
Elaeagnus umbellata flowers - April

And they grew.


They bloom in the spring and the small white tubular flowers smell like warm spices from far away places.   I thought they were enchanting, so we left them. 

Elaeagnus umbellata berries
And then they bore fruit and I figured out what they were:  Elaeagnus umbellata. [Think of it like a woman's name:  Elly Agnes.]  The autumn olive.  

UPDATE:  Apparently sometimes these have nasty thorns.   I had no idea!  We have the thornless kind.  


And then we found out that they're considered a pest here.   Because the birds love them.   And eat them.  And poop their seeds everwhere.    And now we have loads and loads and loads of them. 
 
The red berries are small - about the size of the nail on your little finger - and have silver spots. 

I did a lot of searching to find out if the berries are edible and indeed they are.    They're very acidic and have a large seed.   If you taste one right off the tree, you'll get that weird dry taste that you get from green bananas and unripe persimmons.

They're abundant, they're full of vitamin C and they're free, so I set about experimenting to see what kind of jam I could make.

The first thing I learned was that the redder they are, the better they are.  Also, it's best to not skimp on the sugar.   These babies are tart, I tell you.   Treat them like cranberries - be generous with the sweetener.

I tried elaeagnus jam with a touch of lavender and lemon verbena - very nice, but not great.  No one would eat it but me.   Also, I had used pectin and that jelly was firm.

Really firm.   If only my butt were that firm.

Then this year, I tried it with oranges and no pectin and Hello! We have a winner!  This jam is good!  Everyone likes it.

And it's really pretty.   It looks as good as it tastes.

This is what I did:


Elaeagnus Orange Jam
from www.rurification.com

  • Pick about 4 cups of berries.  Make sure they're good and red. 
  • 1/2 cup water
  • 4 cups sugar
  • 2 oranges:  Zest and juice.


Wash the berries and put them in a pot with the water.  Cook until they're good and soft.   While they're hot, pour them into a chinois or strainer and mash the berries to get the juice and pulp out. 


Don't let the seeds fall into the juice and pulp.  [I don't try to squeeze them all dry.   Seeds are often bitter and I don't want that in the jam, so I stop straining when things start getting dry and sticky and most of the juice and pulp is out.]


Almost done!


Discard the seeds and skins. [Chickens like them.]  Put the pulp and juice back into the pot and add the sugar, orange zest and orange juice.   Cook until it boils hard.  


Ladle into jars.   Process for canning 10 minutes for pints and jelly jars. 

Saturday, September 10, 2011

What's that plant?

We haven't played this game in a while but now is a great time of year to find new things blooming around the woods and creeks.   The fall wildflowers are just as colorful and spectacular as the spring ones. 

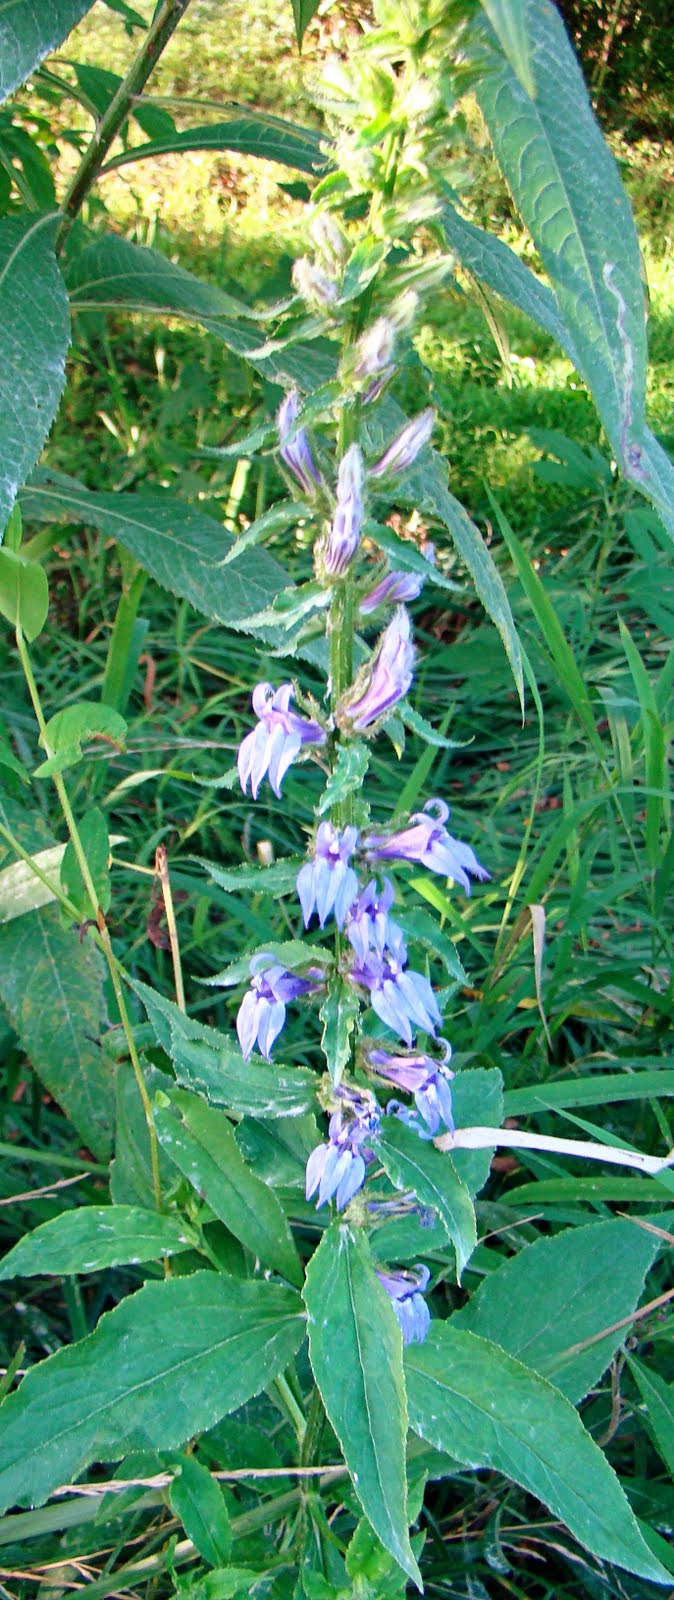
This flower grows in stalks about 24 inches high - taller if they're really happy.  It has blue to purple flowers - usually a bit darker than what it looks like in this pic.   They like damp meadows and creeksides.   They volunteer here everywhere and I'm always very happy to have them show up in the flower beds. 

Hint:  The Latin name sounds like an STD.  Also, it's cousin is named after a bird.  Give yourself extra points if you can name both.

Answer below the fold.

Friday, September 9, 2011

Red Okra

My dad was from Arkansas and we grew up with an appreciation for okra.   Fried okra.   Steamed okra.  Pickled okra.   The slime doesn't bother me. 

My kids love okra steamed, with butter and lemon juice.   Or alfredo sauce.  Or fried up with garlic and bacon grease. 

And they love red okra the best.    And why not?   The plants and flowers are beautiful!   The pods don't keep their color when cooked [they turn green again], but they're pretty in the garden and surely the red ones must taste better than the plain old green ones.  

At least we think so.

Thursday, September 8, 2011

Squash Fritters

I had loads of lemon squash this year.  Which is just fine with me.  I like it with sauces of all kinds instead of pasta.   I like it in cake, too.

Lately, we've been eating it in squash fritters.   Cooked in a little bacon grease.   Here's the recipe:


Squash Fritters:
  • 3 cups grated summer squash
  • 1 medium onion, diced, sauteed until transparent
  • 2 tsp salt
  • 1 tsp thyme
  • black pepper to taste
  • 1 1/2 - 2 cups flour, depending on how sticky you want them.
  • 1/2 cup yogurt
  • 1 egg
Cut the onion and get it sauteing while you grate the squash.   Combine all ingredients in large bowl.  Drop by spoonfuls into hot pan.  Fry like pancakes.  

Here's a great sauce to go with them:

Cream Cheese, Pepper and Bacon Sauce for Fritters
  • 6 slices of bacon, fried crisp and crumbled
  • 1/3 cup chopped onion
  • 1 red sweet pepper, minced
  • 8 oz cream cheese
  • 1-2 tablespoons of milk to get it to the consistency you want.  
Fry the bacon, cool it, crumble it.   Cook the onion and pepper in the bacon drippings until soft.   In another bowl, beat the cream cheese and milk until smooth.   Stir in the bacon, onion and pepper.   Makes a great topping for Squash Fritters and a great stuffing for little hot [or mild] pepper appetizers. 

Wednesday, September 7, 2011

Romularia Spot

One of the facts of gardening life here in southern Indiana is the yearly occurrence of romularia spot.

See the spots on the leaves, left?  That's romularia.  

It's a fungus whose sole purpose in life, I swear, is to take over my garden.  

I'm pretty sure.


And this is what it did to my tomatoes in just a couple of days.   Loads of brown crispy leaves.  I've seen it take a 5 ft diameter clump of rhubarb down to 2 inch stumps in 10 days. 

This fungus spreads in warm damp conditions.    This means that our humid Indiana summers are a perfect breeding ground for romularia spot, and sure enough, I see it every year.   

Romularia hates hot and dry.    All of our heat this summer really helped control it this year.    However, as soon as it cooled down, the romularia took over.  

You'll see it in the lushest parts of the plants first - that's because there's not enough air circulation to dry it out.  Then it will spread up.

Romularia will kill a plant if it can - by defoliation.   Our weather just got hot and dry again, so I'm not going to panic.  I confess that I've been tempted to put fans in the garden just to dry things off.  Since it's September now and the end of the season, I've decided not to, but I will be pulling all the plants off the beds and burning the debris to kill the romularia leftovers.   That helps control squash bugs, too. 


However, I'm keeping a good eye on my peppers - the leaves got spots and turned yellowish and the whole thing kind of drooped.   The fruit is unaffected and we'll harvest that if the plant loses too many leaves.

Tuesday, September 6, 2011

Hornworms: Part 2

They're back.    Earlier this summer, we had a large crop of tobacco hornworms.   I got those under control just in time for the blister beetles.   I got the beetles under control just in time for a second batch of hornworms and romularia.

Tomato gardening is not for the faint of heart.

Tomato hornworms and tobacco hornworms are almost identical.  Tomato hornworms are darker, and the white stripes form Vs instead of just white slashes like the tobacco hornworms.   These were so much darker, that I thought I had tomato hornworms, but the white marks are slashes, not Vs, so this is just a fall version of the tobacco hornworm.

They're just as destructive as the early ones and they leave just as much poop everywhere [called 'frass' I just learned.]   They're harder for me to find this time of year because the plants are so much bigger and leafier, but generally, the worms like the sun.   They'll go to the top or outside of the plant and eat and there will be nothing but sticks left.   Also, they get so big they're hard to miss.   Eventually, you'll find them.   I pick them off and feed them to the chickens.  The chickens are the only ones around here who like them. 

Monday, September 5, 2011

Strawberry Rhubarb Jam

I needed some red jam in the cupboard.   We love strawberry rhubarb pie, so I thought I'm make some strawberry rhubarb jam this year.

This is an easy, pectin free recipe.    And it's a beautiful red!

Strawberry Rhubarb Jam 
  • 5 cups chopped rhubarb, fresh or frozen
  • 3 cups strawberries, fresh or frozen
  • 5 cups sugar
  • 1/4 cup water
Put the rhubarb, water, strawberries and sugar in a pot.  Stir frequently until sugar is dissolved.  Mash whole berries if necessary.  Simmer for an hour or so to thicken.    Ladle into jars.   Process 10 minutes for pints and jelly jars.  Makes about 4 pints.

Option:   Add a vanilla bean in with the fruit for Strawberry Rhubarb Vanilla jam.  Delicious!!

Want the recipe for this jam and a whole lot of other terrific jam recipes?   Check out my ebook:  A Simple Jar of Jam  at www.rurification.etsy.com.   You can preview the book by clicking the link on the sidebar.  Every purchase helps support this site.  Thank you! 


Sunday, September 4, 2011

Eupatorium - Part 2

I mentioned before that we have several types of eupatorium that are native here.    They grow energetically, everywhere, big ones and little ones. 

This variety is eupatorium maculatum - Eastern Joe Pye Weed- and it's a big one.  It grows 8 feet tall and loves ditches and creeksides.   The butterflies love it.   That's a Great Spangled Fritillary in the pic.  It's not uncommon to see a dozen butterflies on one plant.

There are spots on the stems, which are hollow and dry beautifully.   In the spring the dry stems make wonderful swords for swordfights and great duck guides - they reach all the way into the creek and are great for herding the ducks in and out of the water. 

These are similar to the Spotted Joe Pye weed, which are also pink, but which have flat flower heads instead of rounded ones and are also a bit shorter at 4-5 ft instead of 8-10 ft.

Saturday, September 3, 2011

Blueberry Lime Jam

Remember all those blueberries we picked in June?   Since we were doing peaches at the same time, I froze the blueberries.    It's easy to make jam with frozen berries later.

Last weekend was later.

I had heard about Blueberry Lime jam from Chickens in the Road and then when I was reading through the Ball Blue Book for ideas, I found another version of that recipe and decided that it was a good excuse to use the leftover-getting-kind-of-hard-on-the-outside-key limes I had in the fridge.    I jiggled the proportions a bit and here's my version.    It was a big hit with everyone in the family.

Blueberry Lime Jam
  • 5 cups blueberries [fresh or frozen]
  • 1 cup water
  • 3 T Ball pectin [1 pkg]
  • 5 cups sugar
  • Juice of three key limes - about 1/3 cup.
  • Some lime zest - up to a Tablespoon
Dissolve the pectin in the water and add the blueberries.   Heat and mash.   Bring to boil.   Boil hard for 1 minute.  Add sugar.   Stir to dissolve.  Add lime juice and zest.   Bring to boil.  Boil hard for 1 minute.  Ladle into jars.   Process 10 minutes for pints and jelly jars.

This jam looks like blackberry jam and raspberry jam.   Label the jars as soon as the lids are on so you don't confuse them with something else later.

    Friday, September 2, 2011

    4th St. Festival of the Arts and Crafts

    This Saturday and Sunday is the 4th St. Festival of the Arts and Crafts in downtown, Bloomington, Indiana, on 4th Street between Indiana and Lincoln St.   

    Great art, great music, great restaurants along the way.   

    Hours:   Saturday 10-6;  Sunday 10-5

    I'll be there, so come say, 'Hi', and check out some of my hand dyed, handwoven scarves.    The ones in the pics are brand spanking new, just for you.


    I'll also have hand dyed, handwoven silk scarves and some little dyed silks.   Soap sets are special order at this fair - you won't see them on the shelves, but you can order ahead of time and pick them up there if you'd like.   Email me at robin at morenna dot com. 

    Thursday, September 1, 2011

    Tomasqua - to can which Robin uses the pressure canner for the first time.

    We always have an abundance of tomatoes and yellow squash of some sort in the garden.   It's too much to eat fresh, so I cut them all up and combine the tomatoes and squash and can it together.  We call it tomasqua [emphasis on the second syllable:  to-MAH-squa].

    This stuff makes a great base for sauces of all kinds:  marinara, enchilada, chili, etc.   We love it.

    Seriously.   We love it. 

    Since the squash is denser than the tomatoes and much less acidic, I wanted to pressure can it this year - just in case.   We've never had any spoilage with 2 T of lemon juice in each bottle, canned the regular way, but still....

    This was a perfect chance for me to learn to use Big Blue.

    Remember Big Blue?  I got brave and used it to can that tomasqua. 

    I followed the instructions for this make of canner - Mirro.  It took a lot less water than I thought - you don't fill it up, you only put in a couple of inches of water in the bottom to can with.

    I heated the water, put in the jars, sealed it up, put the jiggler on, really heated it up, adjusted the heat so it wouldn't jiggle just enough,  let it process for the required time, turned it off,  let it cool for an hour, then pulled the jars out.   The jars were still 'boiling' when I pulled them out of the canner after the hour of cooling time.    They continued to 'boil' for almost an hour after that.    I know they weren't hot enough to boil the regular way, so I'm assuming some other sort of physical process was going on.   If you know what it is, let me know.   I'm curious.

    If you come by a used pressure canner, snap it up!  You can probably order replacement parts for it online and someone will have posted the manual as well.   I was lucky enough to get my manual with the canner, but we did find it online, too. 

    Next, I'm going to think about canning chicken stock.   
    Related Posts Plugin for WordPress, Blogger...